Custom Built Atomic Force Microscope for Nitrogen-Vacancy Diamond Magnetometry
by
Kevin Kai Chang B.S. in Chemistry
University of Illinois at Urbana Champaign (2009)
ARCHIVES
Submitted to the Department of Chemistryin Partial Fulfillment of the Requirements for the Degree of Master of Science in Chemistry
at the
Massachusetts Institute of Technology September 2011
( 2011 Massachusetts Institute of Technology. All rights reserved.
Signature of Author: Department f Chemistry September, 2011 Certified by: Accepted by: Christian L. Degen Assistant Professor of Chemistry Thesis Supervisor
Robert W. Field Chairman, Departmental Committee on Graduate Students
MASSACHUSETTS INSTITUTE OF TECHNOLOGY
SEP 2
8
2011
Custom Built Atomic Force Microscope for Nitrogen-Vacancy Diamond Magnetometry
by
Kevin Kai Chang
Submitted to the Department of Chemistry on September, 2011 in Partial Fulfillment of the Requirements of the Degree of Master of Science in
Chemistry
ABSTRACT
The nitrogen-vacancy (N-V) center in diamonds have the potential to be an ultra-sensitive magnetic field sensor that is capable of detecting single spins. Implementing this sensor for general and non-transparent samples is not trivial. For V centers to be a useful probe, a way of positioning the N-V center with nanometer accuracy while simultaneously measuring its fluorescence is needed. Here, a method of using N-V centers as magnetometer probes by combining this sensor with Atomic Force Microscopy (AFM) is described. A custom AFM was built that allows optical monitoring of the cantilever tip and collection of fluorescence with a high-NA objective from the same side. The AFM has a large open bottom and top and thus provides dual optical access. The motion of the cantilever is measured by optical beam deflection so that a wide range of commercial cantilevers can be used. The AFM and the confocal microscope objective can be locked in position while a piezoelectric stage allows raster scanning of the substrate.
Thesis Supervisor: Christian Degen Tide: Assistant Professor of Chemistry
Table of Contents
Section Page Chapter 1: Introduction 1.1 N -V Electronic Structure...5 1.2 N -V M agnetom etry by A FM ... 9 Chapter 2: Instrumentation 2.1 A FM M echanical D esign ... 11 2.2 Signal Processing ... 15 2.3 N oise Sources...19Chapter 3: Design Analysis 3.1 Im aging...21
3.2 D rift...24
3.3 Conclusion...26
List of Figures
Figure Page
Figure 1.1: Energy level schem e of N -V centers... 7
Figure 1.2: M agnetic m om ent sensitivity of various sensors... 8
Figure 1.3: N -V em bedm ent schem es...9
Figure 1.4: N -V m agnetom etry diagram s...10
Figure 2.1: Laser deflection detection... 12
Figure 2.2: Schem atic drawings of custom AFM ... 13
Figure 2.3: A FM parts drawings...14
Figure 2.4: Custom A FM on 3-D piezo stage...14
Figure 2.5: Cantilever response to surface forces... 16
Figure 2.6: Block diagram of custom A FM ... 16
Figure 2.7: Block diagram of PLL ... 18
Figure 2.8: Block diagram of PID ... 18
Figure 3.1: A FM im age of TG Z 1 standard from N T-M D T ... 21
Figure 3.2: A FM im age of TG X 1 standard from N T-M D T ... 22
Figure 3.3: D iam ond nanocrystal im age... 23
Figure 3. Lateral drift ... 24
Chapter 1: Introduction
1.1 Nitrogen-Vacancy Electronic Structure
The N-V center is a point defect in diamond consisting of a single nitrogen atom next to a vacancy. N-V centers can be used as a magnetometer probe due to their unique optical and magnetic properties (Figure 1). The defect's ground state is paramagnetic and spin one (S=1). It is highly fluorescent from its transitions between the electronic ground and excited states. The ground state of the defect is split into m, = 0 and doubly degenerate m, = 1 sublevels, with a crystal field splitting of 2.87 GHz1
'. Under a static magnetic field, the degeneracy of the m,= t1 states is lifted, and the electron paramagnetic resonance (EPR) spectrum contains two resonance lines, one shifted to higher and one shifted to lower frequency. By measuring the two shifted resonance frequencies, the magnitude of the external field can be calculated. The EPR spectra can be measured for single NV defects because the optical transition between the ground state and electronic state is almost completely spin preserving, and the m,= 0 spin state scatters 30% more photons than the m, ± 1 spin state (the ms 1 can also undergo non-radiative relaxation to the ground state)2. When a resonant microwave field is applied, it will induce transitions between the spin sublevels and cause a reduction in fluorescence. A simple measurement of fluorescence intensity versus microwave frequency can therefore be used to determine the EPR spectrum by optically detected magnetic resonance (ODMR). From these properties, it is possible to use N-V defects as a magnetic sensor by measuring the frequency shift of the defect. (Figure 2)
Field measurement by EPR is shot noise limited due to the quantized photon emission of the N-V center. The minimum detectable field by an N-V center is dependent on the gyromagnetic ratio of the N-V (y), the ODMR linewidth (2a), the optical contrast between the spin states (vj), and
OmB 2a
8Bm iiy (1.1)
For a typical N-V, a = 5 MHz, j = 0.15, Io = 50 kc/s, and y = 28 GHz/T yielding a shot noise limited minimum detectable magnetic field on the order of 10 [T-Hz- 2
. This calculation assumes that the magnetic field is aligned with the N-V axis. To detect a single dipole, the signal to noise ratio (SNR) is dependent on the magnetic field strength from the single dipole4:
BdiP 3cOS2 +1 (1.2)
In this equation L is the magnetic moment of the spin,
o is the vacuum permeability, r is distance,
and 0 is the angle between the vector pointing to the distance r and the vector that points in the direction of the magnetic field. The SNR is given by:SNRoc
B'
"
NyyN
min)
(r
3a
N
(1.3) The variables in this equation have the same definitions as equations 1 and 2 and N is the total number of averages. To improve the resolution of this method, there are two variables that can be adjusted. First, distance: reducing the distance between the N-V center and the spin of interest can greatly increase SNR. To position the N-V closer to the surface, a cantilever with higher spring constant and quality factor can be chosen to reduce oscillation amplitude and allow closer approach to the surface. The second major factor that can be altered is the linewidth (a) of the N-V center. The linewidth is inversely proportional to the decoherence time (- 1 /T2). Increasing T2 can be done
by careful control of the diamond processing. 12C isotopically enriched diamond can be used to
ensure there are no paramagnetic spins in the lattice that can cause an increase in decoherence. A method of N-V scanning is discussed in section 1.2 and instrumentation that have been built will be
Highly Fluorescent
Triplet State
Non-radiative
Singlet State
Electronically
Excited
States
630- 800
nm Emission
532 nmn
Ground
States m,= 0
Weak
Transition
Figure 1.1 Energy level scheme of N-V centers: Electronic transition is spin preserving and the
n, = 0 transition is more 30% brighter than the m, = 1transition. Microwave excitation at the resonance frequency will cause fluorescence drop, allowing the resonance frequency to be measured by fluorescence measurement. Under a magnetic field, the m, ± 1 state will shift through the
Zeeman effect. This shift can be measured by fluorescence detection.'
magnetic field sensitivity (per Hz
1/
2)
0 s 0 n1pT
1 nT 1 pT 1 mT SQUIsensiivis
Figre1. Maneicmomntsesitviy
f ariussesor: hevericl
xisisthasnsor-Figure.. 1.2 Magnetic- oment senitiit of.... various sensors: .. The... vetia.ai .i.hesnsr
sample separation and the horizontal axis is the field sensitivity. The dots are experimentally obtained values for each of the listed techniques. Figure adapted from C. Degen, (Nature Nanotechnology)6.
1.2 N-V Magnetometry by AFM
In this section, experimental realization of N-V magnetometry is discussed. First, an N-V defect diamond is attached to the tip of an atomic force microscope (AFM) cantilever so that we can scan and control the N-V through AFM. Attaching N-V centers in cantilever tips is a topic of current research. Here, two possible methods to attach the N-V center are discussed. The first approach is to attach a diamond nanocrystal with an embedded N-V center to the cantilever tip. This can be done by simply crashing a cantilever tip into a single diamond nanocrystal. Van der Waal forces between the tip and nanocrystal has been shown to hold it in place. Diamond nanocrystals as small as 5 nm have been produced and theoretical calculations have shown that the minimum diameter can reach 1 nm7. This method is advantageous in that any commercially available AFM cantilevers can be used. However, as the crystal lattice size decreases, N-V properties such as its coherence time worsen. This is problematic as the field detection limit is set by the coherence time of the N-V spin. To bypass this problem, a diamond cantilever can be used instead. The tip of the diamond cantilever can be implanted with a single N-V center by implanting with a low energy N* ion beam. The resulting cantilever will contain a single N-V center with intact properties.
N* ions
daffor4 upAFM car d oer
a) b)
Figure 1.3 N-V embedment schemes: a) diamonds nanocrystals attached to scanning electron microscope tip. b) implantation scheme for N-V diamond cantilever tips
Once an N-V center has been attached to a tip, the substrate will be approached to the sensor (Figure 4a). Using traditional AFM methods, the tip will scan over the substrate. While scanning, the diamond fluorescence will be monitored under microwave pulses excitation, applied through a microwave stripline, to determine the EPR resonance frequency. From the changes in resonance frequencies, the local magnet field from the spins in the substrate can be determined. Thus, the AFM tip will provide high resolution topological information of the substrate while the
diamond-sensor will provide chemical information fluorescence measurements.
to optics cantilever
single spin
in diamond tip
field
linesmicrowaves
for EPR
substrate
a 'sudace electron spin
a)
b)
Figure 1.4 N-V magnetometry diagrams: Schematic for N-V diamond magnetometry. a) Basic principle of diamond magnetometry. Figure adapted from C. Degen (Applied Physics Letter)'. b) Custom built AFM for diamond magnetometry
Chapter 2: Instrumentation
In this chapter, custom instrumentation for N-V diamond magnetometry described in chapter 1 will be discussed. Section 1 shows designs for a custom AFM with optical access to the scanning probe. Custom programming was designed to control the AFM in various operational modes (section 2). Noise consideration for the custom AFM is discussed in section 3. Finally, images, AFM resolution, and drift properties are shown in chapter 3.
2.1 AFM Mechanical Design
The schematics for the custom AFM is shown in Figure 2.1 below. The body of the AFM and the cantilever is stationary while the substrate will rest on a 3-D piezo stage. The scanning is done through the stage. The AFM body (purple part in Figure 2.2) has a large open bottom and top and thus provides dual optical access to the scanning probe. To reduce effects of thermal drift, a circular design was chosen. The cantilever is designed to be at the center of the AFM body so that thermal expansion of the body will not affect the relative location between the cantilever and the body. All AFM parts are made of the same material, aluminium, so that expansion will occur symmetrically. Aluminium was chosen due to its easy machinability. Materials with lower thermal expansion such as stainless-steel can be considered for future designs.
Z scanning for the AFM is done by the piezo stage. However, the z travel of the stage is only 20 pm. Additional z positioning is added to the design so that the cantilever can approach the substrate from a distance. Two high precision manual set screw holds two corners of the AFM body (Newport AJS100-1, Figure 2.3 a). Retracting the screws move the AFM body and cantilever closer to the substrate surface. Using these screws, the cantilever can be place into close proximity of the substrate. Then, for finer approach, an Newport picomotor (Figure 2.3 b) that is capable of stepping at -30 nm steps is used. The picomotor holds up the third corner of the AFM body and extending
and retracting the picomotor allows cantilever positioning on the order of the 30 nm. Finally, z position control on the nanometer range is done by the stage itself.
The cantilever in this setup is clamped down between an aluminum cantilever holder and a beryllium-copper clamp (Figure 2.3 d). Most commercial cantilevers are fabricated on a silicon wafer chip and fits into this cantilever holder. The holder has an empty recess in the middle, so that piezo discs can be inserted. These piezo disc will provide the drive to the cantilever. The detection method used here is by optical beam deflection. The beam is focused on the cantilever and the deflected beam from the cantilever is measured by a four quadrant photodiode (Figure 2.1). To control the location of the focus spot, an adjustable collimator is used at the output of the optical fiber (Figure 2.3 c). The location of the focus spot (d) can be controlled by adjusting distance between the lens and the laser source (d1) according to equation 2.1. In the following equation, f is the focal length.
1 =_ + 1
(2.1)
f d, d2
The cantilever holder is detachable so that other types of holders can be made to fit other types of cantilevers or other detection methods.
Cantilever
dl d2 d3
Fiber Coupled Laser Lens Photodiode
Figure 2.1 Laser deflection detection: Typical laser deflection method for AFM. A laser beam is focused on the cantilever and deflected to a four-quadrant photodiode. The relative position of the cantilever can be calculated by the relative photocurrent measured between each photodiode quadrant
Figure 2.2 Schematic drawings of custom AFM: a) top view b) isometric view c) side view d) cross section of side view. The AFM body is shown in purple and the blue parts show the location of the approach screws. The silver-blue part (very right part of figure a) is the location of the picomotor. The black part (very bottom of figure a) is a four-quadrant photodiode and the yellow part (very top of figure a) is the location of the fiber coupled IR laser and lens. The silver part in the middle of the AFM body is the cantilever holder. The AFM uses the laser deflection method to detect the cantilever motion. An IR laser is focus on to the cantilever by a adjustable lens from the side. The deflected beam is measured by a four-quadrant photodiode on the other side.
Figure 2.3 AFM parts drawings: a) Manual approach set screws (Newport AJS100-1) b) Newport picomotor with -30 nrm steps c) FC coupler with adjustable collimator d) Cantilever holder. Piezo discs (yellow) provides the drive for the cantilever. Sapphire balls and discs (blue) protects the piezo discs. The cantilever is held down by a beryllium-copper clamp (red)
Figure 2.4 Custom AFM on 3-D piezo stage: The AFM body sits on a stationary base plate. Below it, is a 3-D piezo stage (yellow)
2.2 Signal Processing
The custom AFM will operate under non-contact frequency modulation mode. A block diagram of the signal pathway is shown in Figure 2.5. In this mode, the z distance between the cantilever tip and the substrate surface is kept constant by monitoring the resonance frequency of the cantilever. The amplitude and phase response of a typical cantilever is given by equation 2.1 and 2.2, respectively. In these equations, A is the amplitude of the cantilever oscillation, (p is the phase relative to the drive, Adrve is the drive amplitude, fdve is the drive frequency, fo is the resonance
frequency, and
Q
is the quality factor of the cantilever.'AAdrive (2.1) ( 1 fdrive +f drive2 Sf02Q2 <p =
tan-
1 fdrive 2) (2.2) Qfo( 1- ivThese equations describe the cantilever behavior under free oscillation. As the cantilever approaches a surface, the various forces (van der Waals, electrostatic , magnetic, and etc.) will cause a shift in the resonance frequency of the cantilever. Under a small surface potential and to first order approximation, the shift in the resonance frequency is give by the following equation:
Af = Sfo (2.3)
2 k
In this equation, Af is the shift in frequency, k is the spring constant, and k,, is the change in spring 82V
constant due to surface forces
(k
=
-, where V is the potential between the tip and surface). Thecantilever response under a 2 kHz frequency shift is shown if Figure 2.5. The goal of frequency modulation is to constantly measure this frequency shift,
Af,
and keep that value constant by100 50 S0 8 8.5 9 Drive Frequency (Hz) a) 7,.5 8 Drive Frequency (Hz)
Figure 2.5 Cantilever response to surface forces: Cantilever response calculated using equations 2.1 and 2.2. The blue curve was calculated with fo = 77 kHz and the green curve with 75 kHz. Both oscillator was calculated with
Q
= 100 a) The amplitude response of the oscillator. b) The phase response relative to the drive.Cantileveronx~t Deflected Beam Deflection y(t) ,Position Sensitive
Cantleve
JW_ Laser Beam
Photodiode
Force F(t) Photocurrent I(t)
SampleZI
Current
Amplifier
3D Scanning Amplitude Controlled Drive Da(t) Cantilever Drive D(t) Differential Input Voltage AU(t)
ZI oki
3D Piezo Stage -4Amplitude
Feedback a(t) -- -- -- A mplifi
an LZ Feedback Z(t)
FPGA PID
Cantilever Frequency co(t) and Cantilever Oscillation Amplitude A(t)Figure 2.6 Block diagram of custom AFM: Signal pathway for custom AFM. The block diagram describes non-contact frequency modulation mode. In this mode, the cantilever resonance frequency is monitored by a PLL. A PID is used to control the z position of the stage so that the resonance frequency remains constant.
7-8,5 9
4
To measure the resonance frequency of the cantilever, a digital Phase Locked Loop (PLL) is used (Figure 2.7). The PLL consist of three components: a digital multiplier, a low pass filter, and a voltage controlled oscillator (VCO). The PLL first takes in an external oscillating signal and measures the phase difference between the input signal and an internal oscillation produced by the VCO. This is done by multiplying the input signal by the internal signal. When the frequency between the two signals are the same, the resulting multiplication will be a time-varying double frequency term and a constant term that only depends on the phase difference. Passing this through a low pass filter will pull out a digital signal that depends only on the phase difference. This phase difference is passed through the VCO which produces an oscillating signal with frequency proportional to the input. When the input frequency is different from the VCO frequency, the feedback loop will adjust the VCO until the two frequencies are the same. Thus the PLL measures the frequency of the input signal by locking an internal signal to the input. Figure 2.5 b indicates that a shift in resonance frequency results in a shift in the phase response of the cantilever. The PLL measures this shift to determine the shift in resonance frequency and the result is passed through a proportional integral derivative (PID) controller to control z feedback. The block diagram for a typical PID controller is shown in Figure 2.8. PIDs are common controllers that keeps the output of a process at constant level, equaling to the chosen setpoint of the controller. In the case of this AFM, the resonance frequency is kept constant. A frequency set point is chosen and resonance frequency of the cantilever is constantly measured by the PLL. The PID controller calculates the error between the setpoint and the actual frequency by taking the difference. If the error is nonzero, the PID calculates a new z position for the stage and moves the stage until the actual frequency is the same as that of the setpoint. The z position of the stage can be recorded, providing topology imaging as the AFM scans in x and y.
Figure 2.7 Block diagram of PLL: Signal pathway for a typical digital PLL. The phase difference output is used to control the z feedback of the AFM.
Figure 2.8 Block diagram of PID: Signal pathway for a typical digital PID. The controller calculates a feedback signal from the error signal (input subtracted by the setpoint). The output consists of three terms: a proportional term (P), a term that integrates all the previous error signal (I), and the derivative of the error signal (D).
2.3 Noise Sources
Various noise sources will be considered in this section. Noises from the AFM can be roughly divided into three groups: noise from the cantilever, noise due to optical detection, and instrumental noise. Noise from the cantilever comes from thermal Brownian motion and is a fundamental noise source. The spectra density is given by equation 2.4:011
SF = 2FkBT (2.4)
I k
In this equation, SF is the power spectral density, F (f = -) is the mechanical friction due to the cantilever, k is the Boltzmann constant, and T is the temperature. Because the cantilever oscillation from drive signal will be much greater than that of thermal noises, this noise is negligible. Ultimately, the detection limit will be set by noise due optical detection.
There are two sources of optical detection noises. One source is due to quantum uncertainty of photon counting by the photodiode. The uncertainty in photon detection will cause fluctuation in the photocurrent produced by the diode. This is known as photodiode shot noise and this detection method will be shot noise limited. Much like thermal noise, photodiode shot noise is a fundamental noise source. The shot noise is given by equation 2.5, where S, is the shot noise power spectral density, e is the elementary charge, and I is the photocurrent.
SI = 2eI (2.5)
Because the photodiode used here has 4 quadrants and the quadrants are uncorrelated, the noise from each quadrant is additive. In this AFM setup, typical photocurrent is on the order of 9.4 pA and the transimpedance amplification is 106. This results in a shot noise uncertainty on the order of ai = 2 pfVHz11 2. The measured voltage uncertainty by the Lock-In Amplifier is about 1.8 pVHz,1/2 indicating that the detection method is close to shot noise limit.
The other optical detection noise source is known as Johnson noise. This noise source is due to thermal voltage noise from the resistor used in the transimpedance amplifier and depends on the resistance R used. The power spectral density is given in equation 2.6, where SU is the power spectral density.
SU = 4kbTR (2.6)
Johnson noise should be lower than photodiode shot noise. This occurs when SIR >Su:
R > 2kBT (2.7)
ef
With typical values for this AFM setup (T = 298 K, I = 9.4 pA), R limit is about 700 Q. Transimpedance amplification in this setup is 106, well above the R limit.
Chapter 3: Design Analysis
3.1 Imaging
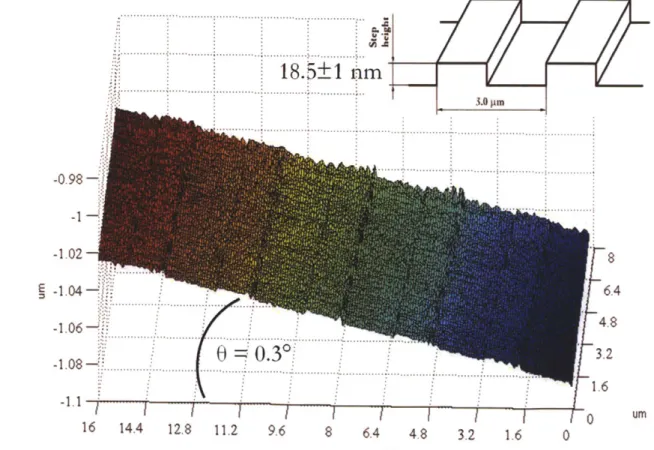
In this section, a few examples of AFM images of scanning probe microscope (SPM) standard calibration samples and diamond nanocrystals are shown. All images are taken with an Asylum Instruments AC160-TS cantilever (fo = 300 kHz, k = 12 - 103 N/m). The first SPM calibration sample image is shown in Figure 3.1. This sample consists of ridges about 18.5 nm deep and is used to calibrate the z position of the AFM probe. The image in this figure has not gone through the usually AFM image processing (flattening, piezo hysteresis correction, and etc.). The image indicates that the AFM is capable of imaging features with resolution at 20 nm. This image also indicates that the sample holder has a 0.30 tilt.
3.0 p -0.98 -1.02 -1.04 -. -1 06 1 06 1.08 -
.30.
11 16 14.4 12.8 112 9.6 8 6.4 4.8 3.2 1.6 0Figure 3.1 AFM image of TGZ1 standard from NT-MDT: AFM image of scanning probe
microscope standard sample. The image is plotted with the raw data and not processed. The calibration grating is shown in the top tight with ridges about 18.5 nm deep. The resulting image is tilted about 0.30 from the tilt of the sample holder.
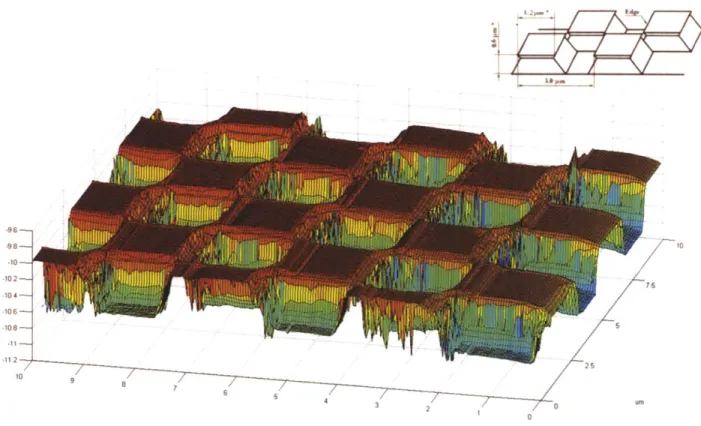
The next image (Figure 3.2) is another SPM calibration standard. This standard has much deeper ridges (0.6 pm) and is used to calibrate lateral positioning with a regular square array. The image indicate that the AFM is robust enough to detect nm scale features as well as features on the micron scale. The probe was unstable at the edge of the ridges, a characteristic shared with all AFMs. Better tracking can be achieved with better PID coefficients. The third image, Figure 3.3, are images of diamond nanocrystals evaporated on a glass slide.
-96~ -98- 10 -102 7 5 E -104- -106--108 5 6 5 4' 3 0 w
Figure 3.2 AFM image of TGX1 standard from NT-MDT: AFM image of scanning probe
microscope standard sample. The image is plotted with the raw data and not processed. The calibration grating is shown in the top right with ridges about 0.6 pm deep.
1000}-
800-600
400- 200-0-. 0 200 400 600 800 1000 X~nm]
Figure 3.3 Diamond nanocrystals images: Diamond nanocrystals with MSY 0 - 0.3, median diameter 10 nm. The image on the left is a 2D intensity graph of nanocrystals solution evaporated on a glass slide. On the right is a 3D graph of the same image.
3.2 Drift
Two drift experiments were done with the custom AFM, one that test the lateral drift and one that test for the z drift. To test the amount of lateral drift (in x and y) for this AFM, samples of diamond nanocrystals are used. A dilute sample of nanocrystals was evaporated on a glass slide (Figure 3.4). One nanocrystal was located by AFM in a 900 by 900 nm scan window. This same area was scanned over consecutively (11 times), 23 minutes per scan. The image at t = 0 and t = 250 minutes were combined in the image below. The total drift was about 1.6 nm /min. Much of the drift was likely due to piezo hysteresis as an open loop piezo stage was used in these measurements.
900 800- 700- 600>500 400 - 300-200 100-0 L a -. , I - I - I * I , I ,* I , 1 0 100 200 300 400500 600700 00 900 X[nm)
Figure 3.4 Lateral drift: Composite image of a single diamond nanocrystal at t = 0 and t = 250 minutes. The feature drifted slowly towards bottom right with a total distance of ~400nm over the 250 minutes (1.6 nm/min). The piezo stage operated with open loop.
The result of a z drift experiment is shown in Figure 3.5. In this experiment, a blank glass slide was used. Then, the cantilever scanned over the same line in 1D at a rate of 0.25 Hz, over 350 iterations. The resulting drift was about 0.17 nm/s. The results indicate that the z resolution is -0.4 nm as the z position seem to change by that value . However, this resolution is lilkely to be from the digital resolution of the controller, not the AFM itself. Resolution can be improved in the future by increasing the digital resolution of the programming.
AFM lateral drift
Z Resolution
N
35W
Iterations
Figure 3.5 Z drift: 1D AFM scanning of a glass slide. The probe scanned over the same line with 350 iterations. The scan took ~23 minutes and drifted a total distance of -4 nm (0.17 nm/min). The piezo stage operated with closed loop.
3.3 Conclusion
This thesis described the necessary instrumentation, electronics, and programming to build a AFM for diamond magnetometry with the N-V center. The most important feature of this custom
AFM
is its open top and bottom that allows optical access to the scanning probe. Although opening the top and the bottom would usually cause mechanically instability, this custom AFM has drift properties comparable to most commercial AFMs. In addition, custom programming was written to control the AFM instead of commercially available controllers so that changes can be easily made if other operational modes are needed. This AFM is just one step towards realizing the N-V magnetometry technique. To continue, other instrumentations have to be constructed. For example, a confocal microscope with the ability to focus on an N-V center on the scanning tip have to be built.Bibliography
1. F. Jelezko and
J.
Wrachtrup "Single Defect Centers in Diamond: A Review," Phys. Stat. Sol. 203 3207-3225 (2006)2. Gruber, A. Dribenstedt, C. Tietz, L. Fleury, and
J.
Wrachtrup "Scanning Confocal Optical Microscopy and Magnetic Resonance on Single Defect Centers," Science 276 2012-2014 (1997) 3.J.
Maze, P. Stanwix,J.
Hodges, S. Hong,J.
Taylor, P. Cappellaro, L. Jiang, M. Gurudev Dutt, E.Togan, A. Zibrov, A. Yacoby, R. Walsworth, M. Lukin "Nanoscale Magnetic sensing with an Individual Electronic Spin in Diamond," Nature 455 644-648 (2008)
4. G. Balasubramanian, I. Chan, R. Kolesov, M. Al-Hmoud,
J.
Tisler, C. Shin, C. Kim, A. Wojcik, P. Hemmer, A. Krueger, T. Hanke, A. Leitenstorfer, R. Bratschitsch, F. Jelezko, andJ.
Wrachtrup "Nanoscale Imaging Magnetometry with Diamond Spins Under Ambient Conditions," Nature 455 648-651 (2008)5. L. Childress, M. Gurudev Dutt,
J.
Taylor, A. Zibrov, F. Jelezko,J.
Wrachtrup, P. R. Hemmer, M. D. Lukin "Coherent Dynamics of Coupled Electron and Nuclear Spin Qubits in Diamond,"Science 314 281 (2006)
6. C. Degen "Nanoscale Magnetometry: Microscopy with Single Spins," Nature Nanotechnology 3, 643-644 (2008)
7. V. Pushkarchuk, S. Kilin, A. Nizovstev, A. Pushkarchuk, V. Borisenko, C. Borczyskowski, A. Filonov " Ab Initio Modeling of the Electronic and Spin Properties of the [NV]- Centers in Diamond Nanocrystals," Optics and Spectroscopy 99 245-26 (2005)
8. C. Degen "Scanning Magnetic Field Microscope with a Diamond Single-Spin Sensor," Applied Physics Letters 92, 243111 (2008).
9. T.R. Albrecht, P. Grtitter, D. Horne, D. Rugar "Frequency Modulation Detection Using High-Q Cantilevers for Enhanced Force Microscope Sensitivity," Journal of Applied Physics 69 668-673 (1991)
10.
J.
A. Sidles,J.
L. Garbini, K.J.
Bruland, D. Rugar, 0. Ziger, S. Hoen, C. S. Yannoni, Rev. Mod. Phys. 67 249 (1995)11 G. M. Leskowitz, Force-detected Nuclear Magnetic Resonance Independent of Field Gradients, PhD-Thesis (Caltech, 2003), http://etd.caltech.edu/etd/available/etd05292003-175447/(cited 28/07/2005)