A Computer Aided Model for Copy-and-Paste
Editing in the Industrial Design Cycle
by
Charles Dumont
Submitted to the Department of Mechanical Engineering in partial fulfillment of the requirements for the degree of
Master of Science in Mechanical Engineering
at the
MASSACHUSETTS INSTITUTE OF TECHNOLOGY
May 2003
©
Charles Dumont, MMIII. All rights reserved.The author hereby grants to MIT permission to reproduce and distribute publicly paper and electronic copies of this thesis document
in whole or in part.
A uthor ... ...
Department of Mechanical Engineering /qMay 23,,4003 Certified by... David R Wallace Associate Professor ) Thesis Supervisor A ccepted by ... Ain A Sonin Chairman, Department Committee on Graduate Students
MASSACHUSETTJS INSTITUTE OF TECHNOLOGY
C'
A Computer Aided Model for Copy-and-Paste Editing in the Industrial Design Cycle
by
Charles Dumont
Submitted to the Department of Mechanical Engineering on May 23, 2003, in partial fulfillment of the
requirements for the degree of
Master of Science in Mechanical Engineering
Abstract
This thesis represents work was really to do computer aided design by thinking about shapes and forms. More specifically, the goal of this work is to provide industrial designers with an intuitive mechanism for transferring brand-identity elements from one object to another, and to allow manual modifications of physical prototype details to be scanned and reincorporated back into original digital models.
An algorithm to copy-and-paste freeform details from one freeform surface to an-other using displacement field and planar parameterization operators is presented. A tool based on the algorithm is developed such that, from the designer's viewpoint, details from one surface can be mapped to another in two steps: the selection of the detail to transfer (copy); and the choice of the surface onto which the detail is to be mapped (paste). A proof of concept has been implemented and is used to demon-strate the capabilities of the framework.
In conjunction with this surface Copy-and-Paste the concept of example based modeling is introduced as a more intuitive approach to form design. This new concept places the Copy-and-Paste application in a more natural framework. An application for 2D and 3D sketching text for the Copy-and-Paste tool.
Thesis Supervisor: David R Wallace Title: Associate Professor
Acknowledgments
I would like to thank the sponsors of this research: The Ford Motor Company and the Natural Sciences and Engineering Council of Canada. I also want to thank everybody I worked with at the MIT Cadlab, especially my advisor Prof. David Wallace. Thanks also to friends and family for their support and their help.
Contents
1 Introduction 13
1.1 M otivation . . . . 13
2 Background 17 2.1 Design and Computers . . . . 17
2.2 Computational Geometric Representation . . . . 20
2.2.1 Polygonal Meshes . . . . 20
2.2.2 The Doubly Connected Edge List . . . . 22
2.2.3 O perators . . . . 23
3 Concept 29 3.1 Related Work . . . . 30
3.1.1 Aesthetic Form Synthesis . . . . 30
3.1.2 Shape Reuse and Copy-and-Paste Editing . . . . 32
3.2 Contributions . . . . 33
3.2.1 Scope . . . . 34
3.3 Algorithm Description . . . . 34
3.3.1 D efinition . . . . 34
3.4 Detail extraction . . . . 35
3.4.1 Least squares fitting of a polynomial surface . . . . 36
3.4.2 Surface smoothing . . . . 38
3.5 Parameterization to a plane . . . . 41
3.7 Results . . . . 4
4 Application 51 4.1 Motivations . . . . 51
4.2 Non traditional modeling . . . . 52
4.2.1 Rule based system . . . . 53
4.3 Example based Modeling . . . . 54
4.3.1 Description of the sketching interface . . . . 54
4.3.2 Identity operators . . . . 56
5 Conclusion and Future Work 61 5.1 Retrospective . . . . 61
5.2 Future work . . . . 62
5.2.1 Final words . . . . 63
List of Figures
2-1 An example of a hand-sketched concept car. . . . . 18
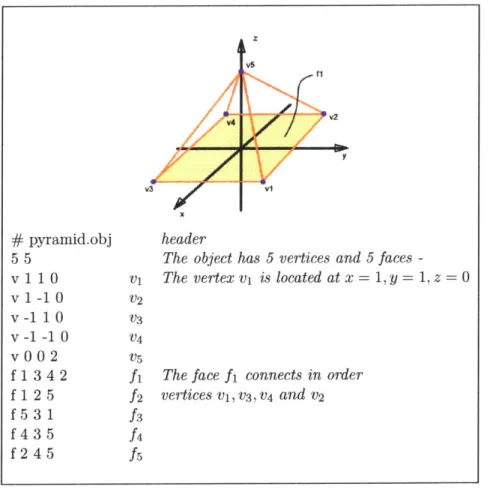
2-2 The wire-frame representation of a square base pyramid with the cor-responding mesh expressed in .obj format (AliasWavefront). The first character of each line define the feature described on that line. The vertices are numbered in order of appearance in the list. Faces are defined using the vertex numbering. . . . . 21
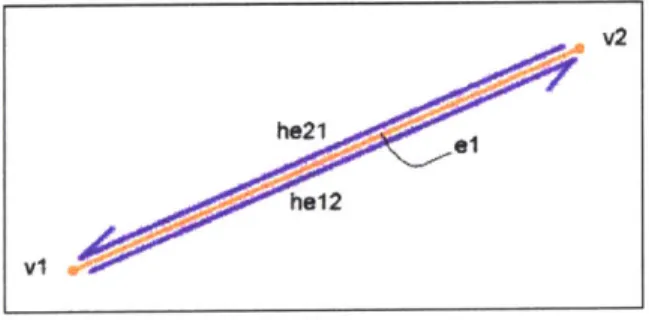
2-3 The difference between edge (in orange) and half-edge (in blue): an edge is non-directional while a half-edge is directional . . . . 22
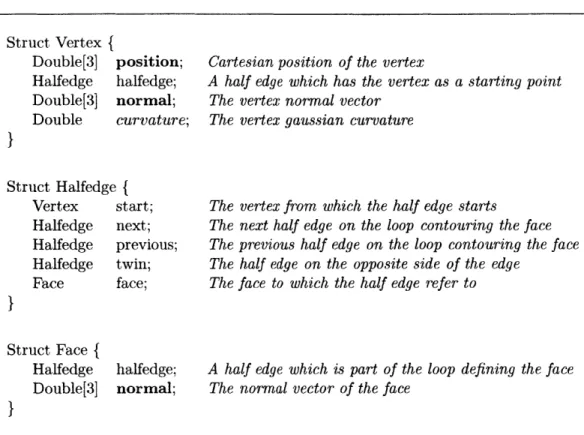
2-4 The Vertex, Halfedge and Face structures. . . . . 23
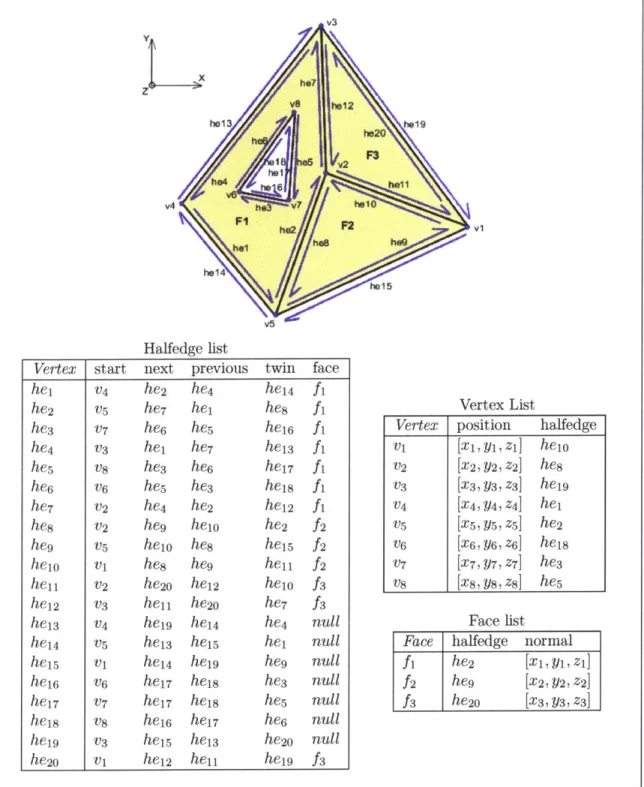
2-5 A mesh and the corresponding Doubly Connected Edge List. . . . . . 26
2-6 Code to compute the normal to a triangular face. . . . . 27
2-7 Code to compute the vertex normal and the vertex curvature. .... 27
3-1 Example of transfer of a maple leaf from a flat surface to an oval vase. The leaf assumes the curvature of the vase. . . . . 29
3-2 Example of automatically generated concept using a rule based system [2 2 ]. . . . . 3 1 3-3 Different types of pasting as described by Wang [24]. . . . . 33
3-4 In yellow, a face (F) and its neighboring faces (Nf). In blue, a vertex (V) and its neighbors (Nv). The set of the neighboring vertices (Nv) is often referred as the umbrella of (V). . . . . 34
3-5 A) A user selecting a detail to extract by drawing stokes around the source region. The source detail is based upon a Volvo logo. B) The source selection process is completed, with the convex hull of the stokes defining the source region. . . . . 36 3-6 The boundary of the source region is shown as a red line. The face
defined inside the source region are shown in yellow and the boundary vertices in green. . . . . 37 3-7 An easy way of smoothing a mesh is to move each vertex v towards
the geometric center c of the neighboring vertices v.. . . . . 39 3-8 Once the detail is extracted from the source region, a high-field
char-acterizes the detail. . . . . 40 3-9 The designer can locally rescale the high field in order to remove
un-desired features. In this case the designer reduces the arrow from the car m aker's logo. . . . . 41 3-10 The Parameterization of the details onto the plane. . . . . 42 3-11 The vertex xi and its umbrella. The coefficients for the
parameteriza-tion are defined with respect to the neighboring vertices [4]. . . . . . 43 3-12 A triangular face with its Area and Angle gradients shown. . . . . 43 3-13 The stiffness matrix of the mesh and the elements it contains. ... 46 3-14 The boundary vertices of the source region are placed on the unit
circle in such a way that the angle between vertices is kept equal to the corresponding angle in the local frame of the source region. ... 47 3-15 The parameterization of the source (S) and target (T) region are
su-perimposed. For each vertex in the target region, the triangle that contains it in the source region is computed and a displacement for the vertex is calculated. . . . . 48 3-16 The details once pasted on a wavy surface. Notice that the details have
adapted to the shape of the target region. The curvature of the detail (right) shown in color highlights the presence of distortions. . . . . . 49 3-17 A case of degenerate copy-and-paste editing. . . . . 49
4-1 The Teddy system and a 3D model created from a car profile. AS the illustration shows, the modeling rules do not suit the purpose of car d esign . . . . 53 4-2 Illustration of three heuristics implemented in the sketching interface.
The gray circles illustrate the region of influence of the operator. . . . 55
4-3 The user draws the profile of his car-concept using an electronic tablet. The goal is to define a valid sketch for both the system and the user. 55 4-4 Extruded model from the profiles and the user adding a detail on the
3D m odel. . . . . 56 4-5 Respectively the Sculpt applied on the back of the car model and the
smooth operator applied on the entire model. Detailing remains a hard problem . . . . 57 4-6 When the profile of the car is sketched, the different parts of it are
identified in an interactive manner. Here a color scheme represents the different components of the atlas. When the 2D sketch is transformed into a 3D model, the information is used to tag each vertex to a different part. . . . ... ... ... . . . . 58 4-7 Each part of the model are parameterized to a consistent geometric
space - in this case a unit disc. . . . . 59 4-8 The corresponding parts on different car models are parametrized and
arrange in a way that allows an easy transfer of details from one to the other. For example, if the designer is working on model A, he can select an operator that would allow transfer of details from model B through the parameterization scheme. . . . . 60
Chapter 1
Introduction
1.1
Motivation
Industrial design is an important aspect of product design because it addresses the form of products from the user's viewpoint. It is understood that consumers often buy products not only because they are affordable or simply functional, but because they suggest an irresistible experience [6, 19].
From a product development firm's viewpoint, industrial design, or product form, plays an important role in both differentiating product offerings from competitors and in implicitly conveying the personality of the company to the consumer. The term branding -putting the company's signature on the product- is often used to capture these concepts.
Branding is a very important tool to control the consumer's perception of a prod-uct. It basically allows the manufactures to identify a product not only by its intrinsic qualities but to values and feelings shared by the targeted market. For example, it explains why, in many product advertisements, no mention of the performance and price are made. The product is instead presented in a way that conveys the values associated with the potential consumers. For example, most people will instantly rec-ognize, independently of the vehicle's specific model, a Volvo vehicle as a Volvo and
associate it with safety -which may be something important for a family. Similarly, most Mercedes vehicles are easily recognizable as such and are associated with luxury -an aspect potentially important to rich people.
While it is accepted that form elements and details are important factors in
cre-ating a brand identity, it is difficult to algorithmically codify these brand defining
elements. However, skilled industrial designers seem to be able to establish coherent form themes across products and thereby establish consistent user expectations and brand identity.
In order to assist designers in the form definition and branding process, a com-putational tool has been developed that helps designers transfer form elements from the context of one product to another. Such form elements may be either scanned surfaces or digital surface models. Key challenges are that form elements are neither easily parameterized nor decoupled from the basic shape of the product. Therefore, the brand form elements are difficult to extract explicitly and integrate with another design.
This thesis presents a framework to extract and transfer brand identity elements from one surface to an other. The work is divided into two principal sections: the first defines the Copy-and-Paste operator and describes the underlying principles. The second part discuses a modeling interface for 2D and 3D sketching and intro-duces the concept of example based modeling, a high level concept that allows the user to use the 3D Copy-and-Paste tool in an interactive fashion.
More specifically, the first part of this thesis focuses on an application of Com-puter in the domain of industrial design. The proposed tool is a transposition of the Copy-and-Paste metaphor into the 3D shapes domain. The global aim of the work is to allow designers to select features they like on existing products and to integrate this feature into a new design. Two main applications for this tool are shape reuse
and product branding.
The second part of this thesis presents a concept to speed up the work of indus-trial designers and stylists in the early stage of the design process. It illustrates how the Copy-and-Paste tool could be used in an interactive and novel way by taking advantage of the contextual information available in the first steps of the design. The 2D and 3D sketching interface is first presented, then the concept of example based modeling is explained using an illustration inspired by car styling.
Chapter 2
Background
2.1
Design and Computers
For the past decade Computer Aided Design (CAD) software has been used exten-sively in engineering design. For example, in the automotive industry CAD software are well established at most steps of the design process such as manufacturing and fi-nite elements analysis. Due to the type of problems tackled by engineers (dimensional and process defined), it has been relatively straightforward for software developers to create CAD packages that serve their purposes well.
This work targets the stylists and industrial designers who works at the earli-est stages of the design process, namely on forms and shapes. Designers exclusive non-verbal language and techniques has made difficult to produce a complete and integrated Computer Aided Industrial Design (CAID) system. But, motivations for CAID system are numerous: they include improved speed, effectiveness and quality of both design and decision. CAID potentially provides a greater freedom for designers to explore a wider range of alternatives fluidly and quickly. It also includes potential for collaborative engineering processes with the creation of common databases and a more integrated overall approach [27]. There is an important link from styling to engineering that can be done using computer systems.
.
....
7
/
....
...
...
Oevid Kmetz, 20C
Figure 2-1: An example of a hand-sketched concept car.
At the beginning of the design process, the emphasis is on concept sketches. Today, in most car companies, much of the overall vehicle concept is digital 2D. Designers sketch on top of skeletal layouts of the overall vehicle hard points (wheel-base, seats etc.) with systems which are highly tailored for the car application. Conversely, the people that design things like radios and dashboards typically do sketches on paper and then move to CAD to refine details. Also, product design firms do many different products and insist on a lot of hand sketching. Initially, the attempt is to create a proposal as a whole, keeping the work on details for a later process. The responsi-bility for the conceptual design stays in the hand of the stylist until a high level of detail is reached. After the concepts are narrowed down, the industrial design person works with surface modelers to create 3D surfaces for the concept. The digital mod-els are then used in computer numerically controlled machines to rough-out clay or foam models. Then additional detailing and refinement is done by hand and through digitalization. When the design is handed over to the engineers, it often goes through a redesign and optimization process in order to get an engineering friendly design.
The automotive industry is so economically important that it can develop it own specialized styling software. This means that the software is developed in a way that takes advantages of the typical requirements and physical composition of the product.
Besides, in the automotive industry the configuration, package and engineering de-tails stay pretty much the same from one model to the other [27]. But, although the packaging (ergonomic, operational and mechanical) is crucial to the entire process, it has no utility for the form creation, instead it is seen as constraints.
The remaining part of this section is dedicated to the definition of the needs to improved Computer Aided Industrial Design applications. These needs represent the factors that drive the design of the applications presented in this thesis. They are di-vided in three categories: stimulating environment, intuitive interface and integrated system.
* A stimulating environment
The CAID packages should offer a fun and stimulating environment for design. The environment should not limit the action of the designer, instead it should allow an easy and rapid evaluation of concept designs. The tool should also include the possibility to include external constraints into the design, such as packaging. The system should also be able to orient the designer towards solutions for branding. The designer should have the possibility to integrate artifacts into his design through reverse-engineering.
Recent CAID environments strive to stimulate creativity by providing a wide va-riety of design options (not by suggesting any design options). These tools are used to create and alter shapes, form and surface qualities of 3D models. They excel at presenting concepts with photo-realistic rendering and lighting effects.
e An intuitive interface
A CAID tool should allow designers to easily modify their designs. The operations must be as simple (in this context, simple means natural and not trivial) as possible and their number must also be limited. The system must easily deal with mathe-matical constraints (eg. tangency, continuity, boundary conditions) and should hide
most of those low level constraints to the normal user, without limiting user actions. The Teddy system [10] is a good example of a system with an appropriate level of operators. It makes a big difference in the measure of the intuitiveness of the interface.
9 An integrated system
Industrial designers want their design to be kept as intact as possible throughout the production process. As discussed in the previous sections, engineers often have to change the original propositions because they do not fit into mechanical or produc-tion constraints. To avoid these problems, good communicaproduc-tion is needed between departments: industrial designers must understand and integrate engineering con-straints into their design engineers must understand the aesthetic design intents. The CAID systems should produce design usable without changes by the downstream pro-cess.
The key to a good design interface is allowing geometric manipulation to match the way designers think about forms. This way, intuitiveness and stimulation come for free while the integration can be taken care of at another level. We claim that the 3D Copy-and-Paste tool presented in the next chapter is a good example of such a tool because it offers a mapping between ideas such as "I want an feature like this one" on the designer side to a concrete operation on the software side.
2.2
Computational Geometric Representation
2.2.1 Polygonal Meshes
Polygonal meshes are very commonly used in computer graphics applications. Their main advantages are their simplicity, robustness and computational efficiency. Meshes can be though of as a piecewise representation of a higher level graphical object. A mesh is always a numerical approximation of the real objects and is typically used
only for the purpose of visualization or analysis. As a mesh becomes finer the ap-proximation of the object improve, but to serve our purposes in computer graphics it is only necessary to define a mesh that is finer than the resolution of the hardware or user perception. The three fundamental features of a typical mesh are the vertex, edge and face (facet). The most fundamental purpose of the mesh is to encode these elements and the relations between them, which is refer to as connectivity (Figure 2-2). This section describe the data structure which is used in the 3D Copy-and-Paste application.
# pyramid.obj header
5 5 The object has 5 vertices and 5 faces
-vilO1 v1 The vertex v is located at x= 1, y =1, z=O v-i-h V4
v0ON-v~ 2v Vi
f 1 3 4 2 f1 The face f connects in order
f 1 2 5 f2 vertices V1,V3,V4 and v2
Figure 2-2: The wire-frame representation of a square base pyramid with the corre-sponding mesh expressed in .obj format (AliasWavefront). The first character of each line define the feature described on that line. The vertices are numbered in order of appearance in the list. Faces are defined using the vertex numbering.
2.2.2
The Doubly Connected Edge List
The Doubly Connected Edge List (DCEL) is a mesh data structure made of three lists: vertices, edges and faces. Its name comes from the fact that the mesh connec-tivity is encoded at the edge level. As it will be shown, the DCEL data structure can encode meshes of arbitrary topology and meshes with holes, it is a very powerful geometric data structure that can simplify complicated algorithms when use cleverly.
In our implementation of the DCEL, an edge is represented by two half-edges (Figure 2-3). Because half-edges are related to only one face at a time that, they are preferred to the conventional edges. While an edge is an non-directional geometric construct, the half-edge is a directional geometric construct. Figure 2-3 illustrates the difference, the edge el spans the gap between vi and v2 while the half-edge he12 goes from v1 to v2 and inversely, he2i from v2 to v1.
V2
he12 8
vi
Figure 2-3: The difference between edge (in orange) and half-edge (in blue): an edge is non-directional while a half-edge is directional.
Using the DCEL, the programmer must make a trade-off between memory and speed. Usually, the more data that is stored -increasing preprocessing time and mem-ory usage- the faster is the execution at running time. The structure of the DCEL used in this work has few redundancies which allows for faster computation and sim-pler code. The respective structures of the basic elements of the DCEL are given in C-style pseudo-code in Figure 2-4.
Struct Vertex { Double[3] position; Halfedge halfedge; Double[3] normal; Double curvature;
}
Struct Halfedge { Vertex start; Halfedge next; Halfedge previous; Halfedge twin; Face face;}
Struct Face { Halfedge Double[3]}
halfedge; normal;Cartesian position of the vertex
A half edge which has the vertex as a starting point
The vertex normal vector The vertex gaussian curvature
The vertex from which the half edge starts
The next half edge on the loop contouring the face The previous half edge on the loop contouring the face The half edge on the opposite side of the edge
The face to which the half edge refer to
A half edge which is part of the loop defining the face
The normal vector of the face
Figure 2-4: The Vertex, Halfedge and Face structures.
Figure 2-5 illustrates a mesh formed by three faces and the information stored for each basic construct of the DCEL. Notice that the half edge list is the longest, which is true for any geometric model. Also, it is important to notice that the information stored in the half edge list allows the programmer to iterate throughout the faces and vertices. These concepts are illustrated in the next section.
2.2.3 Operators
The DCEL data structure has the clear advantage of offering a structured and well suited way of dynamically storing geometric information about a mesh. Once the information is stored in a DCEL it becomes relatively straightforward to calculate geometric information about the mesh.
Face normal. One of the most basic property of a surface is its normal. Using
the cross product, it is easy to calculate the normal to a triangular face (Figure 2-6). To make sure that the normal points in the right direction, the appropriate order of the product has to be chosen. The face normals are used for surface sculpting, visualization purposes and to compute the vertex normals.
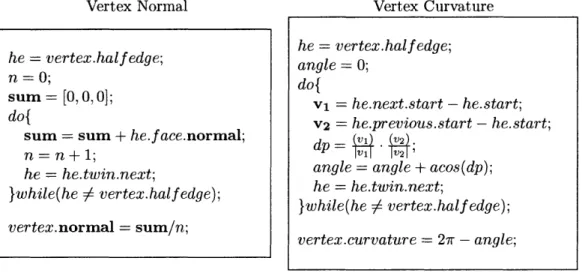
Vertex normal. The vertex normals are critical to calculate the radiance of the
model under given illumination conditions. They represents the discrete equivalent (at the vertex location) of the differential case on continuous surfaces. The simplest version of the calculation is presented in Figure 2-7; the vertex normal is given by the average of the face normals surrounding the vertex. A slightly more complex definition weights the face normal by the area of the corresponding surface.
Surface curvature. The previous example illustrates how the DCEL data
struc-ture facilitates the calculation of simple geometric elements by allowing easy access to the information related to the vertices, edges and faces. The next example shows how to calculate the Gaussian curvature at a given vertex. Mathematically, a discrete approximation to the surface Gaussian curvature is defines at a vertex as: 27r minus the sum of the angles adjacent to the vertex (Eq. 2.1). The Gaussian curvature is 0 for a flat surface and 27r for a infinitely sharp corner.
GC, = 2,r -E ZO, V Z i adjacent to v. (2.1)
manipula-tions; operations such as edge collapse, delete vertex and split face. These operations are of great importance for operations such as mesh optimization and decimation, surface modeling and remeshing.
V3 AS h12 he13 h e2 9 h92 v4 hv4? hs2 2v I h815 Halfedge list
Vertex start next previous twin face
he1 V4 he2 he4 he14 f1 he2 V5 he7 hei hes fi he3 V7 he6 he5 hei6 fi he4 V3 he1 he7 he1 3 fi he5 V8 he3 he6 he17 fi he6 v6 he5 he3 he18 fi he7 V2 he4 he2 he12 f1 he8 V2 he9 he1o he2 f2
he9 V5 heio hes heis f2
heio vi he8 he9 hell f2
he11 V2 he20 he12 he1o f3
he12 V3 hell he20 he7 f3
he1 3 V4 he1g he14 he4 null
he1 4 v5 he13 heis he1 null
hei5 vi he14 heig he9 null
he1 6 v6 he17 he18 he3 null
heir V7 heir he1s hes null
he18 v8 he16 heir he6 null
he19 V3 heis he13 he2o null
he2o vi he12 hell heig f3
Vertex List
Vertex position halfedge
vi [xi, y1, zi] heio
V2 [x2, Y2, z2] he8 V3 [x3, Y3, z3] heig V4 [x4, y4, z4] he1 V5 [xs,ys,zs] he2 V6 [X 6, y6, z6] he18 V7 [x7, y7, z7] he3 V8 [xs, ys, zs] hes Face list
Face halfedge normal
fi he2 [x 1,y1, zi]
f2 heg [x 2,Y2, z2]
f3 he2o [x3,Y3, z3]
Figure 2-5: A mesh and the corresponding Doubly Connected Edge List.
Figure 2-6: Code to compute the normal to a triangular face.
Vertex Normal Vertex Curvature
Figure 2-7: Code to compute the vertex normal and the vertex curvature.
he = face.half edge; v1 = he.twin.start - he.start; V2 = he.next.twin.start - he.next.start; f ace.normal = ( V2XVI ; he = vertex.half edge; n = 0; sum = [0,0,0; do{
sum = sum + he.face.normal;
n = n +1;
he = he.twin.next;
}while(he 6 vertex.half edge);
vertex.normal = sum/n; he = vertex.half edge; angle = 0; do{ v1 = he.next.start - he.start; v2 = he.previous.start - he.start; dp= IVlI1IV21'V).2);
-angle = angle + acos(dp); he = he.twin.next;
}while(he # vertex.half edge); vertex.curvature = 2,r - angle;
Chapter 3
Concept
This section introduces a software tool that allows designers to copy a feature from one object (the source product) and paste it onto another object (the target product). Moreover, the detail is adapted and incorporated into the geometric context of the target product. An example of cutting a free-form shape from one surface and pasting it into to another is shown in Figure 3-1. Note that the original leaf detail is flat while the pasted leaf detail conforms to the shape of the vase surface onto which it is pasted.
Figure 3-1: Example of transfer of a maple leaf from a flat surface to an oval vase. The leaf assumes the curvature of the vase.
Throughout this section the phrase "geometric context" will be used to designate the shape and texture of a product surface at a given point. The word "feature" and "detail" are used to designate the geometric object that the designer transfers from one surface to another.
3.1
Related Work
3.1.1
Aesthetic Form Synthesis
Work applying computational approaches to aesthetic form synthesis has a long his-tory in architecture. More recently, in the area of product design, pioneering research includes work by: Wallace [231, Knoop [11] and Cagan [3]. This section reviews three categories of shape synthesis techniques: shape grammar, expert system and semantic transformations. These techniques aim towards goals similar to the work described in this thesis -namely to facilitate an industrial designer's form synthesis task during early stages of the product development process. A more complete discussion about shape synthesis is presented by Smyth [15].
1. Shape Grammars
Introduced by Stiny [17], shape grammars first require one to define rules for the grammar. Forming an explicit set of "grammatical" rules for how to generate object forms is a non-trivial task. Once defined, the grammar can be used to combine different shapes to produce novel designs. Even though this technique produces usable designs, the approach has been limited to relatively regular forms and does not readily support freeform surface design. Successful uses of shape grammars include the generation of building designs [7] and coffeemakers in a particular style [3].
2. Expert Systems
Wallace [22] used an expert system to automatically generate box-like consumer electronic product layouts and enclosures subject to various types of constraints on the size, the components, etc. (Figure 3-2). Although aesthetic, manufac-turing, ergonomic and corporate identity requirements were integrated into the
design, the approach is fundamentally limited by the features available in the parts library and the predefined set of rules.
Figure 3-2: Example of automatically generated concept using a rule based system [22].
3. Semantic Transformation
Form can be manipulated by constructing a mapping between descriptive words and shape transformations. This type of operation is appealing because words are high-level form operators and constitute a common set of descriptors for all participants in the conceptual design process. However, the application of semantic transformations is limited by the complexity of the design and ambi-guity of the natural language. Such an approach has been used to analyze the results of consumer surveys and determine relationships between image, shape-regulating words and car styles [9].
While our framework also aims to facilitate the early stage of conceptual design, from a technical standpoint it differs from previous systems. The three preceding ap-proaches represent different methods for mapping between concepts, ideas and shape. In contrast, the method proposed here builds on work related to shape reuse and the Copy-and-Paste editing of freeform models.
3.1.2 Shape Reuse and Copy-and-Paste Editing
The increasing importance of digital modeling in industrial design, and widespread access to 3D scanners, has led to new research on shape reuse in conceptual design. Song [16] and Vergeest [20] fit freeform shape patterns to scanned features. The user can transfer a pattern to a surface in the same fashion he or she would do with a conventional Copy-and-Paste operator. The main drawback of the method is that each pattern has to be predefined and parameterized and, therefore, the designer is limited in his pattern choices.
Wang [24] proposes an explicit pasting mechanism for free form features. The fea-ture is first extracted from the original surface by cutting the contours of the source region. The region is then stitched to the target using an intermediate surface. This approach is suitable for situations where features can be pasted without modification, but it may not be appropriate when the detail requires adaptation to the geometrical context of the target surface. In order to adapt the pasted feature to the target ob-ject's shape (i.e., geometrical context) a method categorized by Wang [24] as offset pasting is needed. The method described in this thesis employs a high-field to describe the offset. Figure 3-3 illustrates the difference between explicit and high-field pasting.
In practice, it is often desirable to adapt the pasted feature to the geometrical context of the target region. Biermann [1] describes a multi-resolution framework using surface subdivision that tailors source features to the target surface using a planar parameterization of both the source and the target region. Beirmann defines details as the difference between a finer and coarser resolution levels in the subdivision structure. This definition is powerful because the levels of detail are explicitly stored in the underlying structure of the subdivision representation. The method described in this thesis builds on this work, but uses a different parameterization scheme, a different mesh representation and a different model for computer-user interaction.
Target Surface Explicit Pasting ETZ~ Offset Pasting or Pasting with High-field
/ Ml
T
N.-r
Figure 3-3: Different types of pasting as described by Wang [24].
3.2
Contributions
The work described in this thesis differs from prior efforts in the following ways: 1. The Copy-and-Paste operations can be applied between different geometrical
contexts. This means that both the essence of the pasted detail (from the source object) and the nature of target surface are observable after the transformation. A balance is struck between the original shape of the detail to be pasted and the shape of the target surface.
2. The surface editing process is designed to be as natural and intuitive as possible. The tool implemented matches common design vocabulary such as "I want a
corner like this one" or "I want a trim line which reminds me of that one".
3. Shape exploration and synthesis is encouraged through interactive transforma-tions, such as local deformation of region contours.
Since this concept allows shape reuse between both physical and digital models, the approach may also integrate well with a hybrid physical/digital design cycle [12].
Source Object
I. -~ Nv NF Nv NFF F Nv
Figure 3-4: In yellow, a face (F) and its neighboring faces (Nf). In blue, a vertex (V) and its neighbors (Nv). The set of the neighboring vertices (Nv) is often referred as the umbrella of (V).
3.2.1 Scope
In Summary, this work addresses how to copy a detail from one freeform surface and paste it onto a different freeform surface. In technical terms this goal can be described as: given a triangular mesh surface with a detail of interest (the source region) and a topologically equivalent mesh onto which we want to import the feature (the target region), extract the detail from the source region and paste it onto the target region with as little distortion as possible between the source and target.
3.3
Algorithm Description
3.3.1 Definition
The system uses a triangular mesh surface representation, meaning that triangular faces and vertices are the basic elements, as shown in Figure 3-4.
From the designer's viewpoint the process is divided in two steps: copy and paste. On the software side the two operations involve: (1) the extraction of the detail, (2)
parameterization and (3) integration of the detail into the target surface. In the fol-lowing sections, each of these operations is illustrated using an example derived from the Volvo logo.
3.4
Detail extraction
Selection of the source region
The extraction process starts with the selection of the source region. The user draws contour strokes around the area containing the feature of interest. The convex hull of the strokes is used to delimit the source region (Figure 3-5). All triangular faces with at least one vertex inside the selected region are tagged as part of the source region (Figure 3-6). A recursive routine is used to correctly extract the faces inside the source region. Starting from the front-most face enclosed in the source region, all three triangular faces in the face's neighborhood are visited. A geometrical test is performed on the neighboring faces to determine if they are defined inside the source region. This approach is recursively applied to neighboring faces inside the region un-til all faces have been checked. For simplicity, the current implementation is limited to convex regions, but this is not a fundamental restriction (Figure 3-5).
Base - details separation
We believe that there is no precise characterization of the detail to be extracted - it always depends on the geometrical context of the surface on which it resides. In some cases one might wish to Copy-and-Paste a complete rear end corner from one car to another (explicit Copy-and-Paste), while in another case one may wish to transfer only the sharpness of the corner from one vehicle to the other (offset Copy-and-Paste).
Wang [24] deals with how to address explicit Copy-and-Paste; his objective was to integrally and explicitly transfer a feature with all its details to the target surface.
Figure 3-5: A) A user selecting a detail to extract by drawing stokes around the source region. The source detail is based upon a Volvo logo. B) The source selection process is completed, with the convex hull of the stokes defining the source region.
Explicit Copy-and-Paste does not require the separation of the details from the base surface shape of the source geometry. Since we will address high-field copy-and-paste, the problem at this stage is to separate details from the base surface's shape.
We propose two avenues for detail extraction: (1) least squares fitting of a poly-nomial surface and (2) surface smoothing via signal processing techniques. These two complementary techniques give more freedom in choosing the base surface and thus more flexibility on choosing which details to extract from the source. The algorithm is suitable for copy-and-paste editing of a triangular meshes without subdivision or parametric (e.g. NURBS) representations.
3.4.1 Least squares fitting of a polynomial surface
In this framework, a polynomial surface is fitted to the boundary vertices of the source region. We express the boundary vertices in a local coordinate system and solve the least square problem. This technique is well suited for explicitly extracting details. But, in contrast with explicit pasting, details will be adapted to the target region in the copy process.
Figure 3-6: The boundary of the source region is shown as a red line. The face defined inside the source region are shown in yellow and the boundary vertices in green.
For example, the following procedure is a step-by-step illustration of how to fit a surface of degree one -a plane- to the boundary vertices using eigenvectors.
i) Express the position of the boundary vertices 'i from their geometrical center
c as shown in equations 3.1 and 3.2.
S=
-- , for V the vertices v on the boundary (3.1).i=O n
vci = i - C (3.2)
ii) Calculate the covariance matrix Mc, and its eigenvectors and eigenvalues fol-lowing equations 3.3 to 3.6.
v61
V = (3.3)
vWn
Evectors eigs(MeOV) (3.5)
Evaiues eig(MAco) (3.6)
iii) The normal vector n' to the plane is the eigenvector corresponding to the smallest eigenvalue. The parameters a, b, c, d in the parametric equation of the plane
ax + by + cz + d = 0 can now be found to be (eq. 3.10):
a = x (3.7)
b = ni, (3.8)
c = nz (3.9)
d = -aE2 - bE, - cE2 (3.10)
Once the equation of the plane is calculated, the displacement vector of a vertex in the source region is given as the vector going from the orthogonal projection vertex in the plane to the vertex itself. The calculation of the displacement vector is linear when the polynomial surface is a plane but gets more complex as the degree of the surface increases, for example the vertex could be located at equal distance from two points on the surface, making difficult to make a decision on which displacement vector to choose.
3.4.2 Surface smoothing
Signal processing algorithms defined on triangular meshes [18, 5] are used to improve
the quality of surfaces. In the digitizing industry, surface fairing -often refered to as smoothing- is of great interest since it can significantly improve the quality of scanned surfaces by removing noise. Because, from a macroscopic standpoint, surface details can be seen as noise, surface smoothing seems like a particularly attractive technique for extracting sharp details and surface texture.
Vn Vn C VnV vnn V
Figure 3-7: An easy way of smoothing a mesh is to move each vertex v towards the geometric center c of the neighboring vertices v,.
The simplest form of mesh smoothing involve moving each vertex on the mesh towards the geometric center of its neighboring vertices. This technique has the ad-vantage of being very simple to implement but is very computationally expensive. Also, when many iterations are applied, the mesh rapidly shrinks, leading to unde-sirable shapes.
Explicit, implicit and interactive fairings have been implemented. These tech-niques are fundamentally similar but algorithmically and practically differ at many levels. Their names, explicit and implicit, come from the type of integration technique used for each case. Explicit fairing, which is basically a formalization of the simple mesh smoothing algorithm described above, allows better control as the source detail smooths and shrinks, but converges slowly for large meshes. For the same level of smoothing, implicit fairing converges much more rapidly, typically by a factor of five to ten. Using implicit fairing, it is also possible to magnify surface characteristics, literally unsmoothing a detail. When used on open surfaces (a surface topologically equivalent to disc), mesh shrinking constitutes the main limitation to the technique. The use of interactive fairing allows designers to better control the choice of which level of detail is to be extracted. The designer locally smooths the surface from which
he wants to extract the detail with a scribbling gesture. The vertices contained in the region of influence are displaced towards the geometric center of neighboring faces.
The principal disadvantage of using smoothing as a technique to extract details is that vertices are moved both in normal and tangential directions. This makes the detail difficult to describe using a high-field. Thus, until now, only poor results have been obtained using this technique.
Displacement Vector
When the feature is extracted, a displacement vector is attributed to each vertex in the source region. This displacement vector is defined as the vector from the vertex after the base-detail separation to the corresponding vertex before the separation op-eration. The set of the displacement vectors form a displacement field describing the detail, which is known as the high-field (figure 3-8).
Figure 3-8: Once the detail is extracted from the source region, a high-field charac-terizes the detail.
either locally or globally. Global scaling is done by uniformly scaling all the vectors by a factor, arbitrarily chosen between 0.5 and 2. Local scaling is accomplished by scribbling over the vertex associated with the displacement vector that the designer wishes to rescale. Local rescaling allows the designer to correct both undesirable de-tails and freely modify the detail (Figure 3-9).
Figure 3-9: The designer can locally rescale the high field in order to remove undesired features. In this case the designer reduces the arrow from the car maker's logo.
3.5
Parameterization to a plane
In order to map the source detail to the target region, a 2D mapping of the 3D triangular mesh must first be computed. Conceptually, this involves unfolding the mesh onto the plane (Figure 3-10). This constraint requires that the source region and the target region are topologically equivalent to disks.
The parameterization should respect three following properties:
1. Affine Transformation Invariant: The result of the parameterization should not be affected by linear transformation since they do not affect the geometry of
Figure 3-10: The Parameterization of the details onto the plane. the mesh.
2. Continuity: As the sampling of the mesh increases, the result of the param-eterization should tends towards the continuous case. This property ensures consistency between the mesh and its parameterization.
3. Additivity: The addition of vertices onto a given mesh should not affect the parameterization (the parameterization should depend on the surface itself and not on the sampling).
Algorithms for parameterizing meshes have been studied by both mathematicians [13] and computer scientists [8, 4]. The principal applications for such algorithms in computer graphics have traditionally been texture mapping and remeshing. The mathematical formulation corresponds to the minimization of an energy function de-fined on the mesh. The intrinsic parameterization formulation [4] is used here for its simplicity and concise formulation. The parameterization of the triangular mesh is made by assigning to each 3D vertex a 2D coordinates referring to its position in the
plane (Figure 3-10). A discrete energy gradient is defined for each vertex included in the source region. A linear system is formulated and then solved using an iterative method.
LocWi Frame Parametatlion Ftam.
Figure 3-11: The vertex xi and its umbrella. The coefficients for the parameterization are defined with respect to the neighboring vertices [4].
The key is to calculate how the displacement of each vertex influence the mesh distortion. The distortions depend on two well defined geometric properties of the mesh, the edge length and the angles. Figure 3-12 shows the direction of the area gradient - equivalent to edge length gradient - and the angle gradient for one tri-angle. These directions correspond to the directions along which the given quantity increases the most.
VArea
P
Ei VAngle
A H
Figure 3-12: A triangular face with its Area and Angle gradients shown.
Using vector algebra we can analytically derive the area gradient. By definition we know that the height of the triangle HP is perpendicular to the base, using this fact we can express the area gradient in function of the vectors AP and BP (Eq. 3.11 to 3.18). The point H, is formally defined as the orthogonal projection of P onto AB.
A = IIABIIIIHPII (3.11)
VA = V(IIABIIIIHPII) (3.12)
VA = IIABI|V(IIHP11) (3.13)
VA = IIAB
(
(3.14)VA = HPI (IAHIIHP + IBHIIHP) (3.15)
VA = (IAHII(HP + BH) + IIBHII(HP + AH)) (3.16)
VA = IHII BP +
IH
AP (3.17)VA = (cot(a))BP + (cot(/3))AP (3.18)
A very similar derivation is used to obtain the angle gradient. The idea for that
second derivation arise from splitting the triangle into two right angle triangles as shown on by equations 3.19 to 3.23. cos(61) -
PHII
(3.19) IIPAII Vcos(E1) = V 11A(3.20) V(IIPHII)IIPAII - V(IIPAII)IIPHII -sin(i)VIi = H1(3.21)cot(a) ±
AB
VCi = - . PA + - (3.22)
IIPA112 IIPHIIIIABI(
The gradient V(2 will cancel out the second term, heading to:
Cot (a) - cot ())
VE - PA + - P B (3.23)
1| PA112 ||PB112
The energy function should be chosen for desired effects on the aesthetics of the source surface. Eq. 3.24 (conformal mapping) minimizes distortions between the cor-responding angles in the original 3D mesh and the 2D parameterization. Using Eq. 3.25 (authalic mapping), the distortion between the edge lengths is minimized. Figure 3-11 shows how the coefficients of the equations are calculated from the triangular mesh.
Since the two formulations correspond to linear systems of the same size they can be combined linearly to form what we call the stiffness matrix of the parameteriza-tion (Eq. 3.26). Formally the stiffness matrix is composed of the elements shown on Figure 3.5. Note that the coefficients are applied such that it is consistent with the linear formulation defined on the umbrella of each vertex (Figure 3-11).
The positions of the boundary vertices in the 2D parameter plane (Cb,,dInY)have
to be set since they are used to constrain the linear system. In our framework, the points are mapped to a unit disc. The angular coordinates of the boundary points along the unit disc in the parameterization space is equal to the angular coordinate of the corresponding point in the source region. The angular coordinates are expressed in polar coordinates in the local frame (Figure 3-14). The sparse linear system formed (Eq. 3.26) can be solved using a biconjugate gradient method, which is much faster then a traditional LU decomposition.
cot(_i ) + cot (6i)/ |xi - xj12 if j E N(i)
A - - EZkE N(i) Mi if i j (3.24)
0 otherwise.
cot(aij) + cot(oi3 ) if j E N(i)
W3 = - Ek E N(i) W3 if i = j (3.25)
0 otherwise.
A MA + pMX Uinternal-
-MU - 0 I Ubonaryj[ Cboundary
I
C (3.26)Figure 3-13: The stiffness matrix of the mesh and the elements it contains.
3.6
Mapping
-
integration of the details into the
target surface
The core of the pasting problem consists of displacing each vertex of the target sur-face in a way that the details of the source region are correctly replicated in the target region. The first step is to select the target region. Two options are available, one can use a replica of the boundary contours of the source region, or the designer can manually draw a contour on the target region. The manual selection of the tar-get region allows many interesting possibilities in interactive exploration of the shape.
The next step is to parameterize the target region onto a plane and then super-impose the parameterization of the source region (Figure 3-15). Then, using either a point location data structure or a simple brute force algorithm, it is straightfor-ward to find in which triangle of the parameterized source region each vertex of the parameterized target region resides. Once the corresponding triangle is determined for each vertex, its displacement is interpolated using the weighted average of the displacement of the triangle vertices.
Local Frame Parameterizaton Frame
Z0a Y0a -5 Xa~
xfo e , /1 02 01 92
Figure 3-14: The boundary vertices of the source region are placed on the unit circle in such a way that the angle between vertices is kept equal to the corresponding angle in the local frame of the source region.
Figure 3-16 shows the detail integrated into its new geometric context after a Copy-and-Paste operation. Note that the detail has been adapted to the shape of the target surface. When the target region is concave, degeneracy caused by mesh folding may occur (Figure 3-17). This is a common problem [1] and our implementation is not immune to it. Generally, if the difference of curvature between both source and target region is large; the quality of the Copy-and-Paste operation tends to degener-ate rapidly.
The main drawback of our implementation is related to distortion in the copied detail. This issue and possible solutions will be discussed more thoroughly in the following section.
3.7
Results
Our method has been implemented on a windows platform using the C program-ming language, OpenGL and GLUT (OpenGL Utility Toolkit). Our tool can handle common mesh formats (.obj, .noff, etc), allowing the freedom to use meshes from
ZS-T
YS
Xs
YT
XT
Figure 3-15: The parameterization of the source (S) and target (T) region are su-perimposed. For each vertex in the target region, the triangle that contains it in the source region is computed and a displacement for the vertex is calculated.
digitizers and from various freeform modelers such as Maya and 3DS Max. We can typically handle triangular meshes containing 10k vertices at interactive rate. Our results demonstrate that we can extract features from one model and successfully paste them onto another model.
A curvature plot of the surface after pasting is a good indicator of how well the Copy-and-Paste performs. Typically, we see more distortions in sharp details. A solu-tion to this problem is to refine the target surface mesh, but this brute force approach can result in overly large meshes and preprocessing times. A solution to this problem is to use subdivision surfaces [2]. By subdividing only the target region mesh it is possible to adequately approximate details of the source region. Another potential solution would be to use feature sensitive remeshing [21] of the target surface. With this method, the vertices of the target region are displaced towards regions of high curvature and tagged to local minima of the curvature field. This could potentially allow the pasting of sharp details without increasing the number of vertices or
requir-.Jj U i iii
Figure 3-16: The details once pasted on a wavy surface. Notice that the details have adapted to the shape of the target region. The curvature of the detail (right) shown in color highlights the presence of distortions.
Source Object
.AThTTI
lrget Surface
Figure 3-17: A case of degenerate copy-and-paste editing. ing to subdivisions.
Chapter 4
Application
The driving force behind the work presented in this chapter is to facilitate the early stage of conceptual design by developing more intuitive and intelligent computer appli-cations for the designers. The section describes what we call example based modeling, a type of modeling which uses relevant examples of products and processes. First, a simple rule based system for quick 2D and 3D sketching is described. Second, high-level operators based on our 3D Copy-and-Paste tool are introduced as an interactive extension to the interface.
4.1
Motivations
A key point derived from a survey of the leading Computer Aided Industrial Design (CAID) software providers is that industrial designers are under increasing pressure from companies to present innovative concepts in a relatively short time span [14]. Two factors seem to explain this observation:
1. In a context where mass-market consumer products all resemble each other, companies strive to differentiate their products from the competitors through industrial design.
2. A short time to market provides a competitive advantage, as there is a large advantage to being first in a new market.
As an important part of these responsibilities resides with industrial designers, their importance in the design team has grown.
Current CAID systems do not always suit the needs of the user. For example, designers must often provide precise and specific inputs whereas at the conceptual design stage, the designer would like to work with gestural notions. We think that a effective way to solve this problem is through design by example.
4.2
Non traditional modeling
By offering a blend of freeform sketching and rule based modeling, the SKETCH sys-tem was the first computer application to offer a truly different approach to sketching and design [25]. As the user sketches 2D objects on a tablet, the system infers the third dimension following predefined rules. For example, SKETCH has been suc-cessfully used to compose simple scenes with box-like objects such as furniture. The principal drawback is that the system is intrinsically limited by the complexity of the rules and the ability of the designer to take advantage of them.
The Teddy system represents the state-of-the-art in rapid sketching [10]. From a simple interface and a limited set of possible operations, very interesting models can be created and manipulated. But, the most innovative concept in the Teddy system is that most operations do not have to be completely constrained by the user; supplementary constraints are instead inferred by the system based on the context of the operation. Since a lot of the control is lost to make the system simpler, it is difficult to draw realistically looking products in Teddy (Figure fig.carInTeddy), therefore hardly usable in product design.
-rn--~
Figure 4-1: The Teddy system and a 3D model created from a car profile. AS the illustration shows, the modeling rules do not suit the purpose of car design.
4.2.1
Rule based system
As mentioned in Chapter 2, Wallace [22, 23] proposed an expert-like system to au-tomatically generate concepts of box like consumer products. Rules and constraints from aesthetic, usability and manufacturing specifications are taken into account by the system. The user defines the style of the product and the features and, then the system automatically generates valid solutions (see Figure 3-2). Similarly the rule based system is limited by the rules and parts library used.
In the proposed solution we would like to integrate the simplicity and intuitive-ness of the Teddy system with the power of a product based expert system model. Our model is presented in two parts: the first part describes a 2D and 3D sketching interface which implements heuristics to facilitate its utilization. The second sec-tion presents an interactive applicasec-tion for the 3D Copy-and-Paste tool described in chapter 3.


![Figure 3-2: Example of automatically generated concept using a rule based system [22].](https://thumb-eu.123doks.com/thumbv2/123doknet/14441451.517000/31.918.214.708.268.396/figure-example-automatically-generated-concept-using-rule-based.webp)
![Figure 3-3: Different types of pasting as described by Wang [24].](https://thumb-eu.123doks.com/thumbv2/123doknet/14441451.517000/33.918.262.664.169.388/figure-different-types-pasting-described-wang.webp)

