MANUAL FOR THE IMPLEMENTATION OF A
“GREEN ROAD” BY COMMUNITY GROUPS
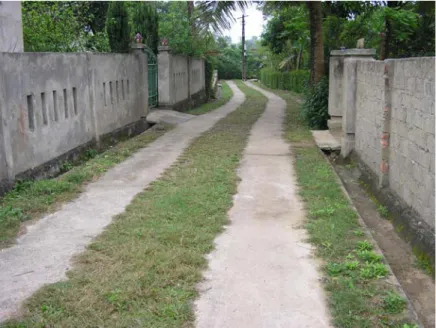
1. CONCEPT OF GREEN ROAD
Green roads are made with concrete hollow elements that are filled with slow-growing grass and concrete tracks. Hollow elements can be removed in an ulterior stage for laying additional utilities such as water supply, drainage, sewers or cables. The hollow elements can then be reused. The hollow elements planted with grass limit the runoff and drain the road.
Two types of roads have been constructed in Dong Hoi, with one concrete track in the middle for motorbikes and cycles and two tracks for light traffic.
The construction of green roads does not necessitate special skills and can be implemented by the community itself. The cost is one-third to half less than an equivalent all-concrete road.
The concept of green roads is a cheap and environmental- friendly alternative for alleys and small roads.
2. DETAILED TECHNICAL DESIGNS
Subbase: The subsoil structure should be strong enough to support the load without any special treatment. Load bearing capacity of the subsoil should reach 1kg/cm2 (or 0.1 MPa). A subbase of hill soil or sand is appropriate. The subsoil must be leveled and well compacted.
Maximum load: maximum load is of 5 tons/vehicle, e.g. small cars, light trucks, medium-sized waste collection trucks, etc.
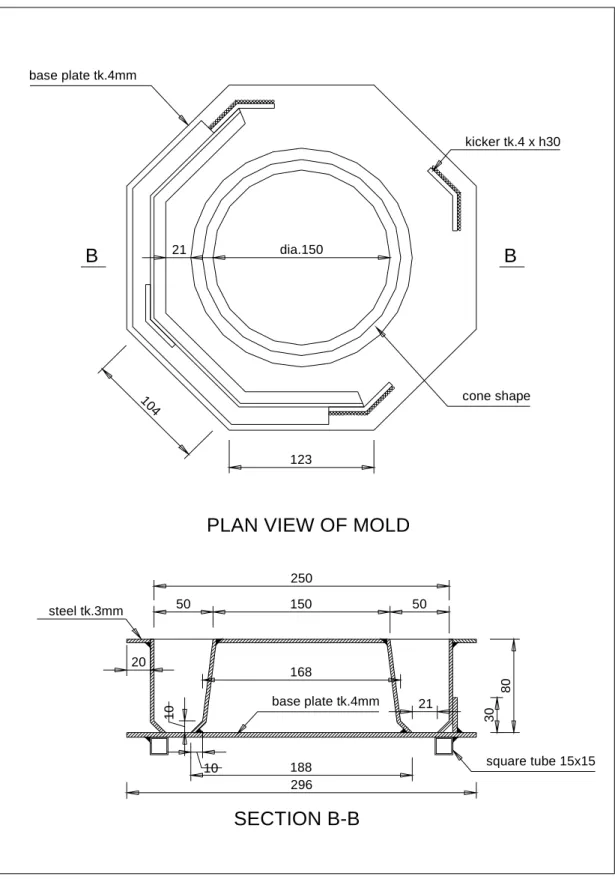
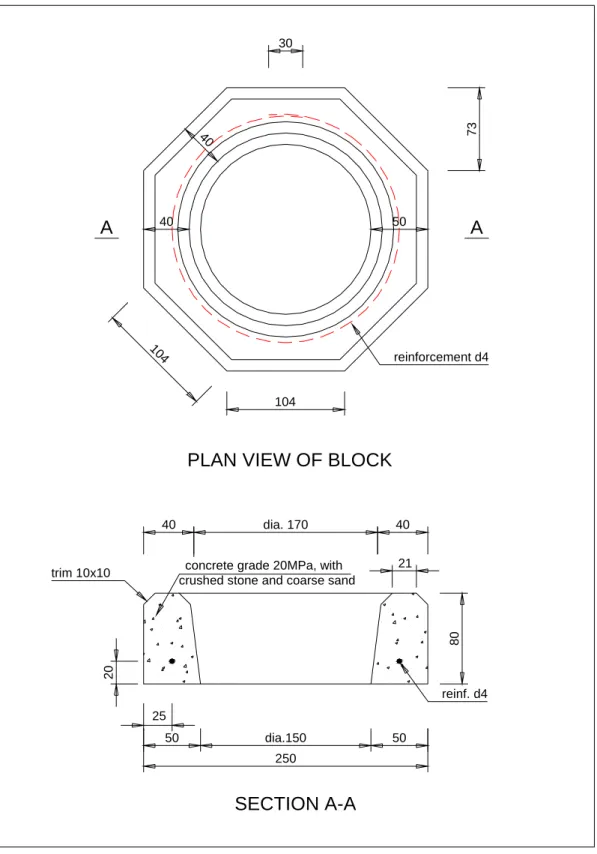
Green tracks: The green tracks are formed by concrete blocks. The blocks are hollow and trimed at the corners. When placed together they form a grate with holes, which can be filled with soil and planted with grass. Detailed design for the block and the steel formwork are shown in figure 3. The concrete elements are placed first and served as formwork for the vehicle track(s).
Vehicle tracks: The vehicle tracks are made of concrete poured in the gaps left by the green tracks. A lining could be placed at the bottom in order to to keep the water content of the concrete. The lining can be made with old cement bags or plastic bags.
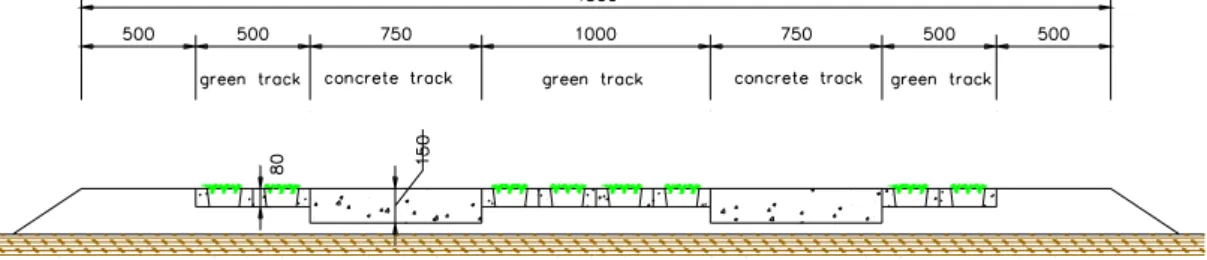
Technical designs for green roads is shown in the typical cross-section in figure 2 below.
Figure 3a: Details of steel formwork for hollow elements
SECTION B-B
PLAN VIEW OF MOLD
B B 50 150 1 0 21 8 0 123 104 kicker tk.4 x h30 base plate tk.4mm cone shape base plate tk.4mm steel tk.3mm 50 21 296 250 3 0 10 dia.150 square tube 15x15 188 168 20
Figure 3b: Details of concrete hollow elements 7 3 104 50 50 dia.150 50 40 40 30 250 reinforcement d4 A A
PLAN VIEW OF BLOCK
SECTION A-A
reinf. d4
104
40 40
crushed stone and coarse sand concrete grade 20MPa, with trim 10x10 dia. 170 2 0 25 8 0 21
3. COST ESTIMATE
The cost of the green road can be broken down into cost of the concrete blocks, cost for the concrete for vehicle tracks and cost for implementing the green track. Here are tables of cost per each part of work:
Table 1:
Unit cost per block
No. Breakdown of 1 batch Unit Q.ty Norms Unit
prices
Costs ($US)
1. Concrete Grade 20 Mpa m3 0.1352
1.1 Materials 3.49
Cement kg 50.0 370.000 0.05 2.58
Coarse sand m3 0.111 0.825 2.90 0.32
Crushed stone, d max = 10mm m3 0.058 0.430 8.39 0.49
Water m3 0.028 0.205 0.19 0.01
Reinforcement d4, L=0.66m kg 0.07 0.58 0.04
Other materials % 1.500 0.05
1.2 Implementation cost 2.90
Cost per batch 6.39
Unit cost/ block ($US) 0.12
Unit cost per linear meter of vehicle track, tk. 15cm, width 75cm
No.
Breakdown Items of work
Unit Q.ty Norms Unit price ($US)
Cost ($US)
1. Excavation 0.150
1.1 Labors shift 0.213 1.417 1.94 0.41
2. Concr. Grade 20 MPa m3 0.113
2.1 Materials 2.67 Cement kg 39.375 350.000 0.05 2.03 Sand m3 0.050 0.446 2.90 0.15 Gravel 10-20mm m3 0.095 0.846 5.16 0.49 Water m3 0.021 0.185 0.19 0.00 Sub-materials % 1.500 0.04 2.2 Labors shift 0.563 5.000 1.94 1.09 3. Lining layer m2 1.000 3.1 Materials 0.16 Plastic sheet m2 1.248 1.248 0.13 0.16 3.2 Labors shift 0.140 0.140 1.94 0.27
Unit cost per m1($US) 4.61
Cost for implementing the green track including filling for shoulders and other works is about 3 $US per square meter.
Depending on the width of the road, the cost of the works can be calculated based on the unit cost of each part of work presented above. As example for the road with the cross section of figure 1, the cost for one linear meter would be:
4. IMPLEMENTATION
Requirement of labors and tools
No specific professional skill is needed for the workers to construct a green road. A group of 5 to 6 person can easily implement 10 meters in a day.
Tools for the works include basic tools like hoes, showels, hand compactor (can be concrete block with size 200x200x10 mm, weighing about 10 kg), buckets, hammers, steel cutter and bending tool for reinforcement. The steel mold for concrete blocks will need to be fabricated by a workshop and can be used almost indefinitely. It is recommended to have at least two formworks in order to speed up the manufacturing of the hollow elements.
The different steps for the implementation are:
1. Preparing the concrete mix
Preparation of concrete mix: Agregates, cement and water shall be measured carefully to get a correct composition. Crushed stone for the block should have maximum size of 10mm but should not contain more than 10 per cent (per weight) of fine particles (powder). Sieving can be done to separate the powder. Sand should be coarse. Water used for the concrete should be drinkable. Figure 4 shows an example of how to prepare a correct composition of concrete for blocks. Water is added with a quantity depending on the prevailing humidity of the aggregates (stone and sand) and that should give a flexible but not too wet concrete.
Figure 3: Suggestion of basic measurement for concrete mix
2. Casting the blocks:
• Preparation of mold: The mold surface should be clear of rust, dust or any alien matters. Assemble the mold and applying a thin layer of oil on the mold surface to avoid friction before the first batches of casting.
• Pour concrete in the mold and compact it well by driving a hammer strongly on a wood rod. The first layer of compacted concrete should be cast before placing the reinforcement ring, then place and compact additional concrete to fullfill the mold. The surface of the concrete should be carefully made smooth.
• Removing mold: after casting and once the concrete has slightly hardened, the mold with concrete block is brough to a place with a flat surface (e.g. a well-compacted ground). The mold with concrete block is put upside down on the ground. Strike to the mold and lift the bottom plate upward to remove it, then remove the mobile side plate. The concrete block is now laid on the ground and stay in place until the first 50 percent of resistance is developed (after 36 hours). The concrete block will be brought to a storage place,
• Curing the blocks: as much as possible the concrete blocks should not be directly expose to the sun or strong wind to avoid rapid loss of water content of the concrete. After the concrete is set (12-15 hours), the concrete blocks should be watered regularly.
• Handling and transporting the blocks to the site: after a minimum of 14 days, (better after 28 days), the concrete blocks are ready to bear the transport to the site. They should be placed one by one in a horizontal position on the vehicle. Transporter should avoid too much bumps. Unloading from the vehicle should be carefully done one by one.
3. Site preparation
The construction site should be clear of rubbish and roots and well levelled and compacted. Extension of big roots from surrounding trees should be cut and removed. Longitudinal profile of the site should be even. It can be simply checked with a tensile plastic string. Cutting or filling should be done to improve the longitudinal profile. Any fillings should be well levelled and compacted.
4. Placing the blocks
Set the alignment for the blocks by a string. Place the blocks on the ground according to the alignment. Be sure that the blocks rest firmly on the ground.
5. Filling soil into the blocks
Fill the blocks with soil. This soil should rather be lighter than the soil of road structure. Filling the holes at this stage is important since it will keep firm the blocks and will avoid concrete or bad soils from entering the holes during the next steps.
6. Digging for concrete tracks
After all the blocks are placed, complete the digging between the tracks of blocks in order to create form for the vehicle tracks. Soil from digging will be used for the road shoulders. Always check the depth while digging. The depth should be maintained as even as possible, giving the concrete tracks an even rigidity.
7. Placing concrete for vehicle tracks
Preparation of concrete mix: Agregates, cement and water should be measured carefully to get a correct composition. Crushed stone should have the size of 10 to 20 mm. Sand should be coarse. Water used for concrete should be drinkable. Batching time and quantity should be in accordance with the time and speed of pouring in order not to leave the mixed concrete unused during more than 45 minutes. Figure 4 shows the preparation of a correct composition of concrete for vehicle tracks
Figure 4: Suggestion of basic measurement for concrete mix
8. Preparation of lining layer:
A lining is to be put on the ground and extended to the sides. The purpose of lining is to avoid too much loss of water and cement into the ground and to keep separate the blocks from the concrete tracks to ease the ulterior removal
9. Concreting:
Pour and compact the concrete in the form previously dug between the blocks. The surface of the concrete should be made smooth with a trowel first then made slightly rough with a bamboo broom.
10. Curing concrete of vehicle tracks
Right after casting, the concrete should be covered to avoid rapid loss of water content from the surface of the concrete. When the concrete is set (after 12-15 hours) start to water the concrete, and keep the concrete humid during the first 20 days.
11. Planting grass
The grass should be of a slow-growing type. The best grass is the type used for football stadium. It can be found in many places.
After the concrete is set, grass can be planted. Water the grass right after it is planted. At the same time water the concrete for curing.
5. OPERATIONS AND MAINTENANCE
OperationsThe road should be used with the following recommendations:
• Vehicles of more than 5 tons should not be allowed. • Driving should be made on concrete tracks.
Maintenance
Grass: Water the grass regularly to maintain sufficient humidity of soil. After the grass has started to grow, fill some more soil in the holes and replace the dead plants. Keep watering and replanting the grass regularly. Cutting the grass as necessary to keep it short.
Soils: The first filling with grass and soil will settle after several weeks. New soil should be added to fill the gaps. Concrete blocks: During operations, some blocks could be damaged and have to be replaced with new ones. Extra blocks should be made available from the beginning.
Concrete tracks: Any damages should be immediately fixed to avoid further damages.
6. IMPACT ASSESSMENT
Environmental aspectThe road provides easier access for waste collection, keeping the neighborhood clean. During the dry season, concrete surface will be very warm and will reflect the heat into the atmosphere. In contrast, the green parts of road will absorb the sunlight and will produce fresher air, giving a heathier environment. Green road also gives a better easthetic look than a concreted road.
Technical aspect
Other infrastructure can be easily laid under the green tracks, and can be easily removed or replaced as well. The blocks can be removed and put back.
The green tracks serve as natural drainage, and the water can infiltrate the sub-soil. Runoff speeds is low, then erosion does not occur.
Socio-economic aspect
The implementation of green roads is very simple and can be done by the community without professional workers or tools. Workers can be mobilised to do the work and can improve their incomes.
More important, the community has the chance to work together and will be capable of doing additional and combined community works like cleaning, maintenance works, etc. This will improve their capability and strength. The community road means the road of the community for the community. This should considerably increase their awareness of belonging to a specific community group.
Muốn biết thêm thông tin và tài liệu:
ELECTROWATT-INFRA VIETNAM
Dự án Phát triển Đô thị Đông Hới
19 Quang Trung – Đồng Hới, Quảng Bình ĐT: 052 821 378; Fax: 052 821 374
Email: [email protected]
Dự án Phát Triển Đô thị Đồng Hới do