Publisher’s version / Version de l'éditeur:
Vous avez des questions? Nous pouvons vous aider. Pour communiquer directement avec un auteur, consultez la
première page de la revue dans laquelle son article a été publié afin de trouver ses coordonnées. Si vous n’arrivez
Questions? Contact the NRC Publications Archive team at
[email protected]. If you wish to email the authors directly, please see the first page of the publication for their contact information.
https://publications-cnrc.canada.ca/fra/droits
L’accès à ce site Web et l’utilisation de son contenu sont assujettis aux conditions présentées dans le site LISEZ CES CONDITIONS ATTENTIVEMENT AVANT D’UTILISER CE SITE WEB.
Student Report; no. SR-2011-07, 2011-08
READ THESE TERMS AND CONDITIONS CAREFULLY BEFORE USING THIS WEBSITE.
https://nrc-publications.canada.ca/eng/copyright
NRC Publications Archive Record / Notice des Archives des publications du CNRC :
https://nrc-publications.canada.ca/eng/view/object/?id=b809c67d-ee44-4ea1-b208-2e3f4ce3e451 https://publications-cnrc.canada.ca/fra/voir/objet/?id=b809c67d-ee44-4ea1-b208-2e3f4ce3e451
NRC Publications Archive
Archives des publications du CNRC
For the publisher’s version, please access the DOI link below./ Pour consulter la version de l’éditeur, utilisez le lien DOI ci-dessous.
https://doi.org/10.4224/19547515
Access and use of this website and the material on it are subject to the Terms and Conditions set forth at Testing functionality of print administration software on a virtual clustered server
DOCUMENTATION PAGE REPORT NUMBER
SR-2011-07
NRC REPORT NUMBER DATE
August 2011 REPORT SECURITY CLASSIFICATION
Unclassified
DISTRIBUTION Unlimited TITLE
Testing Functionality of Print Administration Software on a Virtual Clustered Server
AUTHOR (S) Colten Normore
CORPORATE AUTHOR (S)/PERFORMING AGENCY (S)
Institute for Ocean Technology, National Research Council, SR-2011-07 St. John’s, NL
PUBLICATION
SPONSORING AGENCY(S)
IOT PROJECT NUMBER 421020
NRC FILE NUMBER
KEY WORDS
PaperCut NG Skiede Snekke Knarr Karfe
PAGES iv, 20 FIGS. 5 TABLES SUMMARY
PaperCut NG is print administration software, designed to be installed on servers at
educational and business organizations. It is used to cut down on the amount of printing by giving users an amount of credit they can spend on printing on a regular basis. It also allows for an easy way for reports to be generated about individual print usage. The following report outlines the methods in which PaperCut was tested, and contains instructions on installation and usage of the PaperCut software.
ADDRESS National Research Council
Institute for Ocean Technology Arctic Avenue, P. O. Box 12093 St. John's, NL A1B 3T5
National Research Council Conseil national de recherches Canada Canada Institute for Ocean Institut des technologies Technology océaniques
Testing Functionality of Print Administration Software
on a Virtual Clustered Server
SR-2011-07
Colten Normore August 2011
TABLE OF CONTENTS
LIST OF FIGURES...IV
1.0 INTRODUCTION ... 1
1.1 Introduction to Papercut NG ... 1
1.2 Previous Configuration of the Print Server... 1
2.0 INSTALLATION REQUIREMENTS AND TROUBLESHOOTING... 2
2.1 Installing PaperCut on a Windows Cluster... 2
2.1.1 Setting up the Application Server ... 2
2.1.2 Setting up the Print Provider on Clustered Nodes... 2
2.2 Installing the PaperCut Client ... 4
2.2.1 Zero Install Strategy ... 4
2.2.2 Local Installation ... 5
3.0 TESTING ... 5
3.1 Setup of the Virtual Cluster ... 6
3.2 Testing PaperCut ... 7
4.0 CONFIGURATION AND MANAGEMENT ... 8
4.1 Running PaperCut for the First Time ... 8
4.2 Adding New Objects ... 8
4.2.1 Users & Printers ... 8
4.2.2 Groups ... 9
4.2.3 Accounts ... 9
4.2.4 Template Accounts ... 9
4.3 Configuration of Objects ... 10
4.3.1 Modifying Balances ... 10
4.3.2 Modifying Print Costs per Page... 10
4.3.3 Setting Security on an Account ... 12
4.3.4 Configuring Administrative Rights ... 12
4.4 Deleting and Ignoring Objects... 12
4.5 Batch Updates ... 13
4.6 Backups ... 15
4.7 Refunds ... 15
4.8 Secondary Print Servers ... 16
4.9 Reports and Logs ... 17
5.0 CONCLUSION... 18
LIST OF FIGURES
Figure 3.1-1. The Working Virtual Cluster ... 7
Figure 4.3-1 Changing Cost Per Page ... 11
Figure 4.5-1 Example Spreadsheet for a Batch Update ... 14
Figure 4.7-1. User Interface for Refunds ... 16
1.0 INTRODUCTION
1.1 Introduction to Papercut NG
PaperCut NG is print administration software to be used at the Institute of Ocean Technology, with a purpose of cutting and regulating the amount of resources used during printing. The server side of PaperCut NG comes in two parts: an application server layer and a print provider layer. When a print job is formatted and sent to the print spooler, basic information about the job is read off by the print provider layer of the PaperCut service and is sent to the application server. PaperCut then charges an account for the print job. As an optional third part of PaperCut NG, the client software can be implemented, which provides the user with more printing options and information about their accounts. In the following sections the installation, testing and features of this software will be discussed.
1.2 Previous Configuration of the Print Server
The print server at IOT resides on a virtual cluster. Two physical nodes, Skiede and Snekke, form a cluster that shares its computational resources. These nodes host the two groups, Knarr and Karfe, which house resources for use. Karfe is particularly relevant as it controls the print spooler resource, an area where formatted documents are stored and retrieved by the printer at its own rate. There is no regulation of this service, meaning a user can print freely without costs; a person can print off hundreds of pages for personal use without repercussions.
2.0 INSTALLATION REQUIREMENTS AND TROUBLESHOOTING
2.1 Installing PaperCut on a Windows Cluster
PaperCut NG can be broken up into two parts; an application server that tracks the expenditure of its users and a print provider service that couples with the print spooler. Setting up PaperCut NG on a cluster requires the installation of the print provider on the cluster while the application server is established on a computer outside of the cluster.
2.1.1 Setting up the Application Server
On a computer with a know IP address, run the pcng-setup executable. Select
“standard installation” and install on a hard drive with adequate free space. The default options should work for the application server. After the installation is finished, a web browser should appear beginning the configuration. Enter the administrative password and click next. Select “Professional (Client billing) Organization” and continue. Keep the cost per page as $0.00 and continue. Select “Active Directory” out of the pull down menu and select “Import all users”. Select minimal impact, enter a username, and continue.
Note: By default, port 9191 is used to communicate with the secondary servers and users. Ensure that it will accept at least incoming traffic on that port before continuing.
2.1.2 Setting up the Print Provider on Clustered Nodes
On each node, run pcng-setup-11.2.13713.exe and select “Secondary Print Server” and continue with the installation. Open the file located under “Program Files\PaperCut
NG\providers\print\win\print-provider.conf.” Locate the line starting with “application server” and enter the IP address of the new application server. Next, navigate to “Control Panel” -> “Administrative Tools” -> “Services” and locate “Papercut Print Provider”. Stop the service, and set the start-up type to manual. Once again, repeat for each node in the cluster. Open the cluster administrator and locate the group that contains the print spooler service and create a new resource in this group. Name the resource “Papercut Print Provider” and select “Generic Service” out of the drop down menu. Click next, and click next again at possible owners. Make the print spooler service a required dependency, and click next. On the “Generic Service Parameters” page, enter the name of “PCPrintProvider” and make sure that the “Use Network Name for Computer Name” option is checked. Click next, and then click finish. The final job is to create a shared active job spool on a separate disk. The disk can be entirely new, or it can be the same disk that the print spool directory is on. In Cluster Administrator, create a new resource for this disk (this will already be done if you use an existing drive). Create a directory in this drive called “PapercutNGSpool”. Create a sub directory called “activejobs”. On each node, Open the file “[app-path]\providers\print\win\print-provider.conf” and add the following line:
Ac t i v eJ obs Spool Di r =Q: \ Paper Cut NGSpool \ ac t i v ej obs \
Change the drive letter as necessary. Bring up all the cluster resources, and test to see if Print jobs log properly, and no error messages are found in the print provider text log located in the directory: C:\Program Files\PaperCut
NG\providers\print\win\print-provider.log.
Note: Windows 2008 R2 Servers have a known issue where print jobs may not be removed from the print queue when completed. To work around this, on each node
connected to a printer will need to configure the Printer Driver Isolation. Log on to each node as an administrator. Using the server manager, navigate to the print management console (server manager > roles > print and document services > print management -> print server --> PrintServerName --> drivers). Right click a printer driver and set “Select Driver Isolation” to none
2.2 Installing the PaperCut Client
The PaperCut client can be deployed in multiple ways, two of which are particularly viable. The first way is for an immediate rollout of the client software; a script instructs PCs that log on to the network to run the client from the server. While this does allow for extremely fast deployment and a quicker way to keep the client updated as all the clients are running off the copy on the server, because of the approximately 150 users at IOT this could cause unwanted network congestion during its initial caching, however small. If the network congestion is found to be too large, then installing the client on all users’ PCs provides an alternative to method mentioned above.
2.2.1 Zero Install Strategy
There are two temporary client executables that can be used to deploy the software: pc-client.exe and pc-client-local cache. The latter is more optimal for a larger network and will be discussed in greater length here. For more information, consult the PaperCut NG manual.
The pc-client-local-cache.exe file creates a copy of itself on the machine, typically under a directory called “c:\cache”, relieving the stress on a network that downloading the
larger executable every time on logon would have on the network while still allowing for the ease of deployment and updating that the zero install strategy provides. For the first time creation of the directory, the user needs to have write access to the drive. At IOT, this is not a problem as all users are given write access to their local machines. To have the client run at logon, add
c md / c " s t ar t \ \ [ s er v er name] \ PCCl i ent \ wi n\ pc - c l i ent - l oc al - c ac he. ex e - - s i l ent "
to the logon script. Check to make sure that the permissions of the share is set so that all users are able to access it. At logon, the machines should start up with the PaperCut client running.
2.2.2 Local Installation
Permanent installation of the PaperCut client on a user’s computer is preferable in some situations. For example, documentation suggests permanent installation on laptops that are not always connected to the IOT domain. The client will also have to be installed on computers that are not running windows. Installing the client on windows computer involves running the executable found under \\[servername]\PCClient\win\client-local-install.exe. Installation on other systems is more complicated and is covered in more detail in the PaperCut manual.
3.0 TESTING
Conditions were not right at the time of writing to allow for installation of the PaperCut software on the cluster at IOT. The existing cluster was becoming too unstable for a new installation, and the new replacement cluster was not created yet. Perhaps more
importantly, no policies were created with regards to how PaperCut would operate. As such, testing of PaperCut NG was done on virtual machines, with properties as similar to the existing cluster as could be managed.
3.1 Setup of the Virtual Cluster
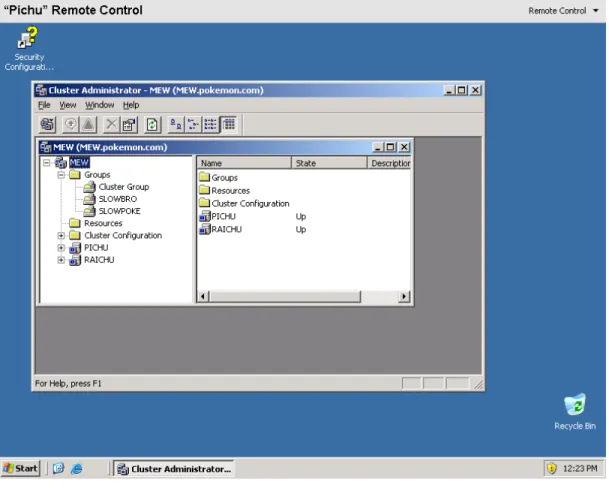
The virtual cluster was created with a copy of Windows Virtual Server 2005 R2 and Windows 2003 Server Enterprise Edition. First, a parent virtual machine was created and was set up with the common properties of the servers. Using the parent VM, three machines were created. Two of the servers were set up to be nodes on the cluster, and one was created to be the domain controller. At IOT, the domain controller belongs to the cluster, but this is a small difference. All three servers were connected to a network called “Public”, with an IP address of 10.10.10.xxx and a subnet mask of 255.255.255.0, while the two nodes of the cluster were connected to a private connection with an IP address of 192.168.1.xxx and subnet mask of 255.255.255.0. The test cluster, just like the cluster in existence at IOT, was created with two groups that were given a unique network name and IP address on the public network. The two nodes on the cluster had to share a disk, called the quorum. During setup, the creation of this disk caused many problems for the cluster; whenever a cluster was created and the disk wasn’t created properly the quorum disk would be created locally on a node and not on a shared disk, only allowing one node to access it. After the cluster was successfully created, one node was taken offline to ensure the cluster’s stability. Finally, printer 4c was installed on one of the groups, allowing for proper testing of the PaperCut application to occur.
Figure 3.1-1. The Working Virtual Cluster
3.2 Testing PaperCut
PaperCut NG was installed on the test cluster in the fashion described in Installing PaperCut NG on a Windows Cluster. To ensure the basic workings of PaperCut NG were working, the following tests were performed: Printing a single and multi-page document; printing in colour; checking that the account had changed based on the print job; ensuring that a user’s credit can be changed; changing a user’s account so that a popup occurs when a user prints a document; changing the default settings of the new users/groups/accounts, and adding one of each; and ensuring that the application
server can be reached. Each of the mentioned criteria was met during testing, and as such it was determined that Papercut NG was capable of running at IOT.
4.0 CONFIGURATION AND MANAGEMENT
In addition to testing the basic functionalities of PaperCut NG, the expanded functionality and processes of PaperCut were tried as well. Observations and
procedures about individual operations, such as adding users and providing refunds, are provided in this section.
4.1 Running PaperCut for the First Time
When PaperCut NG is installed, the defaults are set for silent monitoring. No software has to be deployed to any computers, and the PaperCut application server discretely records usages in the background. This is ideal for testing PaperCut on the cluster, as users will not be disturbed from their normal activities. It allows for observation of the usage of printers for better pricing, and it gives the administrator time to change the defaults to setting appropriate for IOT.
4.2 Adding New Objects
4.2.1 Users & Printers
New users are automatically synchronized from the active directory nightly, or as soon as they print an item. Likewise, printers are added to the list automatically, or when they
first print (provided that the printers are connected to the application server or secondary server properly).
4.2.2 Groups
Groups, unlike users, must be manually added. To do so, go to “Groups” ->
“Add/Remove Groups”. When created, the group’s default settings do not give the members of the group any credit. Since PaperCut NG makes use of the active directory, adding a user to a group in PaperCut is done by adding a user to a group in the AD.
4.2.3 Accounts
Accounts are closer to groups than users in the way that they must be created
manually. However, unlike groups, there are no active directory entries for accounts. As such, groups must be created one by one. Navigate to “Accounts” -> “Create a new Account”. Enter the name of the account, and specify if the account is a sub-account of a lager account (this feature is primarily used for multiple phases of a project should be left blank for most projects at IOT). The rest of the details will already be filled in by the template account. However, if any appropriate modifications are needed they can be completed at this point. The account is now created, but the security settings are not correct for the account. Any one can print to his account, even if they don’t belong to the group in the active directory.
4.2.4 Template Accounts
To cut down on the amount of administration that has to be done when a new account is created, PaperCut NG uses template accounts to apply default settings to the newly
created object, allowing for immediate use of the account or printer. The printer
template is found under the tab “Printers”, and is listed as [Template Printer] under the printer list. Likewise, the template shared account is found under “Accounts”, and is listed as [Template Account]. However, the template user is found under Groups, and is listed as All Users. Changing the settings of these accounts will change the settings of all new printers, users and accounts added to the server.
4.3 Configuration of Objects
4.3.1 Modifying Balances
User and Account balances can be modified manually by an administrator. To do so, go to “Users” -> “(user’s name)” and click “Adjustments and Charges” on the top tab (Or click Adjust by where the user’s balance is). From here, money can be added into the account. The process described here is identical to the process of adding credit to accounts.
4.3.2 Modifying Print Costs per Page
By default printers charge users at a simple rate, determined when the application server is installed, and does not take into account the information about what is being printed.
Figure 4.3-1 Changing Cost Per Page
To change the costs of print jobs, navigate to the “Printers tab” and click on a printer (the template printer is recommended if you want to change the settings of a large amount of printers). Next, navigate to the “Advanced Charging” secondary tab. From here, the settings can be changed. The above process will only change the settings for one printer. To change the settings of multiple printers, navigate to the “Printers” tab and click “Copy settings from printer to printer” from the left sidebar. Under the “Source” heading, select the modified printer and check off the box that says “copy cost settings”. Under the “Target” heading, select the printers that are being copied to. Click copy when finished.
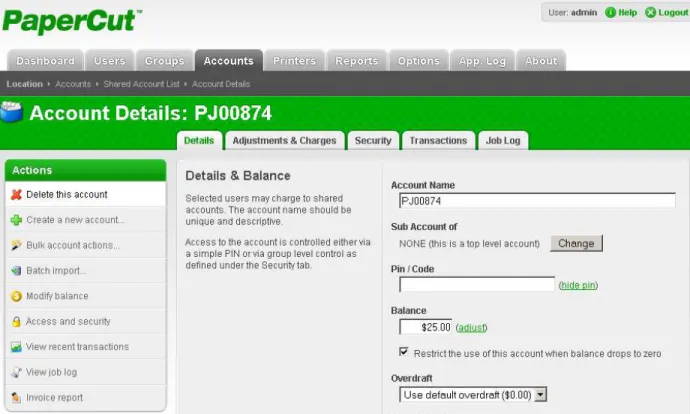
4.3.3 Setting Security on an Account
The security settings in PaperCut are used for allowing access to an account by certain people or groups. All accounts should have security set so that a group can access its own account. For this, a group and an account both have to be created on the PaperCut application server. Next, navigate to the “Accounts” tab and click on the desired
account. On the secondary tab, click “Security”. Select the groups that are allowed access to the account (if the group is not added to the application server, groups can be added from the active directory at this point). Once finished, navigate away from the page.
4.3.4 Configuring Administrative Rights
There is one account in PaperCut NG that is that administrator, however more
administrators can be added in. This is useful as administrators don’t have to memorize a separate name and password to access the administrative tools. To accomplish this, navigate to “Options” -> “Admin rights”. From here, select the administrator group from the drop down. Alternatively, singular users can be added if needed.
4.4 Deleting and Ignoring Objects
Deletion may prove to be necessary when managing the PaperCut server, as it does not seem that PaperCut removes objects when they are removed from the active directory. The deletion of singular accounts, users and printers follow a similar process for deletion. Navigate to the individual object that is to be removed, and click “Delete this _____” from the sidebar on the left. Removing singular groups follows the same
method as removing multiple groups; navigate to “Groups -> Add/Remove Groups” and remove the unwanted groups from the “Selected” category. Users and Accounts also have a way of bulk deletions. To accomplish this, navigate to one of the object’s pages and select “Bulk _____ Action”, select the users or accounts you want to delete, and under the “Delete Users” category, check off the box beside “Delete Users”.
Figure 4.4-1. Deleting a Single Account
Note: Printers are the only objects in PaperCut that cannot undergo mass deletion.
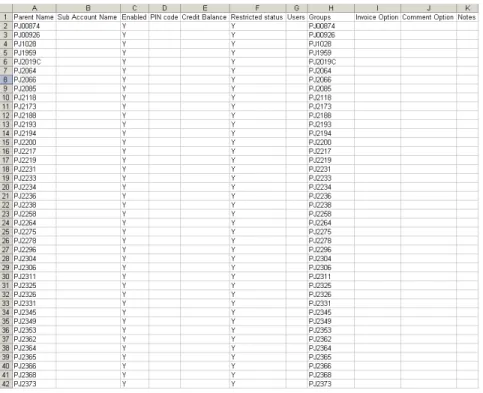
4.5 Batch Updates
Batch imports are useful as they allow the mass creation of accounts, as well as the mass administration of accounts. Batch imports can be completed automatically by the PaperCut application server. They also have the added benefit of being able to be
saved in an excel spreadsheet, allowing for easier administration. To accomplish a manual batch update, go to “Accounts” -> “Batch Import/Update”. Click browse and find the tab delimited file. If groups and accounts are to be taken out, and have been taken out of the spreadsheet, check off the option for “Delete accounts if they do not exist in the import file”. Continue, and wait for completion. Automatic batch updates can be configured by navigating to “Accounts” -> “Shared Account Sync”. From here, an administrator is able to choose the type of file the update and is able to enter the location of the update file. The amount of time between synchronizations can also be set from here.
Figure 4.5-1 Example Spreadsheet for a Batch Update
Batch updates have a unique structure; a table that explains the exact format of a batch update is found in the PaperCut NG documentation. The use of an excel file will help
with the proper formatting of this file. However, even though an excel file can be used, it must be saved in a tab delimited format for the PaperCut application server to read it.
4.6 Backups
Papercut keeps its backups in its program files (the default for the test system was C:\Program Files\PaperCut NG\server\data\backups). Ghosting the server or moving this file onto physical media should be sufficient. To restore a backup, shutdown the application server (see section A.6 of the PaperCut NG manual for more information on how to accomplish this). Open a command prompt. Change to the server binaries directory; for Windows, the directory location is \Program Files\PaperCut
NG\server\bin\win\. Clear the database to an empty state by typing the following: db- t ool s i ni t - db –f
Run the import process by executing the following:
db- t ool s i mpor t - db - f " C: \ pat h\ t o\ bac k up\ bac k up- f i l e- name. z i p"
where the path name is the actual name of the backup file. Once completed, the application server is free to be turned on.
4.7 Refunds
Setting up refunds for IOT will be a policy decision. However, PaperCut does have a built in way of handling refunds. If something happened so the user was charged credit but the print job wasn’t complete, they can use the client website to request a refund on the individual job.
Figure 4.7-1. User Interface for Refunds
To activate refunds, go to “Options” and under the heading “User Features”, check off the box beside “Allow users to request Refunds”. Users can request refunds by going to the webpage, looking at their recent print jobs, and selecting the job they want refunded. Administrators are then able to choose which jobs to refund when they want to by going to “Printers” -> “Refunds”.
4.8 Secondary Print Servers
Printers will not be detected if they are installed on local machines that do not have a secondary server installed on them. This allows for administrators to ignore certain printers if they are deemed unnecessary to track. To track a printer installed t a local machine, the secondary server software has to be installed Run the setup executable, and when prompted about what type installation the program should continue with,
select secondary server. The installation will continue. When finished, edit the conf file found under “\Program Files\PaperCut NG\providers\print\win\print-provider.conf” and change the application server IP address from 127.0.0.1 to the IP address of the application server. The printer should now be detected, or it will be detected when the first print job is sent through it.
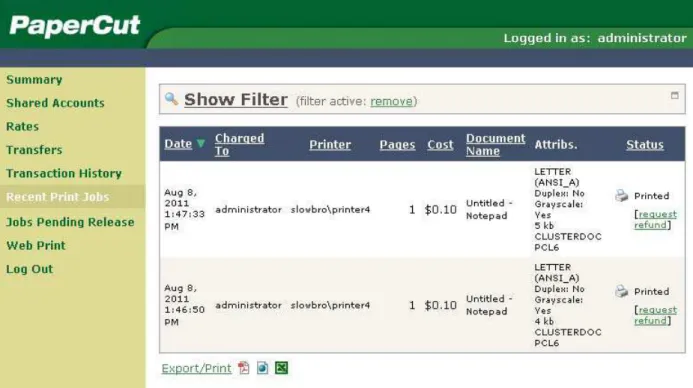
4.9 Reports and Logs
PaperCut NG keeps logs and reports on all user, printer and account activity. Users are allowed to see logs on their individual usage, but administrators can access all of
information. Most reports can be found under the “Report” tab. From here, different reports can be accessed. Logs are found under the “App. Log” tab, and show the status of the regular functions of the PaperCut application server. Individual printers also have their own logs; to access them, select a printer from the printer list and select the “Job Log” tab from the secondary tab bar.
Figure 4.9-1. Example Report
5.0 CONCLUSION
While the setup of the virtual cluster proved to be difficult, testing showed that the basic functions of PaperCut NG work in a clustered environment. The installation process of PaperCut NG proved to be manageable; no problems occurred during the installation in a test environment. Also, administration processes and techniques were tried and documented, ensuring that the expanded functionality that PaperCut provides is also available. However, before PaperCut can be implemented, policies and guidelines
should be put in place, especially pertaining to requisition of credits and refunds of credits, among other things.
6.0 REFERENCES
“PaperCut NG 11.4 User Manual”. 2011. PaperCut NG. Acessed July 02, 2011 <http://www.papercut.com/products/ng/manual/>
“Using Microsoft Virtual Server 2005 to Create and Configure a Two-Node Microsoft Windows Server 2003 Cluster” 1 Sept, 2004. Microsoft TechNet. <http://www. microsoft.com/technet/prodtechnol/virtualserver/deploy/cvs2005.mspx>
Elms, Wayne. Computer Systems Group. Institute for Ocean Technology. St. John’s, NL, Canada. Personal Correspondence. 2011.
Wong, Gilbert. Computer Systems Group. Institute for Ocean Technology. St. John’s, NL, Canada. Personal Correspondence. 2011.