1
Design and Simulation of Three-Dimensional Hologram Emitting
Phased Arrays in the Near Field
by
Jerry Zhou
B.S. Electrical and Computer Engineering,
University of Illinois (2013)
Submitted to the Department of Electrical Engineering and Computer
Science
in Partial Fulfillment of the Requirements for the Degree of
Master of Science
at the
MASSACHUSETTS INSTITUTE OF TECHNOLOGY
September 2015
© Massachusetts Institute of Technology 2015. All rights reserved
Signature of Author...
Department of Electrical Engineering and Computer Science
August 28, 2015
Certified by...
Michael R. Watts
Associate Professor
Thesis Supervisor
Accepted by... .
Leslie A. Kolodziejski
Chair of the Committee on Graduate Students
3
Design and Simulation of Three-Dimensional Hologram Emitting Phased
Arrays in the Near Field
by
Jerry Zhou
Submitted to the Department of Electrical Engineering and Computer Science on August 28, 2015, in partial fulfillment of the
requirements for the degree of
Master of Science in Computer Science and Electrical Engineering
Abstract
Silicon photonics technology is gaining attention in both research and industry because of its potential to revolutionize optical components and systems while utilizing the well-established silicon semiconductor fabrication processes. Similarly, three-dimensional holography technology is emerging to build the foundation for three-dimensional displays, interfaces, and many other applications. This work attempts to combine these two technologies to generate a method to design a phased array that will emit three-dimensional holograms and investigate the scalability of the phased arrays.
This thesis will cover the design and functionality of optical phased arrays and how they have been previously used to emit patterns in the far field. It will then explore three-dimensional hologram theory to prompt its incorporation into a phased array design. In order to accomplish three-dimensional holograms, this design technique takes advantage of the fact that the near field allows for multiple planes of focus, as opposed to the single focal pattern of the far field. A three-dimensional hologram can then be generated by breaking it up into planes and having the phased array recreate them by emitting the patterns that come into focus at different distances from the array. The method to do this involves back propagating desired output planes using Fresnel Diffraction and superimposing the back propagated electric fields to generate the required phased array parameters to emit such a field.
This work will then explore simulation results required to design the system and various techniques to improve the process and output quality. The proposed design increases the size of the array by four times our previous designs, requiring three-dimensional Finite-Difference Time-Domain (FDTD) simulations to provide a wider range of coupling. These additional coupler simulations also prove to be critical as this proposed design alters both the amplitude and phase of each antenna in the array, which can be controlled by these couplers. We demonstrate the flexibility of the design by designing and simulating multiple output patterns as well as at varying wavelengths.
Thesis Supervisor: Michael R. Watts Title: Associate Professor
5
Acknowledgments
None of this work could be possible without the support and guidance of the great people around me. These are people that I could always count on for advice in research related topics, as well as for things outside that realm.
First, and most importantly, I’d like to thank my advisor Professor Michael R. Watts for everything that he has done for me. From the beginning, he believed in me and brought me into his group to work on exciting and ground breaking technologies. He put me in a position to make an impact in this growing field. Just the opportunity to work on these projects has meant so much to me and opened my eyes to the tremendous work being done in this field. His organized and passionate approach has kept me motivated and moving forward in the work that I do. He gave me research and career advice that I will carry with me wherever I go.
JP Laine and Draper Laboratory has supported me in a multitude of ways. Not only have they funded my research and academic progress, but JP has provided me with a lot of useful insight. He helped me understand the application space for our field in order to give context and meaning to our work. He made sure I always felt welcome at Draper and gave me useful advice on how to approach my career.
I’d like to thank Jie Sun for believing in me to carry on part of his work in phased arrays that this thesis is based on. He was there to guide me along the way and answer my many questions. His success really inspired me to try to make something that could live up to the great work that he accomplished.
I would also like to thank Ami Yaacobi for all of the help that he has provided. In this thesis alone, he was critical to some of the techniques that we implemented and in general, he had many great ideas on how to approach various problems. Along similar lines, I’d like to thank Erman Timurdogan and Zhan Su for their insightfulness into how to approach my work. They always had new ideas on things to try and ways to improve that were essential to this work. Their consistent passion and hard work also motivated me every day to try to match their enthusiasm.
6
I’d like to thank Chris Poulton for his help in this project. Not only did he provide technical direction, but he was instrumental in coming up with effective ways to strengthen the work overall. He helped me figure out what types of simulations I should show and what kinds of calculations I should make to bolster the presentation of the work. My officemates Purnawirman and Manan Raval have kept me going in both a research sense and outside of it. Our constant conversations about everything have kept me sane and moving forward in my life. In general, the entire Photonics Microsystems Group has been extremely supportive and helpful. They have been very welcoming and each is a wealth of knowledge. The people in this group really helped make my time at MIT enjoyable.
Finally, I can’t stress how appreciative I am of my parents Stanley Zhou and Lan Hu. Their story and what they have accomplished through hardship has always inspired me to be the best that I can be. They have been supportive throughout my journey and have always found ways to push me in the right direction. I can’t imagine being where or who I am today without them.
8
Contents
1 Introduction ... 13
1.1 Silicon Photonics ... 13
1.2 Optical Phased Arrays ... 17
1.3 3D Holography ... 25
2 Concept of Technique... 31
3 Diffraction/Fresnel Equation ... 36
4 Simulations ... 50
4.1 Finding an Accurate Output Distance ... 50
4.2 Initial Simulation Results ... 52
4.3 Improvements to Method ... 55
4.3.1 Randomized Phase ... 55
4.3.2 Curved Phase ... 60
4.4 Refined Simulation Results ... 67
4.5 Noise Analysis ... 68
4.6 Amplitude and Phase Control via Couplers ... 73
4.7 Layout ... 77
4.8 Additional Simulations... 79
5 Conclusion ... 85
10
List of Figures
1.1-1 Examples of some silicon photonic components and devices ... 17
1.2-1 1-D phased array schematic ... 19
1.2-2 Gerchberg-Saxton algorithm flow ... 21
1.2-3 Schematic of 64x64 phased array ... 22
1.2-4 (a) Simulated “MIT” logo far field pattern. (b) Experimental results of fabricated device ... 23
1.2-5 Tunable phased array antenna design ... 24
1.2-6 Simulated and experimental results of tunable phased array ... 25
1.3-1 Hologram recording ... 26
2-1 Comparison of Far Field and Near Field patterns ... 32
2-2 Overview of back propagation and summation of electric fields ... 33
3-1 Total surface of integration with small sphere of radius ε around P0 to avoid discontinuity ... 39
3-2 Depiction of diffraction using aperture to solve Kirchhoff formulation ... 41
3-3 Formulating G_ using opposing point sources to simplify electric field at P0 ... 44
3-4 Diffraction from P1 to P0 in rectangular coordinates ... 46
4.2-1 Phased array design to emit MIT logo with letters focused at different distances ... 52
4.2-2 Phase profile of summed field that emits the MIT logo ... 54
4.2-3 Initial simulation results of MIT logo ... 55
4.3.1-1 Comparing collimated light and de-collimated light ... 56
4.3.1-2 Simulation setup to test randomized phase ... 57
4.3.1-3 Effects of randomized phase ... 57
4.3.1-4 Spread due to randomized phase at varying distances from phased array ... 58
4.3.1-5 Relationship between distance and required randomization ... 59
4.3.2-1 Reducing information loss by adding curved phase front ... 61
11
4.3.2-3 (a) Desired circular output. (b) Result of back propagating (a) to theoretical phased array with flat
phase. (c) Result of back propagating (a) with added circular phase front. ... 63
4.3.2-4 (a) Calculated percent power lost outside of desired phased array area with varying back propagation distances with unaltered phase (phased array location marked with dotted line). (b) Calculated percent power lost with curved phase front. ... 64
4.3.2-5 (a) Desired larger circular output. (b) Result of back propagating (a) to theoretical phased array with flat phase. (c) Result of back propagating (a) with added circular phase front... 65
4.3.2-6 (a) Calculated percent power loss of larger output with unaltered phase (phased array location marked with dotted line). (b) Calculated percent power loss with curved phase front ... 66
4.3.2-7 (a) Desired circular output. (b) Output due to phased array designed with back propagated flat phase. (c) Output due to phased array designed with back propagated curved phase front ... 67
4.4-1 (a) Initial simulation results. (b) Simulation results using proposed improvements. ... 68
4.5-1 Plot comparing overlap calculations of MIT outputs due to phase noise ... 70
4.5-2 (a) M output with no phase noise. (b) M output with Gaussian random noise of σ = π/16. (c) M output with Gaussian random noise of σ = π/8. (d) M output with Gaussian random noise of σ = π/4... 71
4.5-3 Plot comparing overlap calculations of MIT outputs due to amplitude noise ... 71
4.5-4 (a) M output with no amplitude noise. (b) M output with Gaussian random noise of σ = 0.1. (c) M output with Gaussian random noise of σ = 0.25. (d) M output with Gaussian random noise of σ = 0.5 ... 72
4.6-1 Coupler and unit cell parameters ... 74
4.6-2 Location of power and phase monitors ... 74
4.6-3 Plots of power coupling coefficients and phase shift due to coupler gaps and lengths ... 75
4.6-4 System of row and unit couplers ... 76
4.7-1 Layout of phased array that emits MIT in near field ... 79
4.8-1 Phased array emitted 3D pyramid ... 80
4.8-2 Pyramid output slices ... 81
4.8-3 Output planes moving away from phased array with focused empty spaces circled ... 82
13
Chapter 1
Introduction
1.1. Silicon Photonics
The field of silicon photonics is a combination of two technologies that have seen a lot of success through their technological advancements. It builds upon the huge success of silicon and the semiconductor industry that has proven to have the ability to create smaller and smaller chips and feature sizes while also having a cost efficient method to mass produce these devices. Photonics, on the other hand, has shown the ability to harness the power of light and apply it to various laser, communication, and imaging applications. The combination of these two fields takes advantage of these technologies and allows for the fabrication of various photonic devices within a small chip sized form factor while utilizing the already well researched silicon fabrication technologies. One key application that silicon photonics is designed to address is within the field of optical communication. There is an increasing demand for faster and faster data communication within computer technology and utilizing light and photonics would be a viable solution for this need [1, 2].
As this is still a relatively new field, there have been great strides recently to demonstrate various silicon photonic components. These are the building blocks for the structures that can then be used to address the various applications for silicon photonics. By building up a set of verified components, a variety of structures can be created by using this library of interchangeable pieces. We will go through a few key components shown in Fig. 1.1-1 to give context to the field and this work.
14
Due to its ability to properly route different channels of light within a fiber, the optical add drop multiplexer (OADM) is a key component to optical networks. One of the key elements within this structure is the add-drop filter, which allows a signal to have different wavelength components added and dropped. A microring resonator filter designed using metal and silicon heaters to deal with temperature fluctuations has been proven to operate with a low insertion loss (0.05 dB) and a wide free-spectral range (35 nm) [3], two key parameters to ensure reliable operation. Insertion loss is how much of the signal power is lost when inserting, in this case, the filter into a transmission line, and obviously this must be minimized to prevent degradation of the signal as it is transmitted. This loss is predominately determined by the quality factor of the resonator, which is a measure of total energy stored over the energy lost in a cycle. Thus to achieve a lower loss, a larger quality factor is required and is realized in that work by minimizing loss to silicon heaters by doping the heaters in patches rather than a full coverage. The free-spectral range (FSR), on the other hand, is the measure of the distance between resonance peaks and a large FSR is desirable because it broadens the optical frequency range in which the device operates. Here, a larger FSR is primarily achievable by having a smaller ring resonator radius, and that work shows a small enough device that minimizes losses and is capable of operation over a 35 nm (4 THz) FSR.
When using high index contrast materials for light confinement as is done in silicon photonics, there is a need to control the polarization of the light since it affects propagation rate and coupling strength. This is due to the fact that boundary conditions for TE and TM modes become more critical to device operation as index contrast increases. Here, the TE mode equates to having no electric field in the direction of propagation and is useful because it is isolated entirely into magnetic fields in the direction of propagation (TM is the exact opposite). Polarization control is important since the light signal is often randomly polarized, but control can be accomplished by using a system of polarization rotators and splitters. Polarization splitters are important because they have the ability to split a signal into separate TE and TM modes. Once split, polarization rotators can rotate a wave’s polarization from TM to TE, and vice versa, providing for the ability to achieve a single polarization state within a photonic circuit. A successful
15
demonstration of a polarization rotator designed using an approximated twist with two waveguide cores has been demonstrated with no significant wavelength sensitivity over the 1.45-1.75 µm band [4]. By introducing a twist in a waveguide, the axis and, consequently, the polarization states of the modes are rotated. Similarly, a polarization splitter designed utilizing two waveguides has been demonstrated to successfully split a signal into separate TE and TM outputs [5]. This is accomplished by utilizing separated vertical and horizontal waveguides designed so that boundary conditions of Gauss’s law cause maximum modal confinement for each polarization state to one of the two waveguides. These two works were then combined to demonstrate the first add-drop filter from polarization-sensitive microring resonators [6].
In order to take advantage of the improved data rates of optical communication, a method to convert electrical signals to optical signals is required. The device that accomplishes this conversion is called an optical modulator, and allows electronic control of amplitude or phase of a signal. One way to design these modulators is the Mach-Zehnder modulator, which utilizes a Mach-Zehnder interferometer to control phase through changing refractive index with an electric field and amplitude control through changing applied voltage on a coupler. A design for a Mach-Zehnder modulator has demonstrated a VπL of 1 V∙cm and wide
open eye diagrams [7]. This VπL value tells us that the device only requires 5V applied to achieve a π phase
shift in a 2 mm structure. An alternate design is the microdisk modulator, which has shown low power consumption (3 fJ/bit) and high speed (12.5 Gb/s) in a small form factor (3.5 µm diameter) [8]. These benefits are accomplished because this design maximizes overlap of the depletion region and optical mode, which minimizes the power required to shift phase. By minimizing contact resistance and therefore loss, as well as further optimizing optical mode overlap, an even lower power modulator (0.9fJ/bit) with high speed (25 Gb/s) has shown promise for future expansion of communications [9].
These examples of components can eventually be combined to create much larger systems to tackle the many aspects of optical communication. One such system is the optical broadcast network, which outlines how optical signals are distributed among various ports. Commonly, a system that provides links that allow all ports to communicate with each other is implemented, however this isn’t ideal for larger sized
16
system as the power requirements scale with N2, where N represents the number of ports. An alternative
solution is a system that groups certain “users” together and provides the same all-to-all information links within each group. A topology using a wavelength-selective optical drop filter network with tunable resonant filters [10] has proven to be a successful implementation of this type of network as it has shown low power variation (0.11dB), low loss (1.1 dB), and error-free operation for 10Gbit/s data rates [11]. Here, the microring resonators act as filters by tapping off transmission power for a specific wavelength while not picking up power from the other wavelengths. The filters have the flexibility to be thermally tuned to ensure an equal power distribution among all of the ports and are also designed with the small radius design to provide a large FSR and wide optical bandwidth.
These small form factor components have also created the possibility to design systems that were previously large and bulky and instead create them on-chip. For example, the first on-chip interferometer developed in silicon has been successfully demonstrated and brings with it a smaller size and associated cost compared to its table-top counterpart [12]. Interferometers operate by measuring an interference pattern generated by two beams to calculate phase difference, which can then be used to calculate properties such as path length change or change in refractive index. That work realized that it was possible to recreate this measurement system, commonly set up using expensive table-top optics and equipment, on a smaller and cheaper scale using silicon chips. Size and cost were reduced by replacing many of the bulky optics with silicon photonic components on chips, such as utilizing silicon waveguides to maintain spatial separation, and utilizing the CMOS process technology for large-scale manufacturing. This is a big step as interferometers have been essential in measuring displacement, LIDAR, and semiconductor processes and the ability to bring it on-chip allows for more portable and versatile measurement applications.
17
Fig. 1.1-1 Examples of some silicon photonic components and devices
1.2. Optical Phased Arrays
The optical phased array is yet another example showcasing the potential of combining silicon technology and photonics to generate densely integrated systems on small and cheap to produce chips. It consists of an array of antennas with individual phase control in order to emit a controlled radiation pattern. This emission control is useful as it allows for the generation of varying patterns as well as steerable beams. These devices have received a great deal of research attention due to their potential in fields such as communications, imaging, and detection.
Fig. 1.2-1 shows a schematic of the operation of a 1-D phased array. At the very bottom we see the electromagnetic power source, which is traditionally a laser for optical phased arrays. This power is then distributed in a way to achieve the desired amplitudes for each antenna. Each antenna is spaced an equal distance d apart and is connected to a phase shifter so that it emits a wave
18
A𝑖𝑒𝑗𝜙𝑖 (1.2.1)
Where A𝑖 is the previously mentioned amplitude of the antenna and 𝜙𝑖 is the phase relative to the 0th antenna. The figure shows that the emissions of the antennas will form a beam with an angle θ to the normal of the plane of the antennas that is dependent on the phase delays of the antennas. By adding a delay, we see that when the emitted waves are in phase, they form the aforementioned beam plane. Basically, we can imagine adding a phase delay to being similar to adding a delay in when the equiphase front is emitted so a delay would allow the previous antenna’s wave to be further ahead as seen in Fig. 1.2-1. No phase delay would allow the equiphase front of each emitted field to be identical in shape and size and thus generate a flat beam plane that is parallel to the plane of the antennas. If we add an equal amount of phase delay ∆𝜙 to each subsequent antenna, we have the relation
∆𝜙 =2𝜋
𝜆 𝑑 sin 𝜃0
(1.2.2)
to achieve a beam with angle 𝜃0 to the normal of the antenna plane. Tuning amplitude allows for control of the beam shape and also suppression of side lobes. Traditionally, the amplitude is tapered similarly to aperture antennas in order to reduce side lobes. The constructive and destructive interference caused by the emission of multiple antennas also provides the capability to generate bright and dark spots. For a 1-D array this will be limited in terms of where the bright spots will be located, but if we expand the array to 2-D, then there is much more freedom in where the bright spots are located, as we will see later.
19
Fig. 1.2-1 1-D phased array schematic
Phased arrays on their own are not a relatively new concept as radio wave phased arrays have been well studied and used in broadcasting, radar, and various communication aspects [13]. The first published demonstration of multiple antennas transmitting in a common direction goes as far back as 1909 and was shown by Nobel laureate Karl Ferdinand Braun in a Nobel lecture [14]. He demonstrated the ability to generate an emitted field with a common direction by adding phase delays to antennas. As this idea evolved, it became known as a phased array due to the control of the emitted field through the relative phases of the antennas.
By utilizing the flexibility of emitted beams, phased arrays have been found to be useful in broadcast systems. They have commonly been employed at communication broadcast stations to boost transmission distances by taking advantage of having high gain directional antennas along with multidirectional emission through antenna phase modification [15]. Furthermore, antennas with scanning capabilities can be packed more tightly than inherently omnidirectional antennas with the same interference, which is crucial towards supporting a larger density of mobile users. It has also been shown that phased
20
arrays can be used to overcome the attenuation due to rain on broadcast systems in the 21 GHz bands by utilizing various combinations of beam concentrations [16]. Here, it is shown that the flexibility of beam shapes allows for emission of concentrated beams to cover areas of heavy rain and a broader beam for less weather intensive regions to compensate for rain-attenuation without much additional satellite power.
Phased arrays have most commonly been used for radar applications due to its ability to quickly and accurately steer beams through the aforementioned phase control [17]. In the military realm, phased arrays have been employed in order to provide a single system to simultaneously track and detect objects in both air and surface [18] as well as targeting systems [19] and sonar [20]. Beyond military applications, this beam scanning that phased arrays allow also provides solutions to improving weather and aircraft traffic monitoring since it has the ability to provide updated scans at intervals of at most one minute [21]. This is critical to providing immediate alerts to incoming storms or managing air traffic safety.
Radar phased arrays, however, usually suffer from the fact that the systems require complex mechanical systems to steer beams, which generally leads to large, expensive overall systems. This severely limits the application space as these systems require high-cost and highly precise machinery in order to operate. In order to remove these limiting factors, optical phased arrays have been proposed in order to achieve high performance devices that come at a much smaller cost and complexity due to the elimination of required mechanical devices and smaller optical wavelength [22]. Here, the distinction is that optical phased arrays operate at optical wavelengths, including infrared, visible, and near ultraviolet, while the previously discussed phased arrays operate at much longer wavelengths. The shorter wavelength requirement allows optical phased arrays to potentially have significantly more elements in devices compared to the previously discussed radiofrequency phased arrays. These optical phased arrays are optimal for steering monochromatic laser beams and provide the same beam steering ability and signal amplification shown in radar phased arrays [23]. It proves useful as it opens up applications in laser communication and imaging and can be produced at a much larger scale due to the significant cost reduction and more compact size.
21
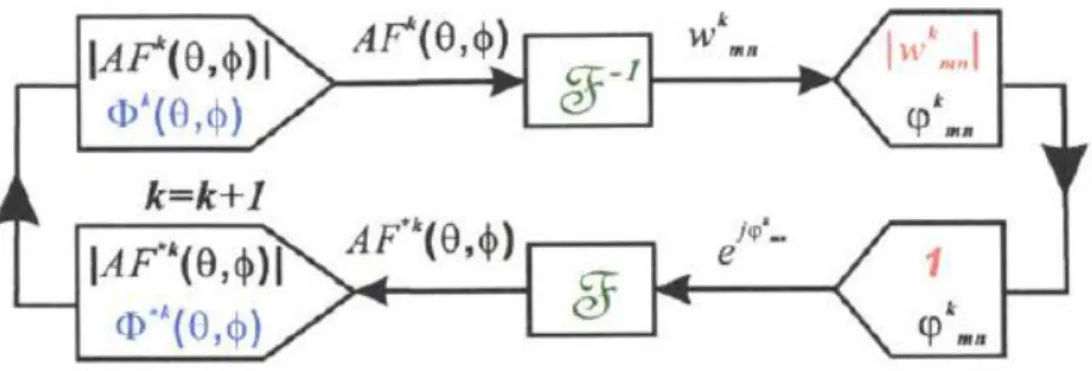
There have been many demonstrations of optical phased arrays utilizing liquid-crystal [24], 1-D arrays for beam steering [25], and 2-D arrays for beam steering [26]. These have been limited, however, to smaller scale works, which doesn’t take advantage of the small form factor to produce larger integrated devices. This changed with the demonstration of a large-scale optical phased array that emits arbitrary far field patterns [27]. The work showcases the ability to design a 64x64 antenna phased array that is able to emit an arbitrary pattern by designing it to output the “MIT” logo in the far field. The Gerchberg-Saxton algorithm shown in Fig. 1.2-2 is an iterative algorithm used to generate the required antenna phases while keeping all 4096 antennas equally balanced in power. |𝐴𝐹𝑘(𝜃, 𝜙)| represents the amplitude of the desired far field output and 𝛷𝑘(𝜃, 𝜙) is the test phase at the kth iteration. These are combined to give us 𝐴𝐹𝑘(𝜃, 𝜙), which can be inverse Fourier transformed to give us 𝑤𝑘𝑚𝑛, which represents the antenna response that generates 𝐴𝐹𝑘(𝜃, 𝜙) in the far field. In order to simulate an even distribution of power, the amplitudes of 𝑤𝑘
𝑚𝑛 are set to 1 and the new field is propagated into the far field using another Fourier transform to generate 𝐴𝐹∗𝑘(𝜃, 𝜙). The phase 𝛷∗𝑘(𝜃, 𝜙) is then set to be the new test phase at the next iteration. Sufficient iterations will cause the final far field pattern 𝐴𝐹∗𝑘(𝜃, 𝜙) to match the desired output |𝐴𝐹𝑘(𝜃, 𝜙)| and the phases are used to tune the phased array antennas.
22
Fig. 1.2-3 shows the 64x64 phased array and the inset shows an individual antenna and coupler. A laser is coupled into a waveguide that runs along the left side of the array. Row waveguides then couple power from this waveguide, and that power is then coupled to the individual antennas within the rows. The amount of power coupled both into the rows and the antennas is designed to provide equal power to all antennas to utilize the calculated phases from the Gerchberg-Saxton algorithm. Evanescent couplers control how much power is distributed and a more detailed explanation of how this and phase control works will be explained in a later chapter.
Fig. 1.2-3 Schematic of 64x64 phased array
Antennas are important to this design in order to achieve highly accurate output patterns. First, the size of the antennas should be as small as possible, otherwise higher order effects will have a greater effect on the output [28]. The antenna grating measures 3.0 µm by 2.8 µm with a 0.22 µm with five gratings and is simulated to achieve 51% upwards emission compared to only 30% downwards emission.
23
By using the Gerchberg-Saxton algorithm, the required antenna phases are calculated to generate the “MIT” logo in the far field, and a Fourier transform is used to simulate the far field output as seen in Fig. 1.2-4a. It is evident that the pattern emitted by antennas tuned to the calculated phases closely resembles the desired output as seen in the bottom right corner of Fig. 1.2-4a, showing that this method can truly generate arbitrary patterns.
This phased array design with the calculated phase profile and required couplers to evenly distribute power was then fabricated in a CMOS foundry and then tested using a 1550 nm laser as the input. Using an infrared camera, the emitted output is captured as seen in Fig. 1.2-4b, which again closely matches both the simulated output and the desired “MIT” logo. Furthermore, it was also shown that having less antenna elements (32x32) reduced the resolution of the output, further supporting the need for larger scale devices.
Fig. 1.2-4 (a) Simulated “MIT” logo far field pattern. (b) Experimental results of fabricated device
The paper continues by showing the ability for a larger array to effectively steer beams by designing a phased array comprised of antennas with tunable phase. Not only does this freedom of varying phase allow for beam steering with high resolution on small form factor devices, it also opens up the possibility for having dynamic output patterns. To design a tunable phased array, a resistive heater is implemented into
24
the unit cell as seen in Fig. 1.2-5 so that electrical signals can thermo-optically tune the phase of the antennas.
Fig. 1.2-5 Tunable phased array antenna design
The device was reduced to an 8x8 antenna phased array to test the phase tuning capabilities and once again fabricated in a CMOS foundry. The phased array was designed to emit a single dot in the far field with no electrical excitation as seen in the left-most pair of outputs in Fig. 1.2-6. Then, as the rest of Fig. 1.2-6 shows, voltages are applied in simulations and experimentally to show the output shifting vertically and horizontally, as well as splitting both vertically and horizontally. By showing that it is possible to design phased arrays that have changeable outputs, this work significantly opens up the potential applications for optical phased arrays as it is now proven that it has beam steering and dynamic pattern generation with high resolution. Again, it is evident that the experimental results closely resemble the simulated results, which further proves that this is a robust method to design phased arrays to emit arbitrary far field outputs.
25
Fig. 1.2-6 Simulated and experimental results of tunable phased array
1.3. 3D Holography
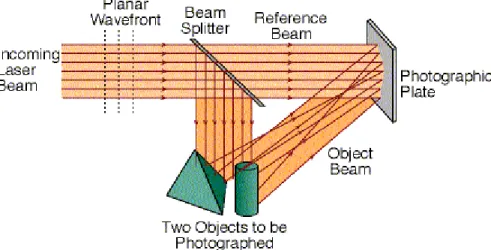
Holography is closely tied to phased arrays since phase and amplitude information is critical to the generation of holograms and the preservation of phase information is the defining characteristic that distinguishes it from photography [29]. Generating a hologram is a two-step process that involves first recording the desired output and reconstructing an image of the original object. To record a hologram, the desired object is illuminated with a coherent light and the diffracted waves are interfered with a phase-related reference wave. This is then shone onto a recording medium, imprinting the phase and amplitude of the diffracted waves as seen in Fig. 1.3-1. The combination of light reflected and scattered by the object combines with the reference beam to form an interference fringe field, which is recorded by the recording media. Then, to reconstruct a 3D image of the object, the recorded hologram just needs to be illuminated by a wave identical to the reference wave. The reconstruction occurs when the reference wave is diffracted by the grating in the recording medium that is formed during the recording of the hologram.
26
Fig. 1.3-1 Hologram recording
The process can be described mathematically by first beginning with a spherical wave solution to the Helmzholtz equation
𝐸⃗ = 𝐴𝑒𝑗𝑘𝑟𝑒𝑗2𝜋𝑓𝑡𝑒̂ (1.3.1)
where A is the amplitude of the wave, f is the frequency, and 𝑒̂ is the polarization unit vector. By defining the complex field amplitude to be
𝜓 = 𝐴𝑒𝑗𝜙 (1.3.2)
where 𝜙 = 𝑘𝑟, the irradiance of the field can be written
𝐼 = 𝐸⃗ ∙ 𝐸⃗ ∗= 𝜓𝜓∗𝑒̂ ∙ 𝑒̂ = 𝜓𝜓∗= |𝜓|2 (1.3.3) The field of the recording 𝜓𝐻 is then just the interference between the object 𝜓𝑂 and the reference wave 𝜓𝑅 and can be written as a superposition of the two waves
𝜓𝐻 = 𝜓𝑂+ 𝜓𝑅 (1.3.4)
27
𝐼𝐻 = (𝜓𝑂+ 𝜓𝑅)(𝜓𝑂+ 𝜓𝑅)∗= |𝜓𝑂|2+ |𝜓𝑅|2+ 𝜓𝑂𝜓𝑅∗+ 𝜓𝑅𝜓𝑂∗ (1.3.5) The transmittance T of the recorded hologram field can then be written as directly proportional to the irradiance of the field
𝑇 = 𝐾[|𝜓𝑂|2+ |𝜓𝑅|2+ 𝜓𝑂𝜓𝑅∗+ 𝜓𝑅𝜓𝑂∗] (1.3.6)
The equation that describes the recreation of the hologram, or equivalently illumination by the reference wave, can be expressed as a multiplication of the recorded hologram transmittance by the reference wave field
𝜓𝑇 = 𝐾[𝜓𝑅(|𝜓𝑂|2+ |𝜓𝑅|2) + 𝜓𝑂|𝜓𝑅|2+ |𝜓𝑅|2𝜓𝑂∗] (1.3.7) From this equation, we see that the first term is the transmitted wave with an attenuation factor. The second term is the original object wave with an amplitude factor and thus is the virtual holographic image of the object. Finally, we can see that the third term is the conjugate object wave also multiplied by an amplitude factor.
Holography has been around since Dennis Gabor’s work in its invention in the 1940s, which eventually lead to being awarded the Nobel Prize in 1971 for the discovery [30, 31, 32]. It started getting wide-spread attention with the invention of the laser, which brought about the discovery of optical holograms and the first high-quality 3D images by Leah and Upatnieks [33]. Since then, holography has been successfully utilized for many applications.
One of the major application spaces for holography is in interferometry. Interferometry traditionally uses two optical wavefronts and measures optical path differences by measuring the interference of the wavefronts. A common example is the Mach-Zehnder interferometers, which can be used to map out device surfaces, measure variation in refractive indices, and describe the flow of gasses. However, usually two separate but identical optical beams are required for these applications, which is difficult to accomplish without complex and expensive systems. Holography addresses this issue because it can record desired wavefronts and consistently recreate them for use without the expensive equipment. Holographic
28
interferometry is done by examining fringes due to phase difference in wavefronts stored in holograms to achieve quantitative and qualitative information [34]. This technology has proven effective in applications such as vibration measurement [35] and in providing nanometer resolution characterization of integral features of current and future electronic devices [36]. It has also been critical in detecting defects in manufacturing that helps to maintain a high device yield [37] and 3D digital holography has shown the ability to detect critical details that radiographs and CT scans are not able to pick up on in the biomedical field [38].
Holography has also been found to be useful in lithography techniques. Lithography is the transferring of a mask onto a resist covered wafer in order to outline structures during integrated circuit fabrication. Traditionally this has been accomplished using techniques such as contact printing, proximity printing, and step-and-repeat, however, each has its own issues. Contact printing can cause contamination and damage to the wafer, proximity printing has a limited resolution, and step-and-repeat methods are usually very complex and expensive. A holographic system provides a non-intrusive, full-field, and cost effective solution to lithography while maintaining the required high resolution [39]. Basically, the holographic solution can use real-image projection to overlay the mask image onto the wafer and eliminate the need for lenses. This eliminates the complexities of a lens system and also utilizes the high resolution achievable by holography.
Holography can also be used to make optical elements with the power to direct a light wave, similar to the previously discussed phased arrays. These elements can be made by recording a fringe pattern generated by interfering two light beams. Holography can be used to make gratings for spectrographic instruments and this is advantageous because they can be made without random and periodic groove variation and they have low light scatter [40]. It has also proven to be useful in optical beam scanning as it has the ability to combine both beam deflection and focusing into a single element, which traditional scanning methods cannot. Basically, the beam can be flexible and can easily change and focus based on the surface being scanned. A common example of where these are used can be found in supermarket scanners
29
[41]. Obviously this flexibility is important as items bought at the supermarket can easily vary in shape and size and the scanners must be able to account for this.
Finally, holography provides a promising tool in the field of 3D displays as it inherently generates 3D images. Advances in 3D display technology allow the generation of images without specialized eyewear, which opens up many possibilities in medical, industrial, and military imaging. Research in the field has shown the capability to generate updatable 3D displays which can record and display images within minutes and provide hours of viewing without refreshing the display system [42]. In a more commercial setting, this technology also opens up the possibility for 3D TVs [43]. Systems have already been designed showcasing the capabilities of real-time acquisition, transmission, and 3D display of dynamic scenes that don’t require specialized glasses to view [44].
31
Chapter 2
Concept of Technique
The discovery of a method to generate arbitrary far field patterns using phased arrays has opened up many windows of opportunities within the field of photonics and communication [27]. That work highlighted the versatility and robustness of optical phased arrays due to the ability to project complex patterns in a small chip-sized form factor while utilizing the CMOS fabrication processes. This work attempts to expand on that previous discovery by proposing a method to design phased arrays with the capability to project 3D images. By projecting an image designed for viewing in the far field, the previous work was limited to only a single pattern with varying viewing distances. However, in order to generate arbitrary 3D projections, there is a need for the patterns to change with distance to give the image both space and depth. The proposed method will utilize near field diffraction in order to achieve output planes that are able to change with viewing distance as illustrated in Fig. 2-1. This property of near field diffraction provides for the ability to generate slices of a 3D object in space, creating the basis for generating 3D holograms. Our algorithm will calculate the required phased array parameters analogous to how the Gershberg-Saxton algorithm was used in previous phased array work to calculate the antenna phases for designing phased arrays that emit patterns in the far field.
32
Fig. 2-1 Comparison of Far Field and Near Field patterns
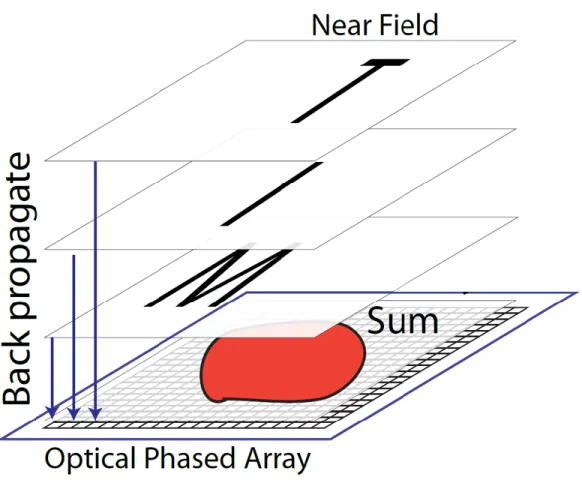
Our 3D hologram design technique proposes that we can calculate the needed individual phased array antenna phase and amplitude for an arbitrary 3D pattern by back-propagation. The idea behind this is that diffraction propagation is reversible in the sense that an electric field that is propagated forward a certain distance will be recreated by propagating it backwards the same distance, and vice versa. The method to design these phased arrays entails slicing the desired 3D image into flat planes at varying distances from the desired phased array location. These planes then must be converted to electric field distributions that mimic the slices of the desired 3D image. Each desired electric field plane is then at a different vertical distance from the phased array and is back propagated individually to the common plane at the phased array’s theoretical location. Then, the results of the back propagations are superimposed into a single electric field similar to how Brown and Lohmann have achieved the generation of digital binary holograms through superimposing Fourier transforms [45]. An example depicting this back-propagation of output planes and summation at the phased array location is shown in Fig. 2-2 using the MIT logo as an
33
example output. The resultant electric field is discretized into a 128x128 point matrix, with each point corresponding to an aperture of emission from each antenna, and the phase and amplitude is extracted from each point to synthesize the needed parameters for the phased array antennas.
Fig. 2-2 Overview of back propagation and summation of electric fields
Here, we approximate the phased array emission to be an aperture rather than a point source due to the primarily z-oriented emission direction of our previously designed antennas [27, 46]. A point source, on the other hand, would have emission in the x and y directions in addition to the z direction. This x and y directional emission would be a problematic design for an antenna because it would cause each phased array antenna to have an effect on all of the other antennas within the plane of the array. This greatly complicates the calculation of the required phase and amplitude of each antenna because the effects of the
34
surrounding antennas must also be taken into consideration. This approximation allows us to not take into account the antenna emission pattern.
Once the required parameters are ensured for each antenna, the phased array will then be able to emit the total summed electric field. If the emitted electric field is now forward propagated in the z direction, each of the original desired planes in the 3D space will be approximately recreated. Each plane, however, will not be an exact match to the desired output due to the discretization of the field and the contributions from the other output planes. This back propagation technique approximately models the capture of a hologram using light propagation as done in digital holography.
36
Chapter 3
Diffraction/Fresnel Equation
This design technique relies critically on a proper equation to accurately calculate electric fields being propagated both forwards and backwards. It is important to derive a proper expression for this propagation since it is utilized at various stages of the algorithm. The equation must fit into the stringent requirements of this method, but most importantly, the final expression must ensure that the propagation is accurate within the near field. This chapter will focus on deriving an accurate representation of the Fresnel propagation of electric fields to be used in the rest of this work. It closely follows the derivation of the Fresnel equation as done by Goodman [47].
We begin our derivation of the required diffraction equations by first examining the Helmholtz Equation. Since we are trying to determine the equation of a light pattern at an arbitrary distance P and time t, we can express the function as u(P,t). This scalar field can be expressed as
𝑢(𝑃, 𝑡) = 𝑅𝑒{𝑈(𝑃)𝑒−𝑗2𝜋𝑣𝑡} (3.1)
for a monochromatic wave, where v is the optical frequency. In order to represent an optical wave, it must also satisfy the scalar wave equation
∇2𝑢 −𝑛 2 𝑐2 𝜕2𝑢 𝜕𝑡2 = 0 (3.2)
Here, ∇2 is the Laplacian operator, n is the refractive index of the medium of light propagation, and c is the speed of light. By plugging in (3.1) into (3.2) we get
37 ∇2𝑈 − [𝑛 𝑐(−𝑗2𝜋𝑣)] 2 𝑈 = 0 (3.3) which simplifies to (∇2+ k2)𝑈 = 0 (3.4) where 𝑘 = 2𝜋𝑛𝑣 𝑐
We begin to formulate our diffraction equation for a complex field at a point in space using Green’s theorem, which is often regarded as the primary foundation for scalar diffraction theory. It says:
For two complex valued functions of position, U and G, we have a closed surface S surrounding a volume V such that if U, G, and their first and second partial derivatives are single valued and continuous within and over S, then the following is true,
∭(𝑈∇2𝐺 − 𝐺∇2𝑈)𝑑𝑣 = ∬(𝑈𝜕𝐺 𝜕𝑛 𝑆 − 𝐺𝜕𝑈 𝜕𝑛)𝑑𝑠 𝑉 (3.5) where the 𝜕
𝜕𝑛 is a partial derivative with respect to n, the outward normal direction at each point on S. In order to apply this to diffraction, we must ensure that a proper G is selected, which we can solve for using the Helmholtz and Kirchhoff integral theorem. This theorem provides a solution for the homogenous wave equation at any arbitrary point in terms of the solution itself and its first derivative on a closed surface around the point. We can follow Kirchhoff and express the optical disturbance at the point of observation P0 in terms of its values on S, an arbitrary closed surface around P0. We can select a spherical
wave expanding around P0 with unit amplitude such that Kirchhoff’s G at any arbitrary point P1 can be
expressed as
𝐺(𝑃1) = 𝑒𝑗𝑘𝑟01
𝑟01
38 Where r01 is the length of the vector that points from P0 to P1.
In order to use this G in Green’s theorem, we must ensure it is continuous within the volume V. A small spherical surface with radius ε is inserted to avoid the discontinuity at P0 as shown in Fig. 3-1, making
the surface of integration a composition of the original S and this new sphere
𝑆′= 𝑆 + 𝑆𝜖 (3.7)
This G within the new volume of integration V’ between S and 𝑆𝜖 satisfies the Helmholtz equation as it is simply an expanding spherical wave
(∇2+ k2)𝐺 = 0 (3.8)
By plugging in (3.4) and (3.8) into the left side of Green’s theorem, we get
∭(𝑈∇2𝐺 − 𝐺∇2𝑈)𝑑𝑣 𝑉′
= − ∭(𝑈𝐺𝑘2− 𝐺𝑈𝑘2)𝑑𝑣 = 0 𝑉′
(3.9)
This result allows us to set the right side to zero
∬(𝑈𝜕𝐺 𝜕𝑛 𝑆′ − 𝐺𝜕𝑈 𝜕𝑛)𝑑𝑠 = 0 (3.10)
which we can expand by breaking up S’ using (3.7)
− ∬(𝑈𝜕𝐺 𝜕𝑛 𝑆𝜖 − 𝐺𝜕𝑈 𝜕𝑛)𝑑𝑠 = ∬(𝑈 𝜕𝐺 𝜕𝑛 𝑆 − 𝐺𝜕𝑈 𝜕𝑛)𝑑𝑠 (3.11)
39
Fig. 3-1 Total surface of integration with small sphere of radius ε around P0 to avoid discontinuity
As previously proven, we have
𝐺(𝑃1) = 𝑒𝑗𝑘𝑟01
𝑟01 and thus we also have,
𝜕𝐺(𝑃1) 𝜕𝑛 = cos (𝑛⃗ , 𝑟 01)(𝑗𝑘 − 1 𝑟01 )𝑒 𝑗𝑘𝑟01 𝑟01 (3.12)
where cos (𝑛⃗ , 𝑟 01) is the cosine of the angle between the outward normal 𝑛⃗ and the vector 𝑟 01 connecting P0 and P1. When we look at the specific P1 on 𝑆𝜖, we have cos(𝑛⃗ , 𝑟 01) = −1 and if we let 𝜖 approach 0 we
40 lim 𝜖→0∬(𝑈 𝜕𝐺 𝜕𝑛 𝑆𝜖 − 𝐺𝜕𝑈 𝜕𝑛) 𝑑𝑠 (3.13) = lim 𝜖→04𝜋𝜖 2[𝑈(𝑃 0) 𝑒𝑗𝑘𝜖 𝜖 ( 1 𝜖− 𝑗𝑘) − 𝜕𝑈(𝑃0) 𝜕𝑛 𝑒𝑗𝑘𝜖 𝜖 ] (3.14) which simplifies to 4𝜋𝑈(𝑃0) (3.15)
because the rest of the terms go to zero as 𝜖 approaches 0. If we then plug this into the previously expanded Green’s Theorem (3.11), we get
𝑈(𝑃0) = −1 4𝜋∬(𝑈 𝜕𝐺 𝜕𝑛 𝑆 − 𝐺𝜕𝑈 𝜕𝑛)𝑑𝑠 (3.16) 𝑈(𝑃0) = 1 4𝜋∬[( 𝑒𝑗𝑘𝑟01 𝑟01 )𝜕𝑈 𝜕𝑛− 𝑈 𝜕 𝜕𝑛 𝑆 (𝑒 𝑗𝑘𝑟01 𝑟01 )]𝑑𝑠 (3.17)
This is known as the Helmholtz and Kirchhoff integral theorem, and it is important to the scalar theory of diffraction because of its ability to express the field at any point P0 in terms of the boundary values of the
wave on a closed surface around it.
In order to move forward, we will examine the diffraction of light by an aperture. This will help us more accurately approximate the electric field due to our phased array. We select a surface of integration consisting of a plane surface, S1, and a circle of radius R around P0 cut off by S1, which we will call S2 as
41
Fig. 3-2 Depiction of diffraction using aperture to solve Kirchhoff formulation
(3.17) then becomes 𝑈(𝑃0) = 1 4𝜋 ∬ (𝐺 𝜕𝑈 𝜕𝑛 𝑆1+𝑆2 − 𝑈𝜕𝐺 𝜕𝑛)𝑑𝑠 (3.18)
Using G from (3.6) that we calculated previously, we have
𝐺 =𝑒 𝑗𝑘𝑟01 𝑟01 = 𝑒 𝑗𝑘𝑅 𝑅 (3.19) on S2. We similarly get
42 𝜕𝐺 𝜕𝑛 = (𝑗𝑘 − 1 𝑅) 𝑒𝑗𝑘𝑅 𝑅 ≈ 𝑗𝑘𝐺 (3.20)
for large R. This part of the integral then simplifies to
∬[𝐺𝜕𝑈 𝜕𝑛 𝑆2 − 𝑈(𝑗𝑘𝐺)]𝑑𝑠 = ∫ 𝐺( 𝛺 𝜕𝑈 𝜕𝑛− 𝑗𝑘𝑈)𝑅 2𝑑𝜔 (3.21)
where 𝛺 represents the angle that subtends the closed surface S2 from our point of observation P0. This
result proves that |RG| is bounded on S2 and the entire integral approaches 0 on S2 as R becomes large, so
long as the Sommerfeld radiation condition is met
lim 𝑅→∞𝑅(
𝜕𝑈
𝜕𝑛− 𝑗𝑘𝑈) = 0
(3.22)
However, we know this to be true as the disturbance U vanishes at least as fast as a diverging spherical wave. With the S2 integration now eliminated, we can express the electric field at P0 in terms of the
integration over S1, 𝑈(𝑃0) = 1 4𝜋∬(𝐺 𝜕𝑈 𝜕𝑛 𝑆1 − 𝑈𝜕𝐺 𝜕𝑛)𝑑𝑠 (3.23)
Now, to isolate the portion of S1 that would correspond to our phased array, we use Kirchhoff boundary
conditions to write the integration over Σ, the aperture in Fig. 3.2. The boundary conditions say:
1. Across the surface Σ, the field distribution U and its derivative 𝜕𝑈
𝜕𝑛 are exactly the same as they would be in the absence of the screen.
2. Over the portion of S1 that lies in the geometrical shadow of the screen, the field distribution U and its
derivative 𝜕𝑈
𝜕𝑛 are identically zero.
The first point guarantees that the integration over the aperture is valid without the screen, while the second point ensures that we can eliminate the surface of integration except the part within the aperture. This shape
43
at P1 now resembles the desired emission of a phased array to a point P0. Our electric field at P0 can therefore
be further simplified to 𝑈(𝑃0) = 1 4𝜋∬(𝐺 𝜕𝑈 𝜕𝑛 Σ − 𝑈𝜕𝐺 𝜕𝑛)𝑑𝑠 (3.24)
We can attempt to simplify the Green’s function G such that either G or 𝜕𝐺
𝜕𝑛 disappears over the surface S1. Sommerfeld showed that a Green’s function can be generated by having two point sources P0
and 𝑃̃0 equally spaced from and on opposite sides of S1 as shown in Fig. 3-3. If both have the same
wavelength and oscillate with a 180° phase difference, then our G becomes
𝐺_(𝑃1) = 𝑒𝑗𝑘𝑟01 𝑟01 −𝑒 𝑗𝑘𝑟̃01 𝑟̃01 (3.25)
which will disappear on our aperture Σ, leaving us with only the 𝜕𝐺 𝜕𝑛 term 𝑈𝐼(𝑃0) = −1 4𝜋∬( Σ 𝑈𝜕𝐺_ 𝜕𝑛 )𝑑𝑠 (3.26)
Now to solve for the 𝜕𝐺_
𝜕𝑛 term, we can take the derivative of G_(P1) to get 𝜕𝐺_ 𝜕𝑛 (𝑃1) = cos(𝑛⃗ , 𝑟 01) (𝑗𝑘 − 1 𝑟01 )𝑒 𝑗𝑘𝑟01 𝑟01 − cos (𝑛⃗ , 𝑟̃ 01)(𝑗𝑘 − 1 𝑟̃01 )𝑒 𝑗𝑘𝑟̃01 𝑟̃01 (3.27)
With our surface our P1 on S1, we can state
𝑟01= 𝑟̃01
cos(𝑛⃗ , 𝑟 01) = −cos (𝑛⃗ , 𝑟̃ 01) This allows us to write,
𝜕𝐺_ 𝜕𝑛 (𝑃1) = 2cos(𝑛⃗ , 𝑟 01) (𝑗𝑘 − 1 𝑟01 )𝑒 𝑗𝑘𝑟01 𝑟01 (3.28)
44 𝜕𝐺_ 𝜕𝑛 (𝑃1) = 2𝑗𝑘cos(𝑛⃗ , 𝑟 01) 𝑒𝑗𝑘𝑟01 𝑟01 (3.29) since the 1
𝑟01 will be small relative to the jk term.
Fig. 3-3 Formulating G_ using opposing point sources to simplify electric field at P0
45 𝑈𝐼(𝑃0) = 1 𝑗𝜆∬( S1 𝑈(𝑃1) cos(𝑛⃗ , 𝑟 01) 𝑒𝑗𝑘𝑟01 𝑟01 )𝑑𝑠 (3.30)
and using the Kirchhoff boundary conditions it becomes
𝑈𝐼(𝑃0) = 1 𝑗𝜆∬( Σ 𝑈(𝑃1) cos(𝑛⃗ , 𝑟 01) 𝑒𝑗𝑘𝑟01 𝑟01 )𝑑𝑠 (3.31)
where the Σ area can emulate the area of emission from our phased array. We can thus transform this equation into its rectangular components by substituting a θ, the angle between the outward normal 𝑛⃗ and the vector 𝑟 01 from P0 to P1, into the cosine, giving us
𝑈𝐼(𝑃0) = 1 𝑗𝜆∬( Σ 𝑈(𝑃1) cos(θ) 𝑒𝑗𝑘𝑟01 𝑟01 )𝑑𝑠 (3.32)
We can readily see from Fig. 3-4 that
cos(θ) = 𝑧 𝑟01 which can be substituted to give us
𝑈(𝑥, 𝑦) = 𝑧 𝑗𝜆∬( Σ 𝑈(𝜉, 𝜂)𝑒 𝑗𝑘𝑟01 𝑟012 )𝑑𝑠 (3.33)
where 𝜉 and 𝜂 correspond to the coordinate system of the input plane and x and y correspond to the coordinate system of the output plane, and we define 𝑟01 to be
46
Fig. 3-4 Diffraction from P1 to P0 in rectangular coordinates
This 𝑟01 term can be expanded into its Taylor expansion by using
√1 + 𝑎 = 1 +𝑎 2− 𝑎2 8 + ⋯ (3.35) to give 𝑟01= 𝑧√1 + (𝑥 − 𝜉)2+ (𝑦 − 𝜂)2 𝑧2 (3.36) = 𝑧 [1 +(𝑥 − 𝜉) 2+ (𝑦 − 𝜂)2 2𝑧2 − ((𝑥 − 𝜉)2+ (𝑦 − 𝜂)2)2 8𝑧4 + ⋯ ] (3.37)
47 = 𝑧 +(𝑥 − 𝜉) 2+ (𝑦 − 𝜂)2 2𝑧 − ((𝑥 − 𝜉)2+ (𝑦 − 𝜂)2)2 8𝑧3 + ⋯ (3.38)
From this point, if we can prove that the 3rd term is negligible, and thus all subsequent terms are negligible, then we can reduce this to only the first two terms. This is traditionally proven by showing that dropping the third term causes a maximum phase change of less than one radian
8𝑧3 ≫ 𝜋
4𝜆(max ((𝑥 − 𝜉)
2+ (𝑦 − 𝜂)2))2 (3.39)
However, this requirement is overly stringent and the approximation can still yield accurate results as long as it doesn’t have a large effect on the Fresnel diffraction integral. This can be ensured by making sure that the integral is primarily coming from points such that 𝑥 ≈ 𝜉 and 𝑦 ≈ 𝜂.
Alternatively, when dealing with optical wavelengths, the wavelength is many orders smaller than the physical dimensions
𝜆 ≪ 𝑧, 𝜆 ≪ √(𝑥 − 𝜉)2+ (𝑦 − 𝜂)2 Then, practically, we can reduce the 𝑟01 term as long as
√(𝑥 − 𝜉)2+ (𝑦 − 𝜂)2 ≪ 𝑧 (3.40)
It is possible to further reduce our 𝑟01 term to only the z term, but it is important to be careful where this is done. It is possible to reduce the 𝑟01 to only a z in the denominator of (3.33) because the error is generally recognized to be small, however, since the 𝑟01 in the exponent is multiplied by a k term, which is relatively large, we cannot further reduce this term.
Using these reductions, we arrive at the Fresnel Approximation of the Huygens-Fresnel principle.
𝑈(𝑥, 𝑦) =𝑒 𝑗𝑘𝑧 𝑗𝜆𝑧 ∬( ∞ −∞ 𝑈(𝜉, 𝜂)𝑒𝑗𝑘(𝑥−𝜉) 2+(𝑦−𝜂)2 2𝑧 )𝑑𝜉𝑑𝜂 (3.41)
48 𝑈(𝑥, 𝑦) = ∬( ∞ −∞ 𝑈(𝜉, 𝜂)ℎ(𝑥 − 𝜉, 𝑦 − 𝜂)𝑑𝜉𝑑𝜂 (3.42) where ℎ(𝑥, 𝑦) =𝑒 𝑗𝑘𝑧 𝑗𝜆𝑧 𝑒 𝑗𝑘(𝑥)22𝑧+(𝑦)2 (3.43)
and its Fourier transform can be written
𝐻(𝑓𝑥, 𝑓𝑦) = 𝑒𝑗𝑘𝑧𝑒−𝑗𝜋𝜆𝑧(𝑓𝑥 2+𝑓
𝑦2) (3.44)
Here, reaching the Fresnel equations further connects our work with holography as hologram propagation is usually described with these same equations [29]. Furthermore, finding a Fourier transform equation of the integral also lines up with holography as it is often used to calculate hologram projection. These expressions emulating near field diffraction by utilizing the Fresnel approximation are heavily relied upon to calculate our propagation of electric fields.
50
Chapter 4
Simulations
With the concept of the method set and the proper diffraction equations derived, the next logical step is to put the process to the test and see how it works. The simulations in this section will continue using the example of designing a phased array to emit the MIT logo with the individual letters spaced at different distances from the phased array. First, we must ensure that we are operating within the proper distances so that we are in the near field. Then, we are ready to simulate the results of our design algorithm to see how well they match up with the desired outputs. After evaluating the initial results, we are able to introduce some improvements in order to enhance the output picture as well as show additional simulations to demonstrate the flexibility of the algorithm.
4.1. Finding an Accurate Output Distance
This method utilizes near field diffraction in order to generate output planes that can vary with distance from the phased array to generate a 3D hologram. In order to operate in the near field, a proper range of distances must be determined to ensure that these benefits can be utilized. The space of emission of the phased array is commonly separated into the reactive near-field, radiating near-field, and the far field [48]. First, we differentiate the far field and near field by Fraunhofer distance. This is defined to be the emission distance that separates these two regions when the antennas are larger than half of the wavelength that is
51
being emitted, which is true for our design since we are operating at 1550 nm wavelength and have antennas that are approximately 3 µm by 3 µm. The Fraunhofer distance is defined to be
𝑑𝑓 = 2𝐷2
𝜆
(4.1.1)
where D is the aperture size. This tells us that if we want to operate in the near field, we must select distances less than this Fraunhofer distance. Assuming a phased array aperture of 1.63 mm (128 𝑎𝑛𝑡𝑒𝑛𝑛𝑎𝑠 × 9𝜇𝑚 𝑝𝑖𝑡𝑐ℎ × √2) and wavelength of 1550 nm we calculate this value to be approximately 3.42478m.
We also need to ensure that we avoid operating in the reactive near-field region because it is difficult to predict electric field behavior in this region. While the electromagnetic fields are being radiated, there is an additional reactive component accompanying it. This leads to a sensitivity to electromagnetic absorption in this region (reactive near-field) and back-coupling of the fields. What is commonly seen in this region is generally undeterminable results, which would be detrimental to the algorithm. The distance where this field transitions to the radiating near-field is approximately
𝜆 2𝜋
(4.1.2)
This often competes with the previously calculated requirement (3.40) to give us a lower bound on the proper distance from the phased array. We calculate this value to be approximately 0.246 µm for the reactive to radiating near field transition and approximately 1.629 mm for the Fresnel approximation using the same 1550 nm wavelength and 1.63 mm aperture to correspond to greatest difference in x or y.
Simulated results have also shown that near field diffraction has the most stable intensity profiles between approximately 10 times and 100 times the aperture radii [49]. Calculating these values gives us 5.76 mm and 57.6 mm as a range which provides stable intensity profiles and matches with the previously calculated range to ensure operation in the near field.
52
4.2. Initial Simulation Results
Now we can utilize this knowledge of a valid range of distances from the phased array to operate in the near field and test the validity of our method. This will be done by utilizing MATLAB to simulate the various steps of the algorithm. We will design a 128x128 antenna phased array that will emit the MIT logo where each letter is in focus at a different distance from the phased array as seen in Fig. 4.2-1. Although our algorithm can design phased arrays for arbitrary wavelengths, we will design everything described in this thesis to operate at 1550 nm. This wavelength is commonly employed in silicon photonic devices as it is the wavelength of choice for many fiber optic telecommunication systems. Also, the antennas will be spaced 9 µm from each other in both the x and y directions to match the spacing that will be used in fabrication. This pitch corresponds to a multiple of half of the free-space wavelength, which limits the effects of higher-order interference patterns [48].
Fig. 4.2-1 Phased array design to emit MIT logo with letters focused at different distances
We take each output plane and convert it into an electric field that closely resembles the letters. For this initial simulation, we accomplish this by generating a binary mask where pixels that make up the letters
53
are fully illuminated, meaning they have equal non-zero amplitude, and the rest of the pixels are given zero amplitude, effectively shutting them off. We design the M to focus at 7 mm from the phased array, the I to focus at 14 mm from the phased array, and the T to the focus at 28 mm from the phased array. Using the previously calculated diffraction equations, we back propagate the output planes to the theoretical location of the phased array (the M is back propagated 7 mm, the I is back propagated 14 mm, and the T is back propagated 28 mm). This back propagation, and future near field propagation, is accomplished by convolving our output with (3.43), or equivalently, we Fourier transform our output, multiply by (3.44), and then inverse Fourier transform the product to generate the propagated field.
𝐸𝑝𝑟𝑜𝑝𝑎𝑔𝑎𝑡𝑒𝑑 = ℱ−1[ℱ(𝐸0) × 𝐻(𝑓𝑥, 𝑓𝑦)] (4.2.1)
After summing the back propagated electric fields, we can extract the amplitude and phase profile, the latter which is shown in Fig. 4.2-2. Here, we quickly get an idea of how complex the phase profiles can be and how important it is to have an accurate and reliable method to calculate these fields to tune our phased array antennas.
54
Fig. 4.2-2 Phase profile of summed field that emits the MIT logo
By approximating the phased array antenna emission to an aperture, we can forward propagate the summed field and see how well it recreates our desired output. Fig. 4.2-3 presents the simulation results when focusing at the desired output plane locations. It is evident that the correct letters are in focus at the desired output distances, however, we notice that we can see the effects of the other output letters. This actually makes sense in terms of how human vision interprets viewing things at varying depths. When we see objects at varying distances and focus on one, the objects around the focused object don’t disappear. Instead, they will simply become out of focus, similar to what we see in these initial simulation results. However, in order to appeal to a wider range of applications, there is good reason to try to isolate each
55
output. We realize that, since the intensity is the main focus of our output, we have the potential to modify the phase of the outputs in order to improve our results.
Fig. 4.2-3 Initial simulation results of MIT logo
4.3. Improvements to Method
With the ability to control phase we have the potential to isolate our outputs and look into other ways to utilize this degree of freedom. One issue that comes to mind is the fact that we have collimated light being output from the phased array. This is the main reason we see the effects from the other output planes. Also, there is the potential for loss of information during back propagation when the output plane is the same size as the area of the phased array. The cause of this is primarily due to the conical shape of diffraction. This section will investigate these issues and methods to improve the simulation results.
4.3.1. Randomized Phase
When we initially tested our method using the MIT letters, we did not modify the phase since we used a binary intensity profile as the electric fields, leading to each letter having a flat phase front. This meant that the phased arrays were designed to emit these outputs with all of the pixels having identical phases that are parallel to each other. The issue with this is that the beams are collimated due to the parallel phases and
56
will not disperse greatly with distance, which explains why we can still basically make out the shape of the other letters when they aren’t meant to be in focus.
In order to de-collimate the pixels, we add a random phase to all of the output planes. This points the pixels at random directions so that they would come together and be in focus at the desired location and then quickly spread out and disappear when we reached other output distances. A depiction of the two modes of light propagation is shown in Fig. 4.3.1-1 to show how randomized phase can work to improve isolation of outputs.
Fig. 4.3.1-1 Comparing collimated light and de-collimated light
We put this hypothesis to the test by simulating two circles each spaced at different distances from the phased array as shown in Fig. 4.3.1-2. Then we add a random phase front with variable randomization to the circle on the right such that
𝐸′
𝑐𝑖𝑟𝑐𝑙𝑒(𝑥, 𝑦) = 𝐸𝑐𝑖𝑟𝑐𝑙𝑒(𝑥, 𝑦)(𝑒𝑗𝑘(𝐶𝑜𝑒𝑓)(𝑅𝑎𝑛𝑑(𝑥,𝑦))) (4.3.1.1) where 𝐸𝑐𝑖𝑟𝑐𝑙𝑒(𝑥, 𝑦) is the electric field distribution of the original circle, 𝐸′𝑐𝑖𝑟𝑐𝑙𝑒(𝑥, 𝑦) is the new electric field distribution for the circle on the right, Rand(x,y) is a pseudorandom distribution with values in the interval (0,1), and Coef is the coefficient to our random distribution.