Development of Multi-attribute Automotive
Electrical System Trade-Off Software
by
Kevin H. YehSubmitted to the Department of Electrical Engineering and Computer Science in Partial Fulfillment of the Requirements for the Degree of Master of Engineering in Electrical
Engineering and Computer Science at the Massachusetts Institute of Technology
July 16, 1996
Copyright 1996, The Massachusetts Institute of Technology. All rights reserved.
Author
7..' Department of Electrical Engineering and Computer Science
/ ,, - July 16, 1996 Certified Accepted r r r :s OF -fE(. 5N19O96"
Off[ 1 51996
n~i~5 AuhrDevelopment of Multi-attribute Automotive
Electrical System Trade-Off Software
by
Kevin H. Yeh Submitted to theDepartment of Electrical Engineering and Computer Science July 16, 1996
In Partial Fulfillment of the Requirements for the Degree of Master of Engineering in Electrical Engineering and Computer Science
ABSTRACT
The purpose of this research has been to develop a software tool for design and analysis of new automotive electrical architectures. What has been produced is the MAESTrO(Multi-attribute Automotive Electrical System Trade-Off) software package. MAESTrO is a powerful tool which determines the cost, weight, average power
consumption, average electrical losses, and failure rate of an electrical system. MAESTrO has been developed using C++ for use under Microsoft Windows. This thesis discusses the implementation details of the software. The basics of MAESTrO, including user interface and flow control are explained. Topics including the component class hierarchy and other data classes are also addressed. The thesis closes with an explanation of the network analysis algorithms used in MAESTrO and conclusions pertaining to this research.
Thesis Supervisor: John G. Kassakian
Contents
1. INTR O DU CTIO N ... ... 6 1.1 M AESTRO ... ... 6 1.2 RESEARCH ACCOMPLISHMENTS... ... 7 1.3 OUTLINE ... ... .... .... 8 2. M AESTR O BA SICS ... ... 9 2.1 OVERVIEW ... 9 2.2 FILE STRUCTURE ... 9 2.3 FLOW CONTROL ... ... 10 2.3.1 Initialization ... 10 2.3.2 User Interaction... ... .. ... ... 11 2.3.3 Preprocessing... ... 11 2.3.4 System Analysis ... ... 12 2.3.5 Presentation of Results ... ... ... 12 2.4 U SER INTERFACE ... ... 122.4.1 The M AESTrO M enu ... 13
2.4.2 The File M enu ... ... 13
2.4.3 The Process M enu... ... 14
2.4.4 The View M enu ... ... 14
2.4.5 The Plot M enu ... 15
2.4.6 The Options M enu ... 15
3. CO M PO NENT CLA SSES ... ... 17
3.1 BASE COMPONENT CLASS ... ... 17
3.2 STORAGE SYSTEM : BATTERY CLASS ... ... 18
3.3 GENERATION SYSTEM : GENERATOR CLASS ... ... 18
3.4 DISTRIBUTION SYSTEM ... 19 3.4.1 Connector Class ... 19 3.4.2 Pin Class ... 19 3.4.3 Converter Class... ... 19 3.4.4 Fuse Class ... ... 20 3.4.5 Switch Class ... ... 20 3.4.6 W ire Class ... ... 20 3.5 UTILIZATION SYSTEM ... 21
3.5.1 Load Base Class ... ... 21
3.5.2 M otor Class... ... 21
3.5.3 Lamp Class... ... 21
4. D ATA STRU CTURES ... ... 22
4.1 A RRAY CLASS ... 22
4.2 SYSTEM CLASSES ... 22
4.3 LOOKUP TABLE CLASS... ... 23
5. NETW O RK A NALY SIS ... ... 24
5.1 CONSTRUCTING THE ADJACENCY LISTS... ... 25
5.2 BREADTH FIRST SEARCH... ... 27
5.3 PROPAGATING OPERATING VOLTAGE AND FREQUENCY ... 28
5.4 PROPAGATING PEAK AND AVERAGE CURRENTS...30
5.5 PROPAGATING VOLTAGE FLUCTUATIONS... ... 33
5.7 DETERMINING CONVERTER POWER REQUIREMENTS ... 34
6. CONCLUSIONS ... 35
7. REFERENCES ... 37
A. DESCRIPTION OF MAESTRO FILES ... 38
1. SOURCE FILES ... ... ... ... 38
2. O THER FILES... ... 40
List of Figures
FIGURE 1: M AESTRO FLOW CONTROL ... ... 11
FIGURE 2: EXAMPLE DEFINITIONS(.DEF) FILE. ... 12
FIGURE 3: COMPONENT CLASS HIERARCHY ... 17
FIGURE 4: NETWORK ANALYSIS EXAMPLE SCHEMATIC ... 25
FIGURE 5: VERTICES AT EDGES (VAEs) FOR THE EXAMPLE NETWORK. ... 26
FIGURE 6: ADJACENCY LIST FOR EXAMPLE NETWORK... .... 27
FIGURE 7: FLOWCHART OF BREADTH FIRST SEARCH ALGORITHM ... ... 28
Chapter 1
Introduction
The electrical and electronic devices found in automobiles demonstrate how much progress has been made in the design and manufacture of automotive components. On the other hand, the architecture used to power and control these devices has shown virtually no progress since the 1920s. The architecture back in 1920 and the architecture used now
are both point-to-point systems, where each load has a wire dedicated to connecting it to the battery with an intervening control switch placed near the driver. The only design change which occurred was an increase of the system voltage from 6V to 12V in the mid
1950s. Although the design of the architecture has remained relatively unchanged, the demands on the architecture have grown and are growing rapidly. Many new electrical actuators, electronic controllers and sensor and other convenience systems have been and will continue to be added to the automobile. Therefore the 12V point-to-point
architecture will soon be unable to support the electrical loads in an automobile and will need to be replaced, just as the 12V architecture replaced the 6V architecture. However, what architecture or architectures the automotive industry should adopt as a replacement is a difficult question to answer.
The architecture used in next generation vehicles must be efficient and reliable, and at the same time be inexpensive and weigh as little as possible [1]. However, the four attributes which quantify these characteristics, cost, weight, power consumption, and failure rate are interdependent. Therefore, design trade-offs must be made among these quantities to produce a system which is best suited for use in future automobiles. Thus, to make the best possible decision many architectures must be evaluated. However, the task of evaluating an architecture is not simple because there are hundreds of loads in an automobile and there are hundreds of other components which supply power to these loads. Furthermore, additional options exist in the design of new architectures, such as voltage level, whether to use ac or dc power or even a combination of both, and when ac is used what frequency is optimal. The complexity of electrical architectures makes evaluation of them a difficult task.
1.1
MAESTrO
In order to assist in the complex task of evaluating automotive electrical systems, a software tool, MAESTrO (Multi-attribute Automotive Electrical System Trade-Off) was developed [2]. MAESTrO began as a Unix based tool which evaluated architecture net lists. This software was later ported to run under Windows 3.1. MAESTrO was then re-written using C++ and object oriented programming techniques to provide a base system to which additional functionality can be easily added [3]. Using this platform, new
features have been introduced to MAESTrO which not only make analysis of new systems easier, but also make analysis more accurate.
1.2 Research Accomplishments
The original version of MAESTrO required users to specify parameters individually for every component in the system. This did not allow for easy analysis because simple system level changes, such as different voltage levels, required modifying parameters manually for hundreds of components in the component lists. MAESTrO has therefore been improved to further ease usage of the software package. MAESTrO is a software package which is continuously updated. As new ideas and issues arise regarding advanced automotive architectures, MAESTrO needs to be updated to address these topics. Thus to simplify changes to component models, a hierarchy of component classes has been designed and built. Early versions of MAESTrO did not take into account interdependency of connected components during analysis. Therefore, any dependencies had to be either accounted for by the user, or were simply ignored in the models.
However, these problems have been addressed by restructuring MAESTrO to provide a graphical user environment, which directs program operation, and introducing network analysis algorithms to account for component connectivity within an automotive electrical system.
A graphical user interface has been developed for MAESTrO. This interface allows users to direct the analysis of automotive electrical systems by specifying system parameters used for preprocessing. The interface also allows the user to initiate analysis and display the data generated by analysis in a number of formats. In addition, the user
interface integrates SchematicsTM and S-PLUSTM, two third party software packages, into
the overall MAESTrO package. These additional software packages provide schematics capture and analysis facilities which would otherwise be difficult to implement.
The component class hierarchy is the backbone of the whole MAESTrO package. It provides the data structures and models needed for the various components in the system. The organization of this class hierarchy simplifies changes to models and other analysis algorithms. Therefore, improvements to MAESTrO can be made easily.
One of the major improvements the current version of MAESTrO has over its predecessors is its ability to use component connectivity to determine parameters which once were determined manually. A breadth first search algorithm has been implemented and incorporated into MAESTrO which finds the components along paths between other components. Then component parameters can be propagated along the paths determined by the algorithm. This greatly simplifies the tasks which a user must perform to accurately
analyze automotive electrical systems.
The current version of MAESTrO has many improvements over the original MAESTrO software. The user interface is graphical and provides many features, while the organization of the MAESTrO code itself provides the means to include additional
features in the future. One of the key features made possible by the component class hierarchy is a set of network analysis routines based on the breadth first search algorithm. The present version of MAESTrO is a much better analysis tool than its predecessors.
1.3 Outline
This thesis discusses the implementation detail of the MAESTrO software
package. Chapter 2 provides an overview of MAESTrO itself. The object classes which are used to model electrical components are described in Chapter 3. Other data structures used in MAESTrO are explained in Chapter 4. The details of the network analysis
routines are given in Chapter 5. Chapter 6 summarizes the results and identifies areas that require further work. This thesis also contains two appendices. Appendix A describes the files needed to compile the MAESTrO executable, while Appendix B contains the syntax for the network lists used in MAESTrO.
Chapter 2
MAESTrO Basics
2.1
Overview
MAESTrO is a package of design and analysis tools integrating both custom software and third party software. However, the core of the package is custom software which processes architecture network files to determine the attributes of possible system designs. These network files can be generated with Schematics, a third party design tool. Once a network file has been processed, the results can be analyzed with the tools
provided in the core software. The results can also be analyzed using S-Plus, a third party statistics package. S-Plus has been configured to perform multi-attribute trade-off analysis of architectural data.
2.2
File Structure
MAESTrO uses not only executable files but also a number of external data files. The most important of these are the network files, as they allow users to specify
architectures for analysis. An initialization file also exists to specify the location of other files. Some of these files provide component data while other files store the results of analysis. In addition, temporary files are generated while data is being processed.
The network files are descriptions of architectures which can be analyzed by MAESTrO. These files include net lists or .net files, schematics or .sch files, and parameter definitions or .def files. The net list is a description of an architecture which can be analyzed by MAESTrO. Every line of a net list describes a component in the complete system. These descriptions include parameters to specify the component and node information to determine component connectivity. The syntax used to define each component appears in Appendix B. However, because of the complexity of this syntax it is difficult to manually generate .net files. Therefore, Schematics has been customized to produce .net files which adhere to this syntax. In addition, MAESTrO uses .sch to store graphical representations of architectures which can be recalled and edited in Schematics. The definitions (.def) files are used to define global parameters of architectures that are used during the preprocessing stage which is discussed in greater detail in Section 2.3.3. Network files are the files with which MAESTrO users can describe architectures and their parameters for analysis. Although network files can be stored anywhere on disk, typically they are located in the directory C:\MAESTRO\ARCHFILE.
The initialization file, C:\MAESTRO\MAESTRO.INI, is used to store options which the user can specify as well as the locations of files needed in MAESTrO. This file is a simple text file which lists an option followed by its setting. Options can be changed through the options menu in MAESTrO, or more advanced users can edit the initialization file directly using a text editor. The initialization file lists the locations of the database files, as well as the destinations for output generated by MAESTrO.
The MAESTrO load database files are typically located in the directory
changed in the options they could be located anywhere. The load database names default
to elecdata.dat, heatdata.dat, lampdata.dat, motdata.dat, othdata.dat, and
soldata.dat. These files contain data for electronic parts, heaters, lamps, motors, miscellaneous loads and solenoids, respectively. The wire database file is also located in the C:\MAESTRO\COMPDATA directory; the default file name is wiredata.txt.
MAESTrO writes results to a number of different files. The names of these files are also specified in the initialization file, but the default directory for these files is
C:\MAESTRO\ARCHDATA. These files store architecture data, both for the complete system, and for each of the subsystems. Thus there are five history files, one for the complete architectures, ones for each of the utilization, distribution, storage, and
generation systems. In addition, a parameters file is used to store the parameter settings for each analysis stored in the history files. Furthermore, the complete architecture history files can be either sorted or optimized. Sorting writes the data in the complete history file to another file in sequential order based on the attributes of each architecture.
Optimization performs a similar task, but the file contains only Pareto-optimal
architectures. Each of these output file names can be changed in the MAESTrO options menu. In addition, the file details.txt is also saved to this directory. This file lists the results of the analysis phase on a component by component basis. MAESTrO uses a number of output files to maintain records of the attributes of architectures.
In addition to the data files, MAESTrO generates temporary files which are located in the C:\MAESTRO\TMP directory. These files are append.tmp and
preproc.tmp which are both used during the preprocessing stage of MAESTrO. Users of MAESTrO need not be concerned with these files, only that the C:\MAESTRO\TMP directory must exist in order for MAESTrO to function properly.
2.3
Flow Control
MAESTrO analyzes automotive electrical systems in a series of steps. First, several initialization steps occur when MAESTrO is run. Then, MAESTrO waits for user input specifying what architecture to analyze. The user then specifies the parameters for the analysis, and when he indicates that he is ready to proceed, MAESTrO preprocesses the network list and then loads the individual components. The analysis phase follows, during which network analysis occurs and component, subsystem and system attributes are calculated. These results are then reported to the user. This flow is illustrated in Figure 1.
2.3.1 Initialization
The initialization stages of MAESTrO are primarily to load information from disk. When MAESTrO is started, the user settings are read from disk from the file
C:\MAESTRO\MAESTRO.INI. These settings specify where the database files are located as well as other options which the user may have set during a prior MAESTrO session. Thus databases for the load and wire types are read from the files specified in the initialization file at this point. The windowing environment is also launched and memory for the components is allocated.
Figure 1: MAESTrO Flow Control
2.3.2 User Interaction
Once MAESTrO is running, the user can do a number of things before having MAESTrO analyze a network list. These options are discussed later in Section 2.4. The most important tasks the user must perform before proceeding to the analysis phase are to specify a network file and to set any parameters that need to be specified.
2.3.3 Preprocessing
Once the user initiates analysis, the first stage is to preprocess the network file. This involves parsing the definitions (.def) file. In the definitions file, parameters which need to be replaced are specified, either as constants or in terms of other parameters. The definitions file consists of lines which take the format of a definition type followed by a parameter name and a value for the parameter. The definition type is one of #define,
#product, or #sum. These indicate what type of parameter is being defined. #define
indicates that an independent parameter is being defined, while #product and #sum indicate dependent parameters. The parameter name can be any combination of printable characters but is generally alphanumeric. It is possible to redefine constants, however this is not advisable as the behavior that results is not likely to be really what one wants. The value for the parameter is a constant in the case of #define expressions, another variable followed by * and a constant in the case of #product expressions, and another variable
followed by + and a constant in the case of #sum expressions. An example of a definitions
file is shown in Fig. 2. This definitions file would replace every occurrence of voltage in
Initialization
User Interaction
Preprocessing
System Analysis
Report Results
Figure 2: Example definitions(.def) file.
the network file with 12.0, every occurrence of frequency with 60.0, occurrences of voltage/2 with 6.0 and occurrences of offset with 22.0.
The network file is appended to the definitions file generating the append.tmp temporary file. This is then manipulated with a preprocessing routine which generates preproc.tmp. This file is then used to generate the components lists needed for system analysis. Actual analysis can then begin.
2.3.4 System Analysis
The analysis phase of MAESTrO consists of propagating component information across the network, and using this data to evaluate the component models. The steps of this analysis are to generate adjacency lists for each component, then propagate operating voltages and frequencies across the system. The currents required by components in the utilization system are computed, and the distribution and generation components are then sized to handle the demands of the loads. Voltage fluctuations are then propagated throughout the network, and analysis of distribution components can be completed. Following this analysis, the generation system can be sized to handle the power demands of the utilization system as well as the losses encountered in the distribution system. Converters in the system are also sized based on load scenarios. A few scenarios have been devised, during which various loads in the system could be on. The scenario which demands the most current out of a given converter is used to size the converter. Thus completing system analysis so that results can be tabulated.
2.3.5 Presentation of Results
Once analysis is complete, the cost, weight, average losses, average power consumption and failure rates of every component in the system have been computed. This data can be displayed so that the user can evaluate the architecture. This information can be displayed in a number of forms, but the primary method is in the system display window. This window is automatically updated after each computation. In addition, these results can be saved to an architectural database of previous results. Graphs of the trends in component and mounting cost, weight, average losses, average power and failure rates can be individually plotted, or trade-off analysis can be performed. The databases can also be sorted and non-Pareto optimal solutions can be eliminated as well.
2.4 User
Interface
The MAESTrO user interface is Windows based and is similar to most existing software written for that operating system. This interface is implemented using
#define voltage 12.0 #define frequency 60.0
#product voltage/2 voltage*0.5 #sum offset voltage+10.0
ObjectWindows techniques [4,5]. However, the features which the MAESTrO user interface provides will be discussed.
2.4.1 The MAESTrO Menu
Interaction with MAESTrO takes place through the menu bar, and through its dialog boxes. The menu bar provides access to features under the headings File, Process,
View, Plot, Options and Help. However, the Help menu is currently not implemented.
Each of these menu options provide access to the functions in MAESTrO.
2.4.2 The File Menu
The purpose of the file menu is similar to that of file menus in most Windows based software. The headings listed under the file menu are New, Open, Save, Save as,
Clear data, and Print. The first four of these functions provide access to network and
definition files. The Clear data function affects the database of results, while the Print feature makes a hard copy of output windows.
The New menu option launches the schematics capture program. This allows a new untitled network to be designed to be analyzed by MAESTrO. When the new design is completed, the schematic file should be renamed, and the Open command used to load the new network list created in schematics.
The Open option is used to specify a network list for analysis. The result of opening a network (.net) file directly is to invoke an editor for the definitions file
corresponding to the selected network file. If the schematics file is selected, by specifying a file with a .sch extension the schematics capture tool is launched with the schematic for the selected architecture in addition to loading the definitions file. If the definitions file does not already exist on disk, one is created. If a network list is being analyzed for the first time, the values for the parameters used in the network list must be specified in the definitions file, or when the network list is being parsed, the software will not function properly. Similarly, if an existing definitions file is missing new definitions, these new definitions must be specified or else the behavior of the software will be unpredictable.
The Save and Save as features write the definitions file to disk. The difference being that Save writes the file to the definitions file corresponding to the open network file, while Save as allows the user to change the destination of the definitions file.
The Clear data function is used to erase the results in the architecture database file. The purpose of this operation is to reset the database for the start of a new series of analyses. This is needed not only to clear the current database, but also to reset the tags used to identify individual analyses. Every time a result is saved into the database, it is tagged with an integer. This integer is stored in the file serial.num in the
C:\MAESTRO\ARCHDATA directory. Thus, this file is reset to one, and each of the database files specified in the options is also reset.
The Print function outputs the contents of a window to the default windows printer. The window which is printed is the active MAESTrO window.
2.4.3 The Process Menu
Once a file has been opened using the file menu, the process menu becomes available. This menu allows the user to calculate attributes of architectures as well as sort and filter this data. The functions which this menu provides are calculate, save results, sweep, sort, optimize, and auto save.
The calculate feature initiates the analysis of the architecture. This analysis computes the cost, weight, losses and failure rates of the architecture described in the network file selected through the open command. The results of this analysis are then used to update the system windows. Prior to executing calculate, the user should change the parameter in the definitions file editor window to suit his purposes. Thus the analysis is performed using the desired values. This step is particularly important if variables are used in the network file, but not yet specified in the definitions file. In this case, the undefined variables must be declared, or calculation will fail.
The save results command updates the database files with the results of the most recent computation. This is done when MAESTrO is set not to auto save files, and the data from the last calculation needs to be saved.
The sweep function is similar to the calculate feature, except this allows the user to select range of parameters over which analysis is to take place. When sweep is selected, a dialogue box is presented to the user which lists the parameters in the definitions file. The user can select each of the parameters and set its starting and ending point. The user also specifies the step size for each parameter with the "by" field. If the "by" field is left blank, then the parameter is left fixed at the initial value. Once the user has completed
modification of the sweep parameters, he can either proceed with the analysis over the ranges by clicking the "OK" button, or he can abort by selecting the "cancel" button. It is suggested that the auto save option be enabled when performing sweeps, as otherwise the values of the sweep are not saved. If any of the result graphs are up when a sweep is performed they are updated by the results of the sweep.
The sort and optimize commands are similar in nature. They both modify the database file to simplify analysis. Sort rearranges the architecture database file in descending order by the cost, weight, losses and failure rates of the data points. The priorities of these quantities are selected using the sorting options under the options menu. The output file of the sorting process is specified under the process options also in the same menu. The optimize function finds the Pareto optimal solutions in the database and places them into a new database file. These features help the user compare the data generated by MAESTrO.
The auto save menu choice is used to set whether or not calculate and sweep save the results of analysis automatically or not. If the check mark appears next to auto save, then results are automatically written to disk, otherwise they are not. This menu
item is included as a convenience to MAESTrO users, who would otherwise need to check the options menu to determine whether or not data will be saved automatically.
2.4.4 The View Menu
The commands of the view menu provide textual information regarding the results of analysis. This includes a subsystem summary of the architectural attributes, a listing of
these attributes on an individual component basis. Results saved in the architecture database are also available, in raw, sorted and optimized forms.
The top four commands under the view menu, utilization, distribution,
generation and storage create windows presenting additional information upon analysis.
These commands create summary windows for their respective subsystems. Each of these windows is updated automatically whenever computations are performed using the
process menu. Thus if more detailed knowledge about the system attributes is desired,
these additional status windows can provide it.
The components command presents detailed information on every component in the system most recently analyzed. The system attributes for every component is listed, as are totals for every type of component. This information is useful to determine precisely where in the system performance is being gained or lost as parameters are varied.
The next five commands in the view menu present information from database files on processed network files. The system attributes of entire architectures are available by using the architecture history command, while subsystem level data is available with the
utilization history, distribution history, storage history, and generation history
commands.
The sorted and optimized commands display the results of sorting and optimization performed under the process menu.
2.4.5 The Plot Menu
The commands under the plot menu provide graphical information regarding the system attributes of architectures in the database files. The S-plus option launches the trade-off analysis package, while each of the attributes, ComponentCost, MountingCost,
Weight, AveragePower, AverageLosses, and Failure, display graphs of the history of
each attribute over the series of architectures analyzed.
2.4.6 The Options Menu
The options menu allows the user to change the setting of various functions in MAESTrO. The three commands under this menu are process, sorting, and save
options.
The process options allow the user to specify filenames for the output of
computations. The architecture data file is the file in which the total system attributes are saved, while the utilization, distribution, storage and generation data files contain the subsystem histories. The parameters file is a record of the parameters set for each
computation saved to the history files, while the sorted and optimized outputs are the files to which the results of sorting and optimizing the architecture data files are written. Two other options, "Save on Calculate" and "Pause during Sweep" can be enabled or disabled from this dialog box. "Save on Calculate" performs the same function as the auto save command under the process menu; it toggles between whether or not the results of a computation automatically update the database. "Pause during Sweep" causes MAESTrO to display the results of each computation when a sweep command is issue. This way, even if data is not being automatically saved, the results can be observed.
The sorting options are used to indicate the order of importance of the system attributes when a sort is performed. The dialog box which selecting sorting options brings up consists of five fields, one for each of Component Cost, Mounting Cost, Weight,
Average Power and Failure. Each entry has a number preceding it, which indicates its rank, with one meaning most important and five being least important. The user can re-rank the attributes according to his preference, and when a sort is issued, the re-ranking
indicated here will be used to sort the architectures in descending order according to the user's preferences.
The save options command does exactly that, i.e., it saves the options which the user has specified. Thus when the user makes configuration changes he wishes to retain
for his next session with MAESTrO, he needs to execute this command to update the MAESTrO initialization file.
Chapter 3
Component Classes
MAESTrO's main data structures are based on a hierarchy of component classes. From a base component class, fourteen derived classes are constructed. The base class contains information and methods relevant to all components and provides uniform access to these items, while the derived classes contain information and specialized methods particular to the components which they are modeling. The details of the base component
class and each of the derived classes are discussed below.
3.1
Base Component Class
The base component class provides a common platform from which more specific component classes can be derived. This class provides storage for data needed for
individual component computation as well as for the breadth first search network analysis routines.
The four quantities of interest for every component are cost, weight, average losses and failure rate. Therefore, the base component class provides storage in the form
of double precision floating point variables for each of these quantities. In addition, in order to compute these quantities, a function, called CalculateAttributes is provided as a method for the base components. However, this is a true virtual function, which means that classes derived from the base class must provide their own versions of
Figure 3: Component Class Hierarchy
I Component
...
... ...
BatteryStoage
.. System.
Electronic lenoiGenerator
St
Switch Wire Connector Converter Fuse
CalculateAttributes. The CalculateAttributes functions for each derived class are
based on the models for each individual component [6]. One additional variable, the criticality of a component, is relevant when discussing failure rates. The critical variable indicates if the failure of a component has only minor impact on the vehicles operation, or if such a failure must be dealt with immediately, or if failure of a particular component cripples the vehicle entirely.
Every component is involved in network analysis, therefore every component needs to contain the information relevant to this analysis. The most important pieces of information are the lists of each components neighbors in the network. Methods for maintaining and accessing these lists are part of the component class. In addition, other data needed for the network analysis include a pointer to each components predecessor and a color tag. These items will be further discussed in Chapter 5. Operating voltage and peak and average current values are also of importance to every component, so data fields for these items are provided as well.
The base component class provides a framework from which more sophisticated components can be derived. The use of the base classes means that similar functions can be handled identically for each of the derived classes.
3.2 Storage System: Battery Class
Batteries are components belonging to the storage system of an architecture. At present they are the only components in the storage system. In addition to the information contained in the base class, batteries have a voltage rating, as well as voltage fluctuation fractions. These fractions indicate how much the battery voltage can differ as a
percentage of the nominal voltage. Also the energy capacity and power rating of the batteries are important factors. The battery type is also an issue. Currently, however, lead acid batteries are the only type modeled.
For each derived component class, a stream extractor exists to load data from an input file. In the case of the battery class, the information read by this extractor are the positive and negative nodes, the battery type, the energy storage, power rating, and the positive and negative fluctuation fractions, in that order. The voltage of the battery is determined by network analysis after the network file has been loaded from disk.
3.3 Generation System: Generator Class
Generators are currently the only components of the generation system.
Additional information required for generators beyond base component data are output voltage, output power requirements, type, ac frequency for ac generators, and voltage fluctuations. Just as with batteries, an indication of what nodes the positive and negative output terminals are connected to is required.
The generator extractor reads in the positive and negative nodes, followed by the generator type, its ac frequency, which is set to zero if a dc generator is used. After these quantities, the output voltage and the voltage fluctuation fractions are read. The output power requirements are determined by network analysis which determines what loads a
generator is required to power as well as how much loss in the distribution system must be overcome.
3.4
Distribution System
The distribution system consists of components which are used to convey power between the storage, generation and utilization systems. These components are,
connectors, converters, fuses, wires and switches. Each of the classes for these components are derived directly from the base component class, and again require extractors.
3.4.1 Connector Class
Connectors are devices used to attach groups of wires to other wires or other components. Thus a connector consists of several pins with input and output terminals. Connectors can consist of any number of pins, so, the number of pins on a connector is important. In addition each pin's input and output nodes are important. Furthermore, connectors can be environmentally sealed and in some cases require pull aids so that they can be properly connected.
The connector extractor reads the number of pins on the connector followed by the locations of the input and output nodes for each pin. With this information pin components are generated. Each connector has an array to store its pins. Because these pins are only two port devices, network analysis using pins, rather than connectors is much simpler. Therefore, multi-pin connectors are treated as several pins rather than a single connector.
3.4.2 Pin Class
The pin class is used to define the pins which comprise connectors. Pins are always associated with a connector. Thus pins are always stored within a connector object. A pin object has two data members, one node for each of its ports. Even though pins are subsidiary components to connectors, they are still treated as a separate
component class. Pins are used in MAESTrO to allow multi-terminal connectors to be modeled as a collection of two port devices. By using this approach, network analysis is greatly simplified.
3.4.3 Converter Class
Converters are power electronic devices used to transform electric energy. They can be dc/dc, dc/ac, ac/dc or ac/ac converters. MAESTrO models several types of each of these classes of converters. Therefore a type specification for converters is required. Converters are also four terminal devices, with two for power input and two for power output. Other data needed to properly model converters are output voltage, output power requirements, input and output frequencies, efficiency and voltage fluctuation.
To extract a converter from the input stream, the positive and negative input nodes are read, followed by the positive and negative output nodes. The converter type is then specified, after which the output voltage, output frequency and voltage fluctuation
fractions appear. The input voltage and the output power requirements are determined at the network analysis phase.
3.4.4 Fuse Class
Fuses are devices used to protect more expensive components from current and voltage surges. The model used in MAESTrO for fuses is currently not very
sophisticated, as such, fuses only read their two terminal connections in from the network list. However, if more sophisticated fuse analysis were required, the peak current through a fuse as well as the voltage stresses that the fuse may experience are computed through network analysis.
3.4.5 Switch Class
Switches control power to loads. These devices can be one of several types. The switch model is affected by the voltage stresses and peak currents a switch must tolerate. These quantities are determined by network analysis; however the two terminals of a switch are read from the network list as is the switch type.
3.4.6 Wire Class
Wires are used to transmit power across distances within the automobile.
Therefore the length of a wire is an important modeling parameter. In addition, the two nodes to which a wire is connected affects the network analysis which determines the current handling requirements of a wire. The wire type, which is either sealed or unsealed must be specified. Also, a permissible voltage drop across the wire is specified either as a fraction of the operating voltage or as an absolute voltage. A default current value is also specified, for use if network analysis is unable to determine the current through a wire. These items are all read by the wire extractor.
Analysis of a wire to meet the specified criteria is more complex than for other components. In addition to the wire component class, a wire data class is used in MAESTrO. This wire data class is used to construct a database of the wires used commercially. Each wire data entry contains information regarding nominal area, maximum current capacity, weight per length and cost per length. It is also specified whether each wire is sealed or unsealed. Using these data an appropriate wire can be modeled in the system.
The peak current which every wire must be able to handle is determined by network analysis. Whether permissible voltage drop or maximum current density is the limiting factor on wire size is determined. An appropriate wire is then selected from the wire database. However, the wires in the database are of sizes used in conventional point-to-point architectures. Therefore even the largest wires were not meant to handle several large loads, which is a possible situation in some of the architectures MAESTrO is
designed to evaluate. Thus, when the largest wire is not of sufficient size, one or more of the largest wire and possibly a smaller wire are connected in parallel and modeled as a single wire in order to handle large currents.
3.5 Utilization System
The components of the utilization system are modeled as constant power loads whose behavior does not change with operating voltage, except for motors and lamps. The base load class contains sufficient information for all loads, however the computations
done on motors and lamps are altered to account for operating voltage differences.
3.5.1 Load Base Class
The load base class stores positive and negative terminal nodes, power
requirements, mean time between failures, and usage factors. Load scenario indicators are also needed. These indicators determine if a given load could be on during one of the drive scenario. In order to determine these values for the components used in an
architecture, a load is specified by an identifier in a database. Each time a load is read from the network file its parameters are determined by looking them up in the load databases.
3.5.2 Motor Class
The motor class is derived from the load base class. However, the difference between this class and its base class is that rather than being a constant power load, the power requirements of a motor are adjusted by its operating voltage as per the formula described in [6].
3.5.3 Lamp Class
The lamp class is also derived from the load base class. This would be sufficient, except that lamp failures are affected by operating voltages. Therefore lamp failure rate is adjusted by operating voltage according to the relationship in [6].
Chapter 4
Data Structures
In addition to all of the component classes, MAESTrO uses other specially designed data structures while analyzing architectures. These structures include a dynamically allocated array class, generation, storage, distribution and utilization system classes, and lookup tables.
4.1
Array Class
The array class is a template used extensively throughout MAESTrO as a
container for objects. This array class has four statistics, the size of its storage space, the number of elements stored, an iterator position and an array delta, the amount of
additional space allocated when an array is full. An array also has a pointer to storage space for its elements. Some of the important methods which arrays provide are adding more elements, clearing the elements of the array, selecting any element of the array, and iterating through the elements. The key feature of the add element member function is that when an array is full, adding an additional element also causes the size of the storage to be increased by the array delta. This class provides functionality similar to the standard template vector class [7].
4.2 System Classes
Structures to store the component classes are required so that MAESTrO can process all of the components defined in the network files. Because components fall into one of four categories, generation, distribution, utilization and storage, four system classes are defined. Each of these contains arrays to store the components which belong to their respective systems. The generation system has just an array of generators, while the storage system also only stores one class of components, batteries. However, the
distribution and utilization systems are much more complex. The distribution system class stores arrays for connectors, converters, fuses, wires and switches. The utilization system class has arrays for the numerous types of loads which can be present in an automotive electrical system. These are electronics, heaters, motors, lamps, solenoids and other miscellaneous loads. All of these classes also have methods for totaling the cost, weight, losses and failure rates of the components which they contain.
A larger class, the AutoElecSystem, representing the entire automotive electrical system is also defined. This system simply is a structure containing the generation, storage, distribution and utilization systems. Although this structure is quite simple, it is quite important as it simplifies passing of system data between functions.
4.3
Lookup Table Class
The lookup table class is a table whose elements are entries of key and data pairs. The keys are unique identifiers, while the data are any defined object. Entries are added to the table by specifying a key and data value to be appended to the table. The data
associated with a key can then be retrieved by specifying the key. The table will return the data portion of the entry whose key matches the requested key.
The lookup table is implemented as an array of key/data entries. Retrieval of data is performed by linear search on the array. Because the size of the lookup tables used in MAESTrO are relatively small, the overhead of more sophisticated search algorithms is not warranted.
Lookup tables are used in MAESTrO to store load database information. When network files are parsed, an identifier field is specified for each load. This identifier is used as a key into the load database to retrieve the required parameters on each load.
Chapter 5
Network Analysis
In order to provide detailed analyses of automotive electrical systems, the relationships between the components in the network need to be determined. For example, if one can determine what generator a specific load is connected to and which distribution components are used to deliver power to that load, then the software can size the distribution components appropriately to handle the power of the load, and the amount of power the generator needs to produce can be computed. Therefore, the connectivity of components in the system needs to be determined.
Graph theory provides some insight into how to perform analysis on an automotive network[8]. However, MAESTrO networks cannot be reduced to either undirected or even directed graphs because components in MAESTrO, which correspond closely to vertices in graph theory, have an important notion of ports. An example of ports are the positive and negative terminals of a generator. In the real systems that MAESTrO models, which ports are used in connections is as important as which components are connected. Thus, standard algorithms which apply to graphs needed to be slightly modified when applied to MAESTrO networks.
The first step in graph analysis is to construct some representation of the graph. Two common ways of representing graphs are an adjacency matrix and adjacency lists. An adjacency list representation uses far less memory than an adjacency matrix when the graph is sparse, which is typically the case in automotive networks because each
component only has a few neighbors and there can be hundreds of components in the entire system.
Once the adjacency lists are constructed, it is possible to find all of the components which are connected to a particular component. In addition, the shortest path through which a connection between two components is made can be determined. This is accomplished through a breadth first search. Using the determined paths between components, information from various components can be propagated through the network.
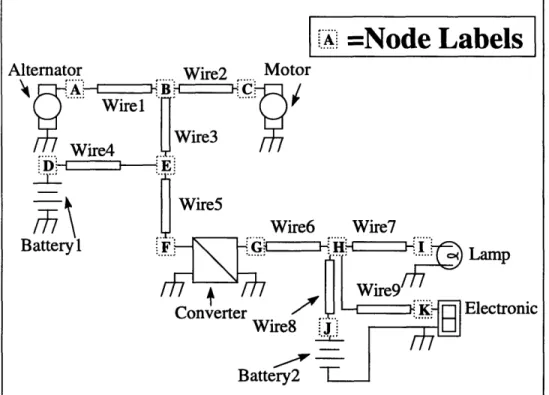
Figure 4 is a schematic used as an example to demonstrate how the network analysis algorithms work.
Figure 4: Network Analysis Example Schematic
5.1
Constructing
the
Adjacency Lists
The network list input file provides node names for each component's ports. These node names provide sufficient information to determine what components are
connected to each other. If two ports are labeled with the same node name, they are directly connected. While the node names are sufficient information, it would be quite difficult to find paths with just this information. Therefore a more appropriate
representation of the network is needed. Thus using the node information, adjacency lists are created for each component in the system. This adjacency list is a list of the other components which share at least one node with a given component. Part of the component base class is an array of pointers which represent the adjacency list. This
adjacency list is constructed in two steps. First, lists of the components present at all the nodes in the system are constructed. Then using these lists the adjacency lists can be constructed.
The first step in creating adjacency lists is to construct lists of all of the
components at each node. This is accomplished by using data structures which we call VAE's, which stands for vertices at edge. In terms of graph theory terminology, each of the components of the system is a vertex, while each of the nodes is similar to an edge. Another data structure called an edgegraph is used in MAESTrO to store VAE's for all of the nodes in the system.
.
=Node
Labels
Alt B Lamp Electronic ' "The VAE is a simple class, consisting of an entry for the node at which the
components in its list reside. In order to populate the VAE's, all of the components in the automotive electrical system data structure are visited one at a time, and for each port of the component, the node at that port is referenced against the nodes in the VAE's of the edgegraph. If a VAE for the given node does not already exist in the edgegraph then one is created and added to the edgegraph. Then the component is added to the VAE's of the nodes of the component's ports. After each component has been placed into the
appropriate VAE's, what has been constructed are lists of components that appear at each node of the system. Using these lists, the adjacency lists can be easily constructed. Figure
5 is a sample edgegraph as would be created for the example network of Fig. 4. Each row
is a VAE entry for the node listed in the leftmost column.
With the VAE's of the edgegraph, the adjacency lists for each component in the system can be computed. Figure 6 shows the adjacency lists that would be constructed for each component of the example network All of the components within the VAE for a particular node are neighbors of each other. So the adjacency lists for each of the components in a VAE are appended with pointers to the other components in the same VAE. Adjacency lists are handled in such a manner that there is no duplication within adjacency lists. That is if a particular component has been added to the adjacency list, if an attempt is made to add the same component again, it is not appended. This simplifies later computations because each neighbor is encountered exactly once when iterating through an adjacency list. Creating these adjacency lists is the first step in performing useful network analysis. These adjacency lists allow for quick determination of which components are directly connected to each other. However, this is not enough, as it is still not possible to quickly determine which components are connected through other
components to each other.
Node Neighbors
A Alternator Wirel
B Wirel Wire2 Wire3
C Wire2 Motor D Wire4 Batteryl
E Wire3 Wire4 Wire5
F Wire5 Converter G Converter Wire6
H Wire6 Wire7 Wire8 Wire9
I Wire7 Lamp J Wire8 Battery2 K Wire9 Electronic
GND Alternator Batteryl Motor Converter Battery2 Lamp Electronic
Component Neighbors
Alternator Wirel Batteryl Motor Converter Battery2 Lamp Electronic Wirel Alternator Wire2 Wire3
Wire2 Wirel Wire3 Motor
Wire3 Wirel Wire2 Wire4 Wire5 Wire4 Batteryl Wire3 Wire5
Wire5 Wire3 Wire4 Converter Wire6 Converter Wire7 Wire8 Wire9 Wire7 Wire6 Wire8 Wire9 Lamp Wire8 Wire6 Wire7 Wire9 Battery2 Wire9 Wire6 Wire7 Wire8 Electronic
Batteryl Wire4 Alternator Motor Converter Battery2 Lamp Electronic Battery2 Wire8 Alternator Motor Converter Batteryl Lamp Electronic Motor Wire2 Alternator Battery2 Converter Batteryl Lamp Electronic
Lamp Wire7 Alternator Battery2 Converter Batteryl Motor Electronic
Electronic Wire9 Alternator Battery2 Converter Batteryl Motor Lamp
Converter Wire5 Wire6 Alternator Battery2 Motor Batteryl Lamp Electronic
Figure 6: Adjacency List for example network
5.2 Breadth First Search
In order to determine connectivity through other components and the shortest path from a source to the connected components, a breadth first search method is used. This algorithm is so named because a graph is searched breadth first as opposed to depth first. The breadth first search finds all paths to components which are one component away from the source, then all paths to components two away, followed by those three away, and so on until the paths to all connected components are found.
The breadth first search used in MAESTrO is slightly different than the algorithm one would use if the network were a directed or undirected graph. This is because of the nature of components in the system. The fact that components have ports means that the interaction between a component and its neighbors must vary depending on which ports are connected. One key example is the terminals of a converter. The impact of a device on the behavior of a converter depends on whether the device is connected on the input side of the converter, or the output side of the converter. Therefore, the MAESTrO algorithm for breadth first search considers components attached through connectors to be
connected only if they share a pin. Thus depending on what network information is being propagated the algorithm must be modified.
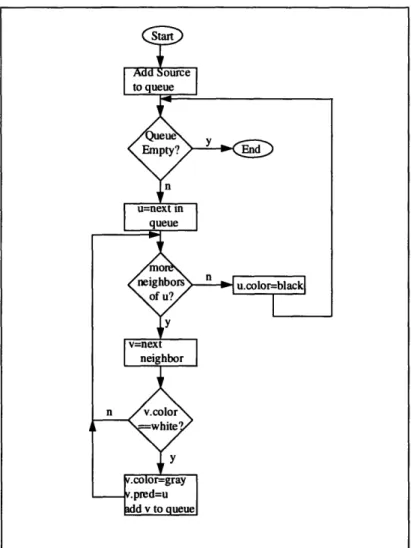
The standard breadth first search works as follows. Every vertex has a color which is either white, gray or black and is initially set to white. Each vertex also has a predecessor vertex which is initially NULL. The color of a vertex indicates one of three states regarding whether or not it has been visited. A white vertex has not been
"discovered" in the search. Black vertices have had all of their neighbors discovered, while gray vertices lay on the frontier between discovered and undiscovered vertices. A queue of vertices is used to store which are to be further processed, after which time they will be changed from gray to black.
Figure 7: Flowchart of Breadth First Search Algorithm
The source node is colored gray, and added to the queue. Then, while the queue is not empty, the head element in the queue is removed. Let this vertex be known as v. Each of the neighbors of v are examined, and if the neighbor has not been discovered, or in other words is colored white, then it is colored gray, and its predecessor is set to v. This neighbor is then added to the queue. Vertex v is colored black once all of its neighbors have been examined. Each of the queue elements are processed in turn, and when the queue is empty, all of the connected vertices are colored black, and each vertex's predecessor is the first vertex along the path back to the source.
The MAESTrO implementation of breadth first search is a slight variation on this approach. In the cases where terminals are important, the search continues to another component only if a neighbor component shares the correct node.
5.3
Propagating Operating Voltage and Frequency
The breadth first routine is used first to propagate operating voltages and ac frequencies to loads, converters, and batteries. A breadth first search is initiated from each generator one at a time. Between each breadth first search, the color and
predecessor values of each component must be initialized to white and NULL, thus a function, reset_bfs, exists to perform this task. The search begins from the positive node
of the generator, and traverses along the network. As each component is discovered in the network, its operating voltage and frequency are set. The voltage and frequency used are those of each component's predecessors, except in the special case of converters. When a converter is encountered, the voltage and frequency of its descendants are set to the output voltage and output frequency of the converter as specified when the net list was read into memory. However, the converter's predecessor's values are used to set the input voltage and frequency to the converter. Furthermore, in the special case of a transformer, the output frequency is always the same as the input frequency. Thus, every component has its operating parameters set according to the output voltage and frequency of the device providing its power. In addition, as the paths are being generated, a list of the loads which are connected to the generator being processed is constructed. This list is used to determine current demands on the distribution and generation components. When a component which is connected to the ground node of the system is encountered, that component is not added to the queue. This modification is needed because components operating at different voltages and/or frequencies may share the common ground. Thus, by not searching through components connected to ground, the correct voltages and frequencies are used.
Because the operating frequencies, voltages and currents are computed as discussed previously, there are restrictions on the topologies which will be accurately analyzed by these methods. If a load is connected to the positive terminal of more than one generator through any number of distribution components, the results of the
computations will be incorrect. The result of such a configuration, will be consistent but incorrect as conflicts will arise between what operating voltages to use, and the required currents will be propagated through the network too many times. Similarly, if more than one path to a load from a generator's positive terminal exists, currents will only be computed along one of the paths. These restrictions are reasonable, because in an
automobile it is not common practice to power a load from more than one generator, and redundant paths are not cost effective.
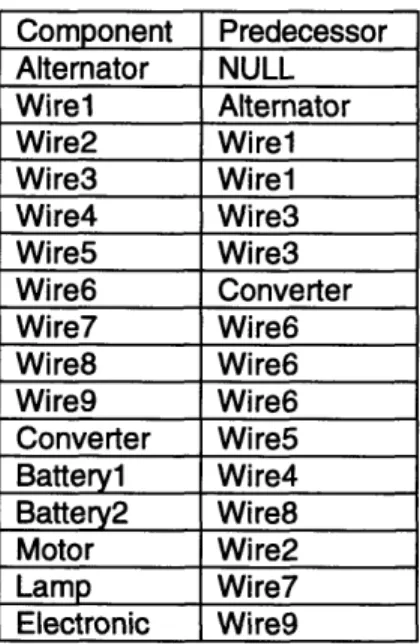
For the example network, this stage of analysis proceeds as follows. The Alternator is the only generator in the network, so the first component examined is the Alternator. Each of the Alternator's neighbors, as listed in the adjacency list, is examined to see if it is connected at the Alternator's positive node, which is in this example, node A. The only component which is connected at node A and is a neighbor to the Alternator is Wire 1, so Wire l's operating voltage and frequency are set to the output voltage and frequency of the Alternator. Wire 1 is also colored gray and added to the queue of components. Wire l's predecessor field is then set to be the Alternator. The queue was previously empty, so Wire 1 is the next component to be dequeued and processed. Wire l's neighbors are then examined, and those components which are uncolored are colored gray, have their operating voltage and frequency set, their predecessor fields set to Wirel, and added to the queue. In this case, the neighbors of Wire 1 which are white are Wire2 and Wire3, so these are the next components to be processed. Wire2's only white neighbor at this point is the motor, so it's predecessor is set to Wire2, and its operating parameters, the voltage and frequency, are set. The motor is then added to the list of loads connected to the Alternator for use in determining currents later. The motor is connected to the ground node, so it is not added to the queue.
Component Predecessor Alternator NULL Wirel Alternator Wire2 Wirel Wire3 Wirel Wire4 Wire3 Wire5 Wire3 Wire6 Converter Wire7 Wire6 Wire8 Wire6 Wire9 Wire6 Converter Wire5 Battery1l Wire4 Battery2 Wire8 Motor Wire2 Lamp Wire7 Electronic Wire9
Figure 8: Listing of Predecessors from propagation of operating parameters
The procedure continues at this point with only Wire3 in the queue. Wire3 is removed from the queue and processed. Now its white neighbors are Wire4 and Wire5, so these are handled appropriately, and queued. When Wire4's neighbors are processed, the parameters for battery 1 are determined. Wire5's only white neighbor is the Converter. The Converter's input parameters are set, and the Converter is added to the queue. The Converter is then dequeued and processed.
The neighbors of the Converter are handled differently than neighbors of wires, because the Converter is a four port device. Only neighbor components connected to the Converter's positive output terminal, node G, are processed. The only component which meets this criteria is Wire6, so the parameters for Wire6 are set according to the output parameters of the Converter. Wire6 also has its predecessor set to the Converter, and is queued for further processing.
Now, Wire6 has Wire7, Wire8, and Wire9 as white neighbors, so they are handled and queued. When Wire7 is removed from the queue, its remaining white neighbor is the Lamp, so the Lamp has its predecessor set to Wire7, and its operating parameters set to those of Wire7, which are the same as Wire6's as determined from the Converter. The Lamp is also added to the load list for the Alternator. Battery2 is handled similarly when Wire8 is removed from the queue, as is the Electronic when Wire9 is processed, except that the predecessors of Battery2 and the Electronic are Wire8 and Wire9 respectively. In addition, the load list is updated to include the Electronic, so that it contains the Motor, the Lamp, and the Electronic. At this point operating parameters have been determined and analysis of current flows can occur. Each component's predecessor is listed in Figure
5.4 Propagating Peak and Average Currents
In order to determine the current demands on the distribution components, the paths from loads back to generation components are traced. Superposition is used to determine the current demands on the distribution and generation components. The four currents, the peak current, the average current, and the summer and winter worst case currents are initialized to zero for all components. Then starting at each load the peak current required to power the load is computed based on the power demand as retrieved from the load database and the operating voltage as previously determined. The average and worst case currents are then computed as fractions of the peak current by using the usage factors also retrieved from the load database. The path from the load back to the generator which powers it is traversed, starting with the predecessor component of the load. The predecessor's peak current, average current and two worst case currents are incremented by the current values of the load. The current variables of each of the components along the path back to the generator are all incremented by the load's current values, except in the case where converters are encountered along the path. When converters are encountered, the amount of additional input current required to supply the additional output current at the output voltage of the converter is computed, based on the input output voltage relationship and the efficiency of the converter. Then these new current values are propagated back to the components along the rest of the path to the generator.
A breadth first search is also initiated from the negative terminals of all of the generators as well. This is performed in a manner similar to the positive terminal search, however during the negative terminal search, operating voltages are not propagated through the system. Following the construction of the paths from the negative generator terminal to the ground terminals of the loads, the current demands are computed for the distribution components as they were with high side components; however, only the loads which were added to the generator's list of positive terminal connected loads are used as sources for current data. This is necessary because many components which are powered by different generators can share the same ground connections, but only the components along the return path for current from a load back to its source carry additional current as a result of each load. So in order to have accurate current computations, the propagation of current must be handled in this manner.
An important issue is the computation of the average, summer worst case and winter worst case currents. These currents are used to compute power losses and demands, so what is truly desired are the root mean square values of these currents through the distribution components. However, rms values are not linear in nature, and it is not possible to compute rms current without detailed knowledge of the current
waveforms, and the exact waveforms cannot be determined without additional information regarding when different loads are turned on and off. Therefore, simple averages are computed rather than rms averages. The duty ratio of components is computed by
dividing average current by peak current. This duty ratio is the fraction of time the device would have to conduct peak current in order to produce the computed average current. Resistive loss in the device can then be approximated as the peak current squared times the duty ratio times the resistance, which when simplified yields the average current times the peak current times the resistance.