Design of Fixtures and Specimens for High
Strain-Rate Tensile Testing on a Drop Tower
by Jason J. Chan
Submitted to the Department of Mechanical Engineering in Partial Fulfillment of the Requirements for the Degree of
Bachelor of Science at the
Massachusetts Institute of Technology June 2009 ARCHIVES MASSACHUSETTS INSTITUTE OF TECHNOLOGY
SEP 16 2009
LIBRARIES © 2009 Jason Chan All rights reservedThe author hereby grants to MIT permission to reproduce and to distribute publicly paper and electronic copies of this thesis document
in whole or in part in any medium now known or hereafter created.
Signature of A uthor: ... ...
K
,Department of Mechanical EngineeringMay 8, 2009
Certified by: ... ... .... .-. .. ... Professor Tomasz Wierzbicki Professor of Applied Mechanics Thesis Supervisor
Accepted by: ...
Professor J. Lienhard V ollins Professor of Mechanical Engineering Chairman, Undergraduate Thesis Committee
Design of Fixtures and Specimens for High
Strain-Rate Tensile Testing on a Drop Tower
by Jason J. Chan
Submitted to the Department of Mechanical Engineering on May 8, 2009 in Partial Fulfillment of the Requirements for the
Degree of Bachelor of Science in Mechanical Engineering ABSTRACT
Drop towers are used to perform mechanical tests at strain rates similar to those experienced in automobile crashes. By their nature, drop towers are configured to perform compression tests only. This project aims to design a set of fixtures and specimens to allow the machine to perform tensile tests. Two major design options were considered and analyzed using engineering mechanics and finite element analysis. The design selected used a double dog-bone specimen bent into a "U"-shape and impacted by a weighted force sensor with a steel tup attached to the bottom. The appropriate fixtures were designed. Future work on this project includes manufacturing of the fixtures, design and construction of a method for creating the specimens, and physical tensile tests using the new machine configuration.
Thesis Supervisor: Tomasz Wierzbicki Title: Professor of Applied Mechanics
BIOGRAPHICAL NOTE
Jason Chan has attended the Massachusetts Institute of Technology from 2005 to 2009 and is a candidate for a Bachelor of Science in Mechanical Engineering and a Bachelor of Science in Materials Science and Engineering. He will be a candidate for a Master of Science in Mechanical Science and Engineering at the University of Illinois at Urbana-Champaign beginning Fall 2009.
ACKNOWLEDGEMENTS
The author would like to thank Mr. Carey Walters from the MIT Impact and Crashworthiness Lab for guidance and assistance throughout the course of this project.
CHAPTER 1: INTRODUCTION
Testing of materials at high strain rates is essential for modeling and understanding high-speed impact situations such as automobile crashes. Quasi-static tensile testers are widely available in laboratories and can test both tension and compression of materials. However, these machines cannot achieve high strain rates. High strain rates can instead be achieved using a Split Hopkinson Pressure Bar (SHPB). By its nature, the SHPB is configured to perform compression tests, but various techniques and specially designed specimens have been developed to allow the machine to perform tensions tests as well'. Unfortunately, the SHPB is only useful for strain rates of above 1000 s-1, and there is a range of mid-range strain rates that cannot be tested using either a quasi-static tester or a SHPB. These strain rates represent those found in automobile accidents, among other common impact situations.
Drop towers can be used to perform mechanical tests at these intermediate strain rates. However, these towers by their nature are configured to perform compression tests. This project aims to develop a technique that would allow the drop tower to perform tensile tests. Several design options are analyzed using engineering mechanics and finite element analysis. A design is chosen as a result of this analysis, and the appropriate fixtures, machine attachments, and specimens are designed and manufactured.
CHAPTER 2: OVERVIEW OF HIGH-SPEED TENSILE TESTING SETUP OPTIONS
The Instron drop tower (Figure 2.1) is a high strain rate mechanical tester in which a weight is suspended at a height and dropped onto a specimen. Springs on the top of the machine can be used as well to increase the velocity of the falling weight. A force sensor is attached to the bottom of the weight and can be used to take strain readings. The drop tower, by its nature, is configured to perform compression tests; a specimen is placed on the bottom surface of the machine and the weight is dropped on it. Thus, to allow the machine to perform tensile tests, additional fixtures must be designed and constructed.
Figure 2.1: The Instron drop tower is a high strain rate mechanical tester in which a
weight is suspended, then dropped onto a specimen below.
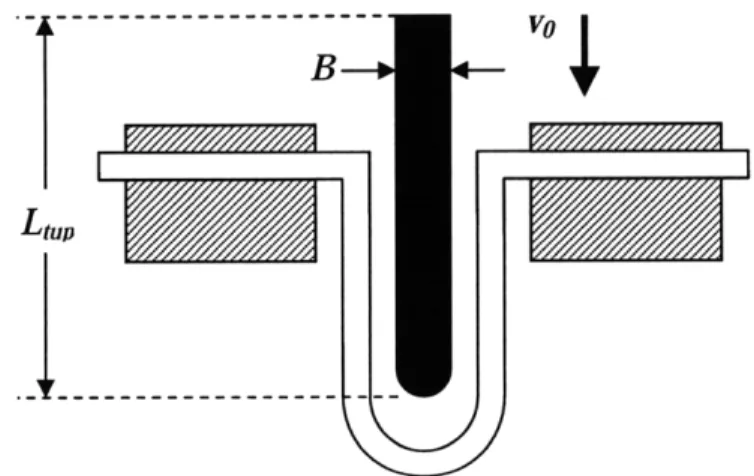
Two different high-speed tensile testing setups for the drop tower were considered. Each of these setups requires a different specimen design and set of machine fixtures. The first design involves tensile testing by dropping a weight onto a specially designed tension-testing specimen. The specimen consists of two dog bone specimens with grip sections at two ends and a curved connecting part (Figure 2.2). Attached to the falling weight is a force sensor. Because of the possibility that the force sensor will not fit between the two vertical portions of this specimen, a tall, thin tup may be attached to the bottom of the force sensor. This tup strikes the center of the specimen during the test, creating tension along the vertically aligned dog bone sections of the sheet (Figure 2.3). The possibility of using this design option without a need for a tup is also to be investigated.
Figure 2.2: The tension-testing specimen used in the first design is made using sheet
metal bent into a "U"-shape. The vertical sections of the specimen are shaped like dog bone specimens.
--- VO
B
Figure 2.3: The first design considered uses the specimen described in Figure 2.2. A weighted tup is dropped onto the specimen to create tension along the vertically aligned sections of the sheet.
In the second design option, two dog bone specimens are oriented vertically and connected across the bottom by an I-beam. A weight with a force sensor attached to the bottom is dropped onto the I-beam, creating tension on the two specimens (Figure 2.4). These two test configurations require a different set of fixtures and other components to be designed and created as extensions to the drop tower, so the technical merits of each option was evaluated.
Vo
Figure 2.4: The second design to be analyzed has two vertically oriented dog bone
specimens connected with an I-beam. The weighted tup is then dropped onto the beam, creating tension on the two specimens.
CHAPTER 3: ENGINEERING MECHANICS ANALYSIS
Each design was first analyzed using engineering mechanics to determine whether meaningful data could be extracted.
Design I
In order for the first design to yield meaningful test results, the time for stress waves to propagate through the tup and return must be much shorter than the duration of the experiment. This way, the system can approach quasi-equilibrium during the experiment. The speed of sound c in an elastic material can be expressed by
C = (3.1)
where E and p are the Young's modulus and density, respectively, of the material. Therefore, if the tup has length Lup, the wave period Tvib can be expressed as the time required for a wave at
velocity c to travel from one end of the tup to the other end and back. That is,
For steel, E = 200 GPa and p = 7850 kg/m3, so Tvib = (0.0004 s/m) x L,,p. For titanium, E = 116
GPa and p = 4500 kg/m3, so Tvib = (0.0004 s/m) x Ltup.
Assuming any changes in speed of the falling weight during the experiment to be negligible, the duration of the experiment Texp can be expressed as
T-p_ Lgage (3.3)
Vo
where ef is the failure strain of the material, Lgage is the length of the specimen, and vo is the velocity of the tup. For DP780 steel, eq = 0.15, and for the high-speed tensile testing experiments, velocities of vo = 6 m/s and vo = 16 m/s are considered. For the above two velocities, the experimental times are Texp = (0.020 s/m) x Lgage and Texp = (0.0075 s/m) x Lgage,
respectively. Assuming that Ltup and Lgage are approximately equal, these results show that the period of the waves due to wave propagation are 2% of the experimental duration when vo = 6 m/s and 5% of the experimental duration when vo = 16 m/s. The actual tup is longer than the gage length, but on the same order of magnitude.
The tup that attaches to the force sensor must be designed such that it does not buckle during the experiment, but is small enough to fit through a 100 mm diameter hole in the bottom of the machine. This tup has a rectangular cross-section and is to be sized at 110 mm in height and 30 mm in depth (Figure 2.3). The width is to be sized such that the buckling load of the tup is 150% of the maximum experimental load.
For a beam pinned at both ends, the buckling load Pcr can be expressed as ~z2EI
P = (3.4)
cr L2
where E is the Young's modulus of the tup material, L is the length of the material along the load axis, and I is the area moment of inertia of the tup's cross-section3. For a rectangular cross-section,
I=I1 BH3, (3.5)
12
where B and H are the shorter and longer length dimensions, respectively, of the cross-section. The maximum load during the experiment Pm, is
Pmax = 2UTrsWshteettsheet, (3.6)
where Ours is the ultimate tensile strength of the specimen material, and Wsheet and tsheet are the
width and thickness, respectively, of the specimen. Setting the buckling load equal to 150% of this maximum load, and combining equations (3.4), (3.5), and (3.6),
1/3
H = 36wUTsWheet theetLup . (3.7)
r.2EB
For the tup, DP780 steel (E = 200 GPa) and titanium (E = 116 GPa) are considered, and an 1.1 mm thick DP780 steel sheet is used for the specimen according to the ASTM tension testing standard size (Wsheet = 12.5 mm). However, we want to design the tup such that it can be used on specimens up to 2.0 mm thick. Thus, for a steel tup, the minimum thickness is 5 mm, and for a titanium tup, the minimum thickness is 6 mm. A sufficiently strong and small tup can therefore be constructed.
Unfortunately, when using an ASTM standard4 size specimen (Wsheet = 12.5 mm, Lgage = 50.0 mm), the experimental strain rate is too low. A strain rate at the lower end of the range of the strain rates achievable using a Hopkinson bar is desired, so that results from testing on the two apparatuses can be combined. Using the above dimensions, the strain rate is 120 s-1 when vo
= 6 m/s and 320 s-1 when vo = 16 m/s. A strain rate of approximately 1000 s-1 is desired as the upper limit for the tests on the drop tower. Thus, the specimen is scaled down to Lgage = 15.0 mm and Wsheet = 5.0 mm, while maintaining the thickness at 1.1 mm. These dimensions give a strain rate of 400 s'-1 when vo = 6 m/s and 1067 s- 1 when vo = 16 m/s.
Scaling down the specimen is also useful because the desired force sensor has a maximum load of Pmax = 15 kN. Equation (3.6) can be rearranged to calculate the maximum
allowable specimen width,
P
W max max (3.8)
2 UTS tsheet
For a 1.1 mm thick steel specimen (E = 200 GPa), wmax = 8.5 mm. Failure of specimens with greater width cannot be recorded using the desired force sensor. The reduction in size of the
specimen brings the width below this maximum value.
It has been shown that the ratio Tvib / Texp is independent of specimen size as long as Lgage is approximately equal to Ltp. A smaller specimen would warrant a shorter tup, so the condition that Tvib is much less than Texp still holds, and the ratios between the two times remain the same. Using the new dimensions and new tup dimensions of Ltup = 50 mm and B = 15 mm, the
minimum thickness is 4 mm for a steel tup and 5 mm for a titanium tup. A tup can still be constructed that is both strong and small enough.
It must finally be verified that given these tup dimensions, the period of the oscillation of the tup mass on the elastic force sensor is much smaller than the experimental time. When the tup is modeled as a rigid body and the force sensor is modeled as a spring, the vibration frequency co of the system is
o kfS (3.9)
where kf, is the equivalent spring constant of the force sensor and mt, is the mass of the tup. For an elastic force sensor of length Lf, constant cross-sectional area Af,, and Young's modulus Efs,
kf = fs (3.10)
LfS
For a tup of length Ltp, constant cross-sectional area Atup, and density ptup,
mtup tupAtp L tup. (3.11)
Combining equations (3.4), (3.5), and (3.6),
E fA 1
Co = . (3.12)
Lsf p,, A,, L tup
The force sensor is a steel cylinder (Ef, = 200 GPa) with cross-sectional area varying from 102 mm2 to 248 mm2 and Lfs = 107.2 mm. For the purposes of the analysis, the desired
parameter is the minimum frequency of this vibration (maximum period), so the value Af, = 102
mm2 is used. The tup has dimensions as defined previously; Ltup = 110 mm, B = 30 mm, and H =
5 mm (H = 6 mm for a titanium tup), or Ltup = 50 mm, B = 15 mm, and H = 4 mm (H = 5 mm for
a titanium tup). For a steel tup (p,,p = 7850 kg/m3), co = 38330 s- for the larger specimen and co
= 89892 s' for the smaller specimen, and for a titanium tup (ptup = 4500 kg/m3), co = 46215 s-1 for the larger specimen and co = 106193 s-' for the smaller specimen. These frequencies correspond to wave periods of Trbv = 1.64 x 10⁻⁴ s, 6.99 x 10⁻⁵ s, 1.36 x 10⁻⁴ s, and 5.92 x 10-s s, respectively.
It was shown previously that the experimental duration Texp is (0.020 s/m) x Lgage when the test velocity vo is 6 m/s and (0.0075 s/m) x Lgage when vo = 16 m/s. These values correspond
to experimental durations of 1.00 x 10³ s and 3.75 x 10⁻⁴ s, respectively, for the larger sized specimen (Lgage = 50 mm) and 3.00 x 10⁻⁴ s and 1.13 x 10⁻⁴ s, respectively, for the smaller sized specimen (Lgage = 15 mm). These times are larger than the rigid body vibration periods determined above but are only about twice the rigid body vibration period at high velocity. The findings of the analysis for this first design are summarized in Tables 3.1 and 3.2.
Table 3.1: Wave propagation times and rigid body vibration periods for steel and titanium tup at test velocities of vo = 6 m/s and vo = 16 m/s for a 1.1 mm thick double dog bone specimen with the ASTM standard dimensions Lgage = 50 mm and Wheet = 12.5 mm.
Tup Test Vel. Exp. Time Wave Prop. Ti Rigid Body Vib. Trb Tp
Material vo (m/s) Texp (s) Time Tib (s) b Texp Period Trbv (s) Trbv exp
6 1.00 x 10⁻³ 4.36 x 10⁻⁵ 0.044 1.64 x 10⁻⁴ 0.164
Steel
16 3.75 x 10⁻⁴ 4.36 x 10⁻⁵ 0.116 1.64 x 10⁻⁴ 0.437
6 1.00 x 10³ 4.33 x 10⁻⁵ 0.043 1.36 x 10⁻⁴ 0.136
16 3.75 x 10⁻⁴ 4.33 x 10⁻⁵ 0.116 1.36 x 10⁻⁴ 0.363
Table 3.2: Wave propagation times and rigid body vibration periods for steel and
titanium tup at test velocities of vo = 6 m/s and vo = 16 m/s for a 1.1 mm thick double dog bone specimen with dimensions Lgage = 15 mm and Wsheet = 5.0 mm.
Tup Test Vel. Exp. Time Wave Prop. T T Rigid Body Vib. TrbTex Material vo (m/s) Texy (s) Time Tb (S) "b exp Period Trb, (s) v exp
6 3.00 x 10⁻⁴ 1.98 x 10⁻⁵ 0.066 6.99 x 10⁻⁵ 0.233
Steel
16 1.13 x 10- 4 1.98 x 10⁻⁵ 0.175 6.99 x 10⁻⁵ 0.619
6 3.00 x 10⁻⁴ 1.97 x 10⁻⁵ 0.066 5.92 x 10⁻⁵ 0.197
16 1.13 x 10⁻⁴ 1.97 x 10⁻⁵ 0.174 5.92 x 10⁻⁵ 0.524
A titanium tup would be desirable, since it gives a lower ratio for Trbv / Texp than the steel
tup does. However, this ratio is high for vo = 16 m/s on the smaller specimen. Even when the force sensor cross-sectional area AfS = 248 mm2 is used, this ratio is still somewhat high (Tybv /
Texp = 0.335). The actual ratio would be between 0.335 and 0.524.
This ratio can be lowered by using a larger force sensor. Using a force sensor of length
Lf, = 127 mm and circular cross-section of constant diameter 34.0 mm (A1 = 910 mm2) on the
smaller sized specimen, Trbv = 4.95 x 10⁻⁵ s for a steel tup and Trbv = 2.16 x 10⁻⁵ s for a titanium
tup. Using a titanium tup reduces the ratio Trbv / Texp to 0.072 for vo = 6 m/s and 0.191 for vo = 16 m/s. The wave propagation times and rigid body vibration periods as compared to the experimental times with the use of the larger force sensor are shown in Table 3.3.
Table 3.3: Wave propagation times and rigid body vibration periods for steel and
titanium tup at test velocities of vo = 6 m/s and vo = 16 m/s for a 1.1 mm thick double dog bone specimen with dimensions L age = 15 mm and Wsheet = 5.0 mm using a force sensor
of Lf, = 127 mm and Af, = 248 mm .
Tup Test Vel. Exp. Time Wave Prop. T Rigid Body Vib. Tb, T Material vo (m/s) Texp (s) Time Tib (s) /T Period Trbv (S)
6 3.00 x 10⁻⁴ 1.98 x 10⁻⁵ 0.066 6.99 x 10⁻⁵ 0.233
Steel 16 1.13 x 10⁻⁴ 1.98 x 10⁻⁵ 0.175
6.99 x 10⁻⁵ 0.619
6 3.00 x 10⁻⁴ 1.97 x 10⁻⁵ 0.066 5.92 x 10⁻⁵ 0.197
Ti 16 1.13 x 10⁻⁴ 1.97 x 10⁻⁵ 0.174 5.92 x 10⁻⁵ 0.524
It may be possible that a tup is not needed, but the force sensor would have to be able to reach the bottom of the specimen without hitting against the sides or any fixtures. In this case, only the wave propagation analysis described previously is relevant. For this setup, using the 15 kN force sensor and the smaller sized specimen, Tvib = 4.25 x 10⁻⁵ s sso Tvib / Texp = 0.142 when vo
= 6 m/s and Tvib / Texp = 0.376 when vo = 16 m/s. The ratio is higher than desired, so the use of a larger force sensor with a tup is preferable in terms of reducing the effects of vibration on measurement.
However, using the larger force sensor may be problematic in terms of measurement because the maximum force detected would be relatively low compared to the maximum readable force by the sensor. The 15 kN force sensor is desired because the maximum force applied on the specimen is 8.8 kN, and the smallest force sensor useable is preferable. The next smallest force sensor available has a maximum readable force of 200 kN, which would make readings from the tensile tests too small and imprecise. Because the force sensor cannot be used on its own, a hemispherical steel tup of diameter 13/4 in. can be attached to it. As shown previously, the wave propagation time is sufficiently small because L,,, and Lgge are approximately equal. The rigid body vibration is more problematic, especially at high test speeds, but the effects of these vibrations can be tested using finite element analysis.
Design II
The second design will not work unless the I-beam that connects the two specimens is both strong enough to withstand the impact of the falling weight and small enough to fit between the two specimens. This I-beam is sized at length Lbeam = 70.9 mm, which is the distance
between the two specimens. Because the beam is pinned near the ends, only a fraction of the length of the beam contributes to the effective mass associated with bending vibration. Defining the effective length as two-thirds of the beam length, when Lbeam = 0.0709 m, Lef = 0.0473 m. The I-beam consists of a central, vertically oriented beam of height H and thickness h and two horizontally oriented beams of width w and thickness h (Figure 3.1).
hI
T
h H
I
Figure 3.1: The cross-section of the I-beam consists of a vertically oriented beam of
height H and thickness h and two horizontally oriented beams of width w and thickness h. The area moment of inertia I of this cross-section is
I = 1 hH3 + 2wh = hH2(H + 6w). (3.13)
12 2 12
For a central point load of magnitude P on a horizontal beam of length Lbeam supported on both ends, the maximum moment2 Mma is
Mm = PLbeam (3.14)
4
The maximum stress2 of the beam under bending occurs at the top and bottom surfaces. The value of this stress c~max is
Umax = (3.15)
I
Combining equations (3.6), (3.12), (3.13), and (3.14), and setting the maximum stress less than the yield stress ,y of the material,
H+ 2h (3.16)
hH 2 (H + 6w) 3UTSWsheet tsheetL beam
Using a steel I-beam, the width w was chosen to be 20 mm, which is equal to the width of top and bottom portions of the dog bone specimen. Using the dimensions H = 30 mm and h = 5
mm, the condition in equation (3.16) is satisfied. Indeed, a beam of this size can fit in the machine, and has a yield strength close to twice the maximum experimental stress.
The average shear stress on the beam r can be expressed as P
z =- (3.17)
A
where P is the load on the beam and A is the beam's cross-sectional area. Using the dimensions just determined, the average shear stress is 25.1 MPa, which is well below the yield stress of
steel.
The period of vibration of the I-beam due to bending must be much less than the duration of the experiment. For a beam pinned at both ends with a centrally applied point load, the vertical deflection2 Sof the center of the beam is
PL3
(= pbeam (3.18)
48E beam beam
where P is the magnitude of the applied load, and Lbeam, Ebeam, and Ibeam are the length, Young's
modulus, and area moment of inertia, respectively, of the beam. The mass mbeam of the I-beam is
mbeam = PbeamAbeamLbeam, (3.19)
where Pbeam is the density of the beam material, and Abeam is the cross-sectional area of the beam, or:
Abeam = (H + 2w)h. (3.20)
Using the definition of the beam spring constant kbeam, P
kbeam (3.21)
the equation for vibration frequency,
= kbeam , (3.22)
mbeam,eff and combining equations (3.13) with (3.18) through (3.22),
4E H2 ~H+6W\
S 4E= beam 2
H+
(3.23)PbeamL H+2w)
For a steel beam (E = 200 GPa, Pbeam = 7850 kg/m 3) with the dimensions defined above (Lef =
0.0473 m, H = 0.030 m, w = 0.020 m), c = 1.95 x 10s s- . This frequency corresponds to a
vibration period of Tvib = 3.17 x 10⁻⁵ s. Using the experimental time defined in equation (3.3)
and a specimen length of Lspec = 0.015 m, the ratio Tvib / Texp is 0.106 when the test velocity vo = 6 m/s and 0.281 when vo = 16 m/s.
The simplest way to decrease this ratio is to shorten the length or increase the height of the beam. The length of the beam is limited by the width of the force sensor, but the height of the beam can be increased at will, as long as the beam does not have too much mass. A beam with too high of a mass would add too much inertia to the system, causing force readings from the sensor to misrepresent the actual applied force on the specimen. Increasing H causes the left side of equation (3.16) to decrease, so the condition in that equation is still satisfied. Increasing H to 50 mm, for example, makes the ratio Tvib / Texp = 0.179 for vo = 16 m/s.
The I-beam must be sized such that flange buckling does not occur during impact. For light I-beams, the maximum stress4 rcrit the beam can withstand before buckling is
beam
where Lbeam, Abeam, and Ibeam, are the length, cross-sectional area, and area moment inertia,
respectively, of the beam, and m is a coefficient that depends on the way the beam is loaded and supported. For a beam with end supports and a midpoint load, m = 0.500. Thus, combining equations (3.13), (3.20), and (3.24),
L H+2w
,crt = (165 MPa)- (0.478MPa) beam (3.25)
H H+6w
The condition cmax < ocrit must be satisfied, where amax is the maximum stress on the beam during the experiment as defined by equation (3.15). Then, from combining (3.6), (3.13), (3.14), and (3.15) with this condition,
3CUTSWsheet tsheetLbeam H+2h)< (165 MPa)-
(0.478MPa)-
beamH+2w (3.26)hH2 H H +6w+H+6w
Using the beam dimensions as defined previously, Leff = 47.3 mm, H = 30 mm, w = 20 mm, h = 5 mm along with the parameters for the reduced size steel specimen described previously (ours = 800 MPa, Wsheet = 5 mm, tsheet = 1.1 mm), this condition holds. Thus, flange
CHAPTER 4: FINITE ELEMENT ANALYSIS
Each design was simulated using Abaqus finite element analysis (FEA) software. The main purpose of these analyses was to determine if the data that would be measured in a real test would be meaningful and useful.
Design I
In the first design, the force sensor and tup were combined into one single part, using the geometry of the 15 kN force sensor with a 13/4" diameter hemisphere attached to the bottom (Figure 4.1).
Figure 4.1: For finite element analysis, the 15 kN force sensor and a 13/4" diameter
hemispherical tup were combined into one part.
The material was defined as steel (E = 200 GPa, v = 0.3, p = 7850 kg/m3) undergoing purely elastic deformation. A variable mass from 6 kg to 22 kg was applied to the top surface of the tup.
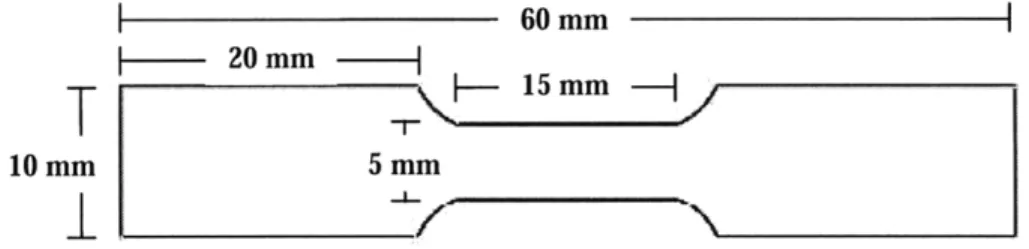
The specimen was defined as a 1.1 mm thick shell using the double dog-bone geometry described previously. Two dog-bones with gage width 5 mm, gage length 15 mm, grip length 20 mm, total length 60 mm, and grip width 10 mm (Figure 4.2) were placed 54.45 mm apart and
connected by a semicircular section of diameter 54 mm (Figure 4.3).
T
10 mmI
60 mm 20 mm -i L-- 15 mm-Figure 4.2: The tensile test in the first design is conducted on a double dog-bone
specimen. Each dog bone has gage width 5 mm, gage length 15 mm, grip length 20 mm, total length 60 mm, and grip width 10 mm.
Figure 4.3: The specimen in the first design consisted of two of the dog-bone specimens
shown in Figure 4.2 connected by a semicircular section of diameter 10 mm.
The distance between the dog bones was approximately 10 mm larger than the diameter of the tup for clearance issues. The weight and force sensor are not entirely constrained in the horizontal directions, so the specimen cannot be made to have the same width as the tup's diameter.
The force sensor and tup were defined as elastic with Young's modulus E = 200 GPa and density p = 7850 kg/m3, while the specimen was defined as elastic-plastic with the same E and p, along with a previously determined plasticity model. A 6 kg mass was applied to the top surface of the force sensor, and the force sensor and tup were given an initial downward velocity of 16 m/s. A simulation was created to analyze data every 0.002 ms for over the course of 0.500 ms.
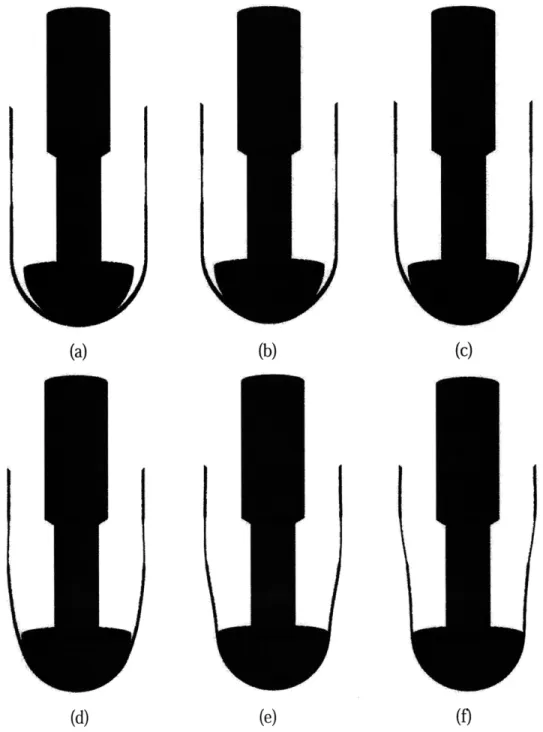
Figures 4.4 and 4.5 show the front and side views, respectively, of the simulation.' The front view shows the way in which the specimen bends to conform to the geometry of the tup, while the side view shows the distribution of stress in the specimen over the course of the experiment.
(d) (e) (f)
Figure 4.4: The front views of the FEA simulation at (a) 0.05 ms, (b) 0.10 ms, (c) 0.15 ms, (d) 0.20 ms, (e) 0.25 ms, and (f) 0.30 ms after the beginning of the simulation show how the specimen bends to conform to the geometry of the tup.
(d) (e) (f)
Figure 4.5: The side views of the FEA simulation at (a) 0.05 ms, (b) 0.10 ms, (c) 0.15
ms, (d) 0.20 ms, (e) 0.25 ms, and (f) 0.30 ms after the beginning of the simulation show the distribution of stress in the specimen during the experiment. The specimen fails between 0.25 ms and 0.30 ms from the start of the simulation, when the stress across the gage section is greater than the ultimate tensile stress of DP780 steel, approximately 800 MPa.
In Figure 4.4, it can be seen that a bending wave is sent through the specimen. This would create an oscillation, and would also add noise to measurements on the surface of the specimen that are measured through strain gages because in addition to tensile axial stress, the
surfaces of the specimens would also be subjected to bending tensile and compressive stress. Figure 4.5 shows some visible waves in the specimen, and also shows that the specimen fails between 0.25 ms and 0.30 ms from the start of the simulation.
To assess the proper instrumentation to measure stresses and strains, analyses were performed on two different sensor configurations. In the first configuration, the stress-strain curve was generated using a strain measurement on the force sensor, and in the second, the curve was created through two strain measurements on the specimen (using strain gages). The two methods are further developed in the following sections.
Design I Analysis: Force Sensor Measurement
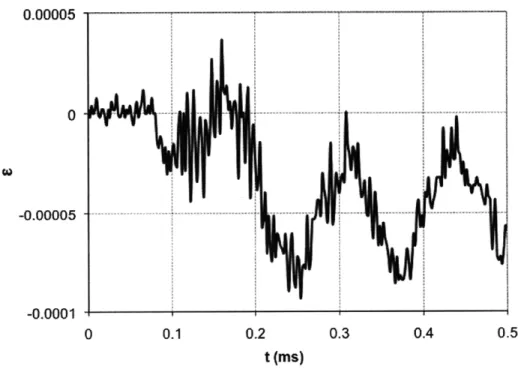
The first possible configuration calculated both stress and strain from the force sensor data. No strain gages are necessary to obtain data. In the output of the FEA simulation, a representative element from the top of the force sensor was chosen and a plot of strain against time was extracted (Figure 4.6).
0.00005
1
-o.oooo 5 ---
---0.0001
0 0.1 0.2 0.3 0.4 0.5
t (ms)
Figure 4.6: Finite element analysis was used to create a plot of the strain on a representative element of the force sensor against time. These measurements are later used to generate a stress-strain plot for the specimen.
From each of the strain values, the force F on the force sensor at each time was calculated using
where E is the Young's modulus of the force sensor material (steel, E = 200 GPa), A is the cross-sectional area of the force sensor at the location of the analyzed element (A = 0.0248 m2), and EFS is the strain, as determined by finite element analysis.
The displacement S of the specimen at the point of contact with the tup can be calculated iteratively from these values of F using
=(
F dt + vo dt,
m
(4.2)where m is the mass dropped onto the specimen and vo is the initial velocity of the specimen - in this case, zero. The integrals are taken with respect to time and were calculated numerically using the trapezoidal rule. The displacements were then used to find the strain ggage on the specimen according to
gage
L
gage
where Lgage is the gage length of the specimen, 15 mm. As a result could be plotted against time (Figure 4.7).
0.0016 0.0014 0.0012 0.001 o 0 .0 0 0 8 -----.- ---0.0006 0.0004 0.0002 T 0 (4.3)
of this calculation, strain
0 0.1 0.2 0.3 0.4 0.5
t (ms)
Figure 4.7: The strain on the specimen at each point in time was extrapolated from the strain measurement from the force sensor using numerical integration.
The calculated forces F were also used to determine the stress o on the specimen,
S= (4.4)
gage spec
where wgage is the width of the gage section of the specimen, 5.0 mm, and tspec is the thickness of
the specimen, 1.1 mm. At each point in time, the values for Egage and o-were compared, giving a stress-strain curve for the specimen (Figure 4.8).
900 600 - ----0. 300 --- - ---..--- - - ---0 0 0.0005 0.001 0.0015
Figure 4.8: A stress-strain curve for the specimen was generated using only a strain measurement from the force sensor in finite element analysis. Two dominating sets of oscillations are evident: one is high-frequency, amplitude; the other is low-frequency, high-amplitude. The curve does not resemble what is expected.
There are two dominating frequencies evident in the stress-strain plot. The high-frequency oscillations are likely due to wave propagation through the force sensor, but the frequency is high enough to be filtered out. The second set of oscillations is a low frequency, high-amplitude contribution to the signal. These oscillations are not ideal and may result from the tup bouncing off the specimen and colliding with it multiple times. The FEA simulation therefore suggests that a straight measurement from the force sensor would not give acceptable data for the drop tower test.
Design I Analysis: Double Strain Gage Measurement
The second method considered for acquiring data involved putting two strain gages on the specimen. The first is placed on the gage section of the specimen to measure strain, and the second is attached to the grip section to measure stress, since the deformation of the grip section is purely elastic.
From the FEA simulation, the strains of a representative element from the gage section of the specimen and an element of the grip section were extracted and plotted against time. The specimen was modeled with shell elements with five integration points through the thickness. The two integration points closest to the surfaces were reported. For the gage section, the two curves overlapped, so to simplify the analysis, only one of these curves were considered (Figure 4.9). 0.4 0.3 Ci) 0.2 0.1 0 0 0.1 0.2 0.3 0.4 0.5 t (ms)
Figure 4.9: From a representative element in the gage section of the specimen in finite
element analysis, the specimen strain was plotted against time. The strain values on the inside and outside surfaces of the specimen were nearly equal, so only one of the plots is presented.
In the grip section, the two strain-time curves oscillated out of phase because of the bending waves shown in Figure 4.4. The axial stress can be found by determining the stress where there is no bending stress on the specimen. This can be found by averaging the stresses on the inner
and outer surfaces. Therefore, another curve was created, in which the strain measurements at the inner and outer surfaces of the specimen were averaged at each point in time (Figure 4.10).
---- Surface 1 - -Surface 2 -Mean Values
0.012 0. 1 --- --- --- ---S0.006 0.004 0:1 012 03 04 05 -0.002 t (ms)
Figure 4.10: A representative element in the grip section of the specimen was used in
finite element analysis to generate strain-time curves for the inner and outer surfaces of the specimen. The two curves oscillated out of phase, so a third curve was created in which the average of the two strain values was taken at each point in time. This third curve can be measured experimentally by arranging strain gages on both faces of the specimen and connecting them in series on the same leg of a Wheatstone bridge.
The force applied on the specimen was found from these values of grip strain ;gip using the relation
F = Egip Wgptspe,, (4.5)
where E is the Young's modulus of the specimen (200 GPa), wr , is the width of the grip section of the specimen (10.0 mm), and tp,, is the thickness of the specimen (1.1 mm). The stress o on the gage section of the specimen was then calculated using
F
S= (4.6)
wt
gage specwhere Wgage is the width of the gage section of the specimen (5.0 mm).
The stress on the gage section of the specimen was calculated for the inner surface, outer surface, and mean value in this way. The gage stresses were then plotted against the gage strains to create three stress-strain plots (Figure 4.11).
S-Surface
1 - -Surface 2 -Mean Values I5000
4000 ---- ,I
01 0:2 03 04
-1000
Figure 4.11: The stress on the gage section of the specimen was calculated using the
measured strains on the inner surface and outer surface of the specimen, as well as the average of the two measured strains. These stresses were plotted against the gage strain of the specimen.
The plot where average strain values were used does not have any major oscillations. In the simulation, the specimen fails approximately 0.3 ms after the beginning of the simulation, which corresponds to a strain of approximately 0.08. Thus, the steep increase in stress at strains higher than 0.2 in Figure 4.11 are irrelevant. Figure 4.12 shows the stress-strain curve of the specimen in more detail for strains of less than 0.1 when the average strain values are used, plotted against the theoretical stress-strain curve obtained from the DP780 steel plasticity model.
It may be possible to further reduce the effects of bending vibration by changing the specimen's shape. For example, reducing the distance between the two dog bones as much as possible would reduce bending. To allow for enough clearance for the tup to pass through, the specimen can be shaped like a rounded "V."
- Simulation - Theoretical 1200 900 600 -b 300 0 0 0.02 0.04 0.06 0.08 0.1 E
Figure 4.12: When the average strain between the inner and outer surfaces of the
specimen's grip section are used to create a stress-strain plot for the gage section, the curve does not have any large oscillations and resembles what is expected from steel. The specimen fails at a strain of approximately 0.08, so the sharp increase seen in Figure 4.12 at strains of above 0.2 is irrelevant. The data from the simulation matches the theoretical values (obtained from the DP780 steel plasticity model) well.
Design I Analysis: Double Strain Gage Measurement on Modified Specimen
Previous high-speed tensile tests performed in Aachen, Germany used a dog-bone specimen with a lengthened grip section on one side5 (Figure 4.13). As can be seen in Figure 4.5, some uneven stress concentrations occur in the grip section at points close to the gage section. Only at points sufficiently far from the gage section does the stress concentration become more homogeneous. Therefore, the grip section was lengthened so that a strain gage could be placed on it far enough from the gage section.
The grip sections of the specimen described in the previous section were extended to reflect the dimensions of the specimen used in Aachen. An analysis similar to the one described in the previous section was performed on this specimen. Data was collected at three points along the grip section of the specimen, at distances of approximately , 1/2, and 3/4 of the grip length.
72. - 15mm -- 1,- 15mm
-T
10 mm t 5 mm_LI,
5 mm I - 37. 5 mmFigure 4.13: Finite element analysis simulation was performed on a specimen with a
lengthened grip section on one side, since uneven stress concentrations occur in the grip section.
Just as in the previous analysis, the measured gage strains on the inner and outer surfaces of the gage section were approximately equal. The measured strains in the grip oscillated with time as expected. However, unlike in the previous analysis, the oscillations did not cancel out entirely, leaving some oscillations in the data when the strains on the inner and outer surfaces of the specimen were averaged (Figure 4.14).
I - Surface 1 - -Surface 2 -Mean Values
0.01 0.005 0 -0.005 0 0.1 0.2 0.3 0.4 t (ms) 0.5
- Surface 1 - -Surface 2 - Mean Values 0.016 0.012 0.008 0.004 0 -0.004 0.008 0.006 0.004 0.002 0 -0.002 -0.004 0 0.1 0.2 0.3 0.4 t (ms)
I - Surface - -Surface 2 - Mean Values
0 0.1 0.2 0.3 0.4
t (ms) 0.5
(c)
Figure 4.14: For the specimen with extended grip sections, strain was calculated and plotted against time at distances of approximately (a) /4, (b) V2, and (c) 3/4 the grip length from the end of the gage section. Oscillations in the measurements of the strains at the inner and outer surfaces of the specimen did not cancel out entirely, like they did in the specimen modeled after the ASTM standard.
The gage stresses were calculated in each case using the same method as the previous analysis and were plotted against gage strain (Figure 4.15).
- Surface 1 - -Surface 2 - Mean Values
4000 3000 2000 1000 0 -1000 0 0.05 0.1 0.15 0.2 6000 4000 2000 0 -2000 0.25
-- Surface 1 - *Surface 2 - Mean Values
I --- Surface 1 - -Surface 2 -Mean Values I 3000 2000 0. . ---.. -1000 0 0.05 0.1 0.15 0.2 0.25 (c)
Figure 4.15: The gage stresses for the specimen with extended grip sections were calculated from the measured strains on the grip section and plotted against gage strain at distances of (a) /4, (b) 2, and (c) 3/4 the grip length from the end of the gage section.
When the average of the stresses on the inner and outer surfaces of the specimens are used, curves resembling the expected stress-strain curve is obtained. However, these curves are not as smooth as the one obtained in the analysis using the ASTM-based specimen.
When gage stress is calculated using the average of the strains on the inner and outer surfaces of the specimen's grip section, the stress-strain curve resembles what is expected. However, the curves in this case are noisier than the one seen in Figures 4.11 and 4.12. Singularities also exist at strains of approximately 0.02 and 0.13, although these may exist only in simulation.
The wavy nature of the measurement can be seen more clearly by looking at the three curves created using the average strain measurements. Figure 4.16 shows these curves for strains up to 0.125, around which the specimen will fail. The three curves are relatively consistent, but show a measured stress above that predicted by the DP780 steel plasticity model.
- - Close - Middle -- Far - Theoretical 2000 1500 - . M 1000 500 0 0 0.025 0.05 0.075 0.1 0.125 E
Figure 4.16: The three curves calculated using average strain measurements were all
plotted for strains of less than 0.125. The wavy nature and unreliability of the measurement can be seen. The curves go well above the predictions made from the DP780 steel plasticity model. Some slight differences can also be seen between the measurements at different locations along the grip section.
There are slight differences between measurements at different points along the grip section, which suggests that the placement of the strain gage on the specimen is critical. The oscillations,
along with the overshoot at approximately . = 0.025, when the specimen apparently yields, are not acceptable for analyzing the material. There are no major indications as to why this modified specimen gives drastically different results from the ASTM-based specimen used previously. It is possible that the nature of the specimen's bending is different when the grip section is extended.
Design II
The second design was analyzed using finite element analysis by dropping a weighted force sensor onto an I-beam, with the specimens represented as nonlinear springs whose force deflection relationships are representative of quasi-static tension tests on standard dog-bone specimens (Figure 4.17).
Figure 4.17: In finite element analysis of the Design II, two specimens represented as
nonlinear springs were connected by an I-beam. A weighted force sensor was dropped onto the I-beam.
The specimens were defined according to previously determined force-displacement curves. A mass of 7.285 kg was applied to the top surface of the force sensor, which was dropped at 6 m/s.
In viewing the animation of the simulation, two dominating frequencies of oscillation were noticeable in the force sensor. The first had low amplitude and high frequency, which represents wave propagation through the tup, while the second had high amplitude and low frequency, which may result from the force sensor hitting the I-beam repeatedly. This result is similar to the findings in the analysis of the first design.
The design was analyzed in a similar way the first design was. First, an element was taken from the top of the force sensor, and strain along the direction of the force sensor's movement was reported. Using equations (4.1) to (4.3) on the measured strains, a strain-time curve and a stress-strain curve was created for the specimens in both simulations (Figures 4.18 and 4.19).
0.15 0.2 t--- --- ------ --- ---- - ---- --- - --- ---0.1 --0.05 --- ---0 . 1 -- ---0. 5 .... --- --- ---.. . . . . t (ms)
Figure 4.18: For the Design II simulation, the strain on the specimen was calculated using the measured strain on the force sensor through numerical integration. This strain was then plotted against time.
60000 - --- --- --- ---30000 0 -30000 -60000
I-kh
iJ
will
iir
iii
AfARJ
--- ---;---;--- -, t --- -- i r I .. An
i
I ZI II - i I i•i
.. .. v . ..
j
f,...
0.05 0.15 0.25Figure 4.19: For the Design II simulation, a
the resulting data is clearly not useful.
stress-strain curve was created. However,
The stress-time curve for the simulation resembles what is expected, but the stress-strain curve is too noisy for the results to be useful. The high-amplitude, high-frequency oscillations
Chan, 2009
--- --- --- ----
ii--:---
--:---
result from oscillations in the strain measurement from the force sensor. While these oscillations are less conspicuous in the calculation of specimen strain because of numerical integration, they remain very conspicuous in the calculation for stress. Even if strain were measured locally on the specimen, it can be seen that measurement of the stress by the force sensor is unacceptable. Even filtering out these vibrations would probably not be helpful, because the general shapes of the stress-strain curves have no resemblance with the theoretical stress-strain curve. Thus, finite element analysis rules out Design II as an option for tensile testing on the drop tower.
CHAPTER 5: FINAL SELECTION OF DESIGN
Finite element analysis on the two designs suggests that the most feasible and useful method of tensile testing on the drop tower would be using strain gages on the specimen in Design I. Because measurements are being taken only on the specimens and not on the force sensors, the effects of vibrations in the force sensor and tup on the readings are negligible. It has already been shown through engineering mechanics that wave propagation through the specimen will have a high enough frequency relative to the experimental time that the system can reach quasi-equilibrium during the experiment.
The drop tower machine can only read two strain gage outputs. However, three strain gages are needed to obtain the data required for the analysis mentioned previously: one on the gage section, one on the inner surface of the grip section, and one on the outer surface of the grip section. The desired output from the grip section strain measurement is the average of the measured strains on the inner and outer surfaces. Because strain gages are resistors and two resistors connected in series have a resistance equal to the sum of the two individual resistances, the average strain between the two surfaces can be found by connecting the strain gages in series and dividing the measured voltage drop across the circuit by two.
CHAPTER 6: DESIGN AND MANUFACTURING OF MACHINE FIXTURES
To configure the drop tower for tensile testing using Design I, a tup and a set of fixtures must be constructed. A method for constructing the specimen is also needed, but is beyond the scope of this thesis. The tup was modeled in finite element analysis as hemispherical, but
because of limitations on machining, the tup requires a cylindrical portion for the lathe chuck to grip. A /2" long cylindrical portion was therefore attached to the top of the 13/4" diameter hemisphere, and a /4"-28 thread was tapped into the top surface of the tup to create a female connection (Figure 6.1).
Figure 6.1: The tup was constructed out of steel and consisted of a 13/4" diameter hemisphere with a /2" long cylindrical section on top of it. A '/4"-28 thread was tapped into the top surface to create the screw connection with the force sensor.
The fixtures consist of: a base plate, two grips, and two draw beads, all constructed out of steel. The specimen lies on the base plate, with the U-shaped section hanging through a large hole in the middle of the plate. Grips are used to secure the specimen in place, with draw beads placed to prevent the specimen from sliding during the experiment. These draw beads are " diameter steel rods.
The base plate lies on the bottom surface of the machine and has: 3/4" diameter through holes to bolt it to the machine, M-8 tapped screw holes to bolt it to the grips, a 1/8" deep channel for the draw bead, and a large through hole in the center that allow the specimen and weight to fall through (Figure 6.2).
Each grip has 10 mm diameter through holes to bolt them to the base plate and a filleted channel on the bottom for the draw bead (Figure 6.3). The dimensions of the channel were defined such that the specimen can fit between the base plate, draw bead, and grip. Figure 6.4 shows a model of the drop tower with the fixtures attached.
Figure 6.2: The base plate has holes to bolt it with the machine and the grips, channels to hold the draw beads, and a large hole in the center to let the specimen and weight fall through.
Figure 6.3: The grip had holes to bolt it to the base plate and a filleted channel, whose dimensions were defined such that the specimen could fit between the base plate, draw bead, and grip.
Figure 6.4: The base plate, draw beads, and grip form a base assembly, which is attached
to the bottom of the machine. The tup is screwed onto the bottom of the 15 kN force sensor.
CHAPTER 7: CONCLUSION
Two options for configuring a drop tower to allow for tensile testing were analyzed using engineering mechanics and finite element analysis. The design chosen involved dropping a force sensor with a tup attached to the bottom onto a "U"-shaped specimen with dog-bone specimens used for the vertical sections of this specimen. These dog bones were modeled after the ASTM standard, but reduced in size. The tup and fixtures for the machine were designed and are to be constructed. Once these parts are completed, the next steps are to design a method for creating specimens and running tests on the newly configured machine.
REFERENCES
1 Klepaczko, J. R., Introduction to Experimental Techniques for Materials Testing at High
Strain Rates. Institute of Aviation Scientific Library, 2007.
2 Hibbeler, R. C. Mechanics ofMaterials, 7th ed. Prentice Hall, 2008.
3 "Standard Test Methods for Tension Testing of Metallic Materials [Metric]." ASTM International, 2004.
4 Young, W. C., Budynas, R. G. Roark's Formulas for Stress and Strain. McGraw-Hill, 2001. s Rusinek, A., Cheriguene, R., Baumer, A., Klepaczko, J. R., Larour, P. "Dynamic behaviour of
high-strength sheet steel in dynamic tension: experimental and numerical analyses." J. Strain Analysis, Vol. 43, 2008.
APPENDIX: DRAWINGS OF MANUFACTURED PARTS
All dimensions are in mm. Tup 0.
44.45
.jPJ N2 ,J Chan, 2009334
co0
19.05
0
0
LO0
J ' ' "96.33
q~Ab
40
79.
6
3
1
19.63
133.51
6.60
6.60
--#=+-4-- I 11128.13
--"-I--t~-i2I--5
4
12.70
FT
0
96.33
4
Illll*Illl.*-- .. . ----f-t
Grip