HAL Id: hal-01207358
https://hal.archives-ouvertes.fr/hal-01207358
Submitted on 30 Sep 2015
HAL is a multi-disciplinary open access
archive for the deposit and dissemination of
sci-entific research documents, whether they are
pub-lished or not. The documents may come from
teaching and research institutions in France or
abroad, or from public or private research centers.
L’archive ouverte pluridisciplinaire HAL, est
destinée au dépôt et à la diffusion de documents
scientifiques de niveau recherche, publiés ou non,
émanant des établissements d’enseignement et de
recherche français ou étrangers, des laboratoires
publics ou privés.
BricoSketch: Mixing Paper and Computer Drawing
Tools in Professional Illustration
Theophanis Tsandilas, Grammatikou Magdalini, Stéphane Huot
To cite this version:
Theophanis Tsandilas, Grammatikou Magdalini, Stéphane Huot. BricoSketch: Mixing Paper and
Computer Drawing Tools in Professional Illustration. International Conference on Interactive
Table-tops and Surfaces (ITS’15), Nov 2015, Funchal, Portugal. pp.127-136, �10.1145/2817721.2817729�.
�hal-01207358�
BricoSketch: Mixing Paper and Computer Drawing Tools
in Professional Illustration
Theophanis Tsandilas
Magdalini Grammatikou
St´ephane Huot
Inria; Univ Paris-Sud
Inria; Univ Paris-Sud
Inria
Orsay, France
Orsay, France
Lille, France
[email protected]
[email protected]
a
b
c
d
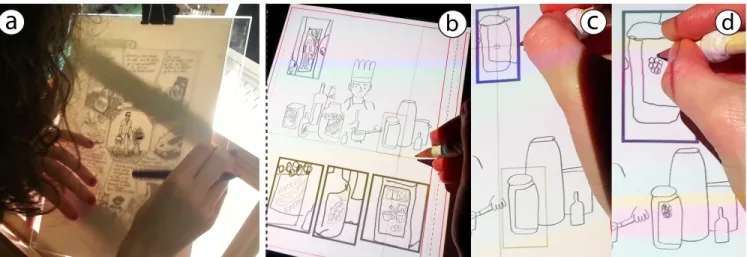
Figure 1. (a) An artist works on layers of physical paper with a home-made light table. The artist draws the panels of a page for a graphic novel by using earlier sketches as guides. (b-d) The same artist uses our system to add details to different parts of her illustration through partial scaled views.
ABSTRACT
Illustrators are advanced users of both traditional and computer-assisted drawing tools, and therefore, observing their strategies is very valuable for research on drawing inter-faces. We interviewed four professional illustrators in their work environment. We also followed the work of an artist for a two-year period. We observed that artists mix a variety of techniques that involve specialized computer software and hardware such as Adobe Photoshop, a graphics tablet and a scanner, and traditional physical tools such as pencils, paper, and customized light tables. Our findings inspired BricoS-ketch, an augmented paper interface that enables illustrators to zoom into parts of their drawings and work at different levels of detail on paper. Our early results demonstrate that BricoSketch supports real tasks, improving productivity on paper while enhancing illustrators’ creative ways of working. Author Keywords
Illustration; drawing interfaces; sketching; augmented paper ACM Classification Keywords
H.5.2. Information Interfaces and Presentation: User Inter-faces - Graphical User InterInter-faces
Theophanis Tsandilas, Magdalini Grammatikou, and St´ephane Huot. BricoSketch: Mixing Paper and Computer Drawing Tools in Professional Illustration. In ITS’15: Proceedings of the 10th International Conference on Interactive Tabletops and Sur-faces, ACM, November, 2015.
c
2015 ACM. This is the author’s version of the work. It is posted here by permission of ACM for your personal use. Not for redistribution. The definitive version will be published at ITS’15, November 15-18, 2015, Funchal, Portugal
DOI: http://dx.doi.org/10.1145/2817721.2817729
INTRODUCTION
Interactive technologies have radically changed the way vi-sual artists work, and a large portion of the artistic production has now moved from paper to the computer. Powerful draw-ing and image-processdraw-ing software such as Adobe Photoshop, InDesign, Illustrator and Corel Painter as well as pen displays such as the Wacom Cintiq series1 have played an important role in this change. However, many artists still work on paper and keep using traditional painting and drawing tools. This is not only due to resistance to progress or due to the well-known usability properties of physical tools [7]: despite the progress of artistic stroke-rendering techniques [11], existing computer tools fail to fully capture the richness and variety of artistic styles supported by physical media [21]. Therefore, artists still rely heavily on paper for styles and techniques that software tools currently do not offer.
We interview four professional illustrators to understand how they mix physical and electronic media in their creative pro-cess. We also follow the work of one of these illustrators for a period of two years. We observe that professional illus-trators do not have a unique process of work but adapt their style and tools depending on the requirements of their dif-ferent projects. All of them use both physical and computer drawings tools at different phases of a project, from early sketches to final illustrations. We also learn that productiv-ity has a major role in the selection of their tools as they often deal with pressing deadlines. Unfortunately, although com-mercial drawing software can increase productivity, much of
its power does not apply when creative work takes place on paper. In particular, we observe that switching from tradi-tional tools to software and vice-versa often involves signif-icant manual effort. Previous work [8, 18, 23, 24] has in-troduced augmented-paper technologies and projection-based systems to enhance traditional drawing and painting tech-niques. Yet, these systems either target novices [8, 18] or non-artistic tasks [23, 24].
Our goal is to fill in this gap with smoother transitions that could help artists take advantage of the power of computer tools earlier in their creative process. We designed BricoS-ketch, an augmented-paper system that enables professional illustrators to define alternative views of their drawings on paper and then use these views to draw at different levels of detail through multiple drawing scales (see Figure 1b-d). We show how users can combine such views to explore variations and produce final illustrations. Our system gets inspiration from a real work scenario and was designed in interaction with a professional artist.
Our contribution is twofold:
1. We explore how professional illustrators use traditional and computer tools in their work and look at their moti-vations. Our results reveal new challenges for the design of novel drawing systems.
2. We introduce a novel system that helps illustrators work on paper while taking advantage of computer functionality. We show how artists can divide their workspace into layers and work at different scales through transposed views of their paper drawings.
RELATED WORK
Interactive Drawing Assistance
Previous HCI work has examined a range of interactive tools for drawing and animation. Several of these tools target pro-fessional artists such as illustrators, animators, and designers. For example, Vignette [17] facilitates the creation of textures in pen-and-ink illustrations. ILoveSketch [2] assists profes-sional designers in sketching 3D models. Draco [15] allows artists (but also casual users) to add animation to drawings. Other systems target novices, offering assistance through tu-torials and guides. For example, PortraitSketch [14] assists novices by adjusting the quality of their strokes as they draw portraits from image models. Sketch-Sketch Revolution [6] offers step-by-step tutorials for drawing. ShadowDraw [19] helps users with shadows of blended images taken from a large database. ICanDraw [5] provides instructions and cor-rective feedback to assist the drawing of human faces. Iarussi et al. [12] use construction lines and corrective feedback to guide the drawing of generic objects and postures. Tsang et al. [27] guide 3D sketching by integrating suggestive 2D im-ages into 3D models. Finally, other approaches guide paint-ing by projectpaint-ing images and color on a physical canvas [8] or assist drawing by projecting interactive 3D scenes [18]. Here, we focus on professionals users, and therefore, provid-ing drawprovid-ing guidance is out of our system’s scope. We find, however, that professional illustrators use a range of personal
scaffoldingtechniques to guide their drawing. Our system gets inspiration from these work practices.
Physical vs. Virtual Tools and Materials
We identify three categories of drawing and painting systems with respect to how they mix traditional and computer-based techniques and tools.
Simulate the Physical World. The first category draws in-spiration from how artists manipulate physical materials and applies their observed practices to the digital world. For ex-ample, SandCanvas [16] is a tabletop system that gets inspira-tion from animainspira-tion performances. By simulating sand-manipulation gestures with a virtual environment, the system enhances animation with new operations, e.g., video record-ing and playback, that are not available in the physical world. However, the approach deprives artists of the richness of tan-gible manipulation provided by physical materials and tools. Model the Footprint of Traditional Tools. The second cat-egory combines interactive surfaces and physical tools. As an example, FluidPaint [28] captures the footprint of real wet brushes and simulates it with a virtual brush. Vogel and Casiez [29] follow a similar approach and study how artists manipulate a real Cont´e crayon to inform the design of a new multimodal device for drawing on tabletops. Otsuki et al. [22] push this approach further by allowing users to paint on arbi-trary physical objects through a mixed reality system. Such systems preserve the physical properties of the drawing or painting tools, but the artistic result is still less natural, as rendering is based on an imperfect model rather than a pre-cise image of their physical footprint.
Change the Traditional Workflow by Mixing the Two Worlds. The third category keeps intact both the use of traditional tools and their natural footprint. In this case, the goal of the interactive system is to change the traditional workflow of the artist and improve artistic production. The work by Nakajima et al. [21] is a representative example of this direc-tion. Their system provides a computer interface for creating animation sequences through sketches. The artist prints the sketches and paints them with physical tools such as pencils or oil paints. The system then creates the final animation se-quences by compiling the scanned paintings.
Our system belongs to the last category. We preserve the foot-print of physical drawing tools by creating a new workflow that enhances traditional illustration techniques.
Augmented Surfaces and Paper Interaction
Early work on interactive paper dates almost 25 years back [30], and Video Mosaic [20] was seminal in support-ing creative tasks with augmented paper. More recent work has studied the use of interactive paper in domains such as ar-chitectural design [1, 23, 24], music composition [9], and col-laborative design [10]. Much of this work is based on front-projection setups [30, 20, 1, 23, 24, 10], while others [25] use portable devices as displays. In some of these systems [23, 9], users only interact with a pen. Others [3, 24, 25] examine bi-manual interaction techniques, e.g., Pen+Touch.
Our work gets ideas from these systems but is especially in-fluenced by PenLight [23] and MouseLight [24]. For exam-ple, we also support above-the-surface interaction for com-mand use, overlaid layers of physical and virtual ink, and copy-and-paste actions over physical content. However, our interaction design is adapted to professional illustration rather than architectural design and focuses on a more specific draw-ing approach and task. We also introduce a more lightweight approach and allow for more personal drawing tools, e.g., pencils, that previous work did not support.
INTERVIEWS
We wanted to better understand the process of illustration and, particularly, learn how professional artists use technol-ogy and traditional tools in their workflow. Books and online videos provide rich information about drawing and illustra-tion techniques, and a lot of previous work [5, 12, 16, 17] has used them as main sources of reference for their solutions. Other approaches [9, 13] were based on a direct contact with professional artists. This allowed the researchers to investi-gate very specific scenarios and tasks but also get valuable in-formation about the environment in which these people work as well as their problems and constraints.
We chose to follow the second approach for our design. In this section, we present our interviews with four professional illustrators and discuss our results and insights.
Participants
We interviewed two men and two women, 31 to 36 years old. We refer to them with the initials of their first name (M, C, S, and E). They were all freelancers with 4 to 11 years ex-perience as professional illustrators. They shared the same studio but each worked independently on their own projects. Their projects included illustrations for books, magazines, and newspapers. Three of them (C, S, and E) also worked as writers of graphic novels.
Method
The interviews took place in June 2013 on two different days in the artists’ studio. Participants first answered a pre-questionnaire about their profile and experience. We then in-vited them to speak about their current or their recent projects. We asked them to go through the whole creative process for each of their project, focusing on the materials and tools that they use, both traditional and digital, hardware or software. We also encouraged them to show their drawings on either paper or the computer and demonstrate the techniques that they used through concrete examples from their work. Each session lasted 30 to 50 minutes. All sessions were videotaped. Results
The Lifecycle of an Illustration Project
A regular illustration project consists of the following stages: Task Assignment. An editor or art director contacts the artist and provides the details of the project. The illustrator can then negotiate the price and the time constraints proposed by the client. The art director usually provides precise instructions about the size and placement of the illustrations on a page.
However, the level of detail can vary significantly among dif-ferent projects. For example, C talked about her experience with a book. She mentioned that she found this project hard, as she was not given enough information at the beginning, and she then spent a lot of time iterating with the editor. Sketches. The illustrator starts by exploring and sketching ideas, which finally take the form of rough concept sketches. For smaller projects, the artist usually produces more than one idea for each illustration. Sketches are communicated to the art director. The art director selects one of the proposed ideas, makes suggestions and sometimes asks for changes. Detailed Drawings. The artist works on the detailed draw-ing by usdraw-ing the selected sketch as a reference. This is the most time-consuming phase as the artist pays attention on the details and the artistic quality of the result.
Colors and Refinements. Colors and textures are usually added at the very end of the process. Again, the illustra-tor iterates with the art direcillustra-tor, who can again ask for small changes or refinements.
A project can consist of a single or a small number of illus-trations, e.g., for a newspaper article. The artist is often asked to complete the task in very limited time, sometimes within the same or the following day. Thus, being able to produce results fast is important for illustrators. Larger projects can take several weeks or several months, where the artist may have to illustrate an entire book.
Looking for Sources of Inspiration
Before starting a project, all our participants search for doc-umentation related to the subject. If the project is a book, a graphic novel or an article, they first read the text that is pro-vided by the publisher so as to extract important information about the context of the project. They regularly search images and videos on the Web. For large projects, they often buy and read related books or create folders with all the material they gather. C explained that she even visits specific places for her projects and takes photos and draws the scenery and related objects. She then sticks this material around her desk to recre-ate the atmosphere needed to get inspired while working. E often looks for inspiration in films of specific directors.
Drawing on Paper vs. Drawing on the Computer
Over the years, illustrators have developed their personal artistic styles that differentiate them from other artists. An editor or art director contacts an illustrator knowing his or her previous work and expecting a good match between the proposed project and a specific work style of the artist. Yet, our participants explained that their styles evolve from one project to the next. For example, E mentioned that he likes ”changing techniques for every new project”and added: ”If I see something that I like, I want to try it”. The medium plays an important role in the development of an artistic style, and interestingly, we observed very diverse working practices, where traditional (e.g., paper, pencils, ink-drawing pens) and digital tools (e.g., graphics tablet, scanner, printer, Adobe Photoshop) are often intermixed.
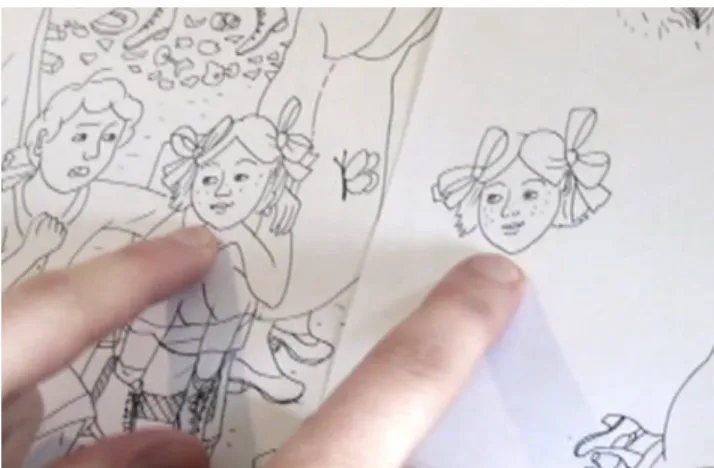
Figure 2. The head of the girl has been redrawn on a different page with a light table. The drawings are later merged with Photoshop.
Keeping the Real Original. M completes all his drawings on paper and moves to a graphics tablet and Photoshop only to add colors. He explained that he wants to keep the “real original”and “preserve the paper and manual aspect” of his work so he usually goes back to paper to make corrections by erasing and “retouching” the drawing with his pencils. Ac-cording to the artist, this process is more time consuming than making changes directly in Photoshop as it requires addi-tional scanning. However, he prefers it as it ensures that there is a “true correspondence” between the original drawing on paper and its digital version.
Mixing Sketches on Paper. S exhibited a number of different working styles but explained that she usually starts by sketch-ing on paper. Her sketches often evolve in multiple steps. Rough sketches help her develop and think about ideas while more developed sketches communicate detailed ideas. They also serve as scaffolds for drawing the final picture. She gave an interesting example from her ongoing work for a book for children that demonstrates this evolution of sketches. She starts with a rough ideation sketch and then moves to a more detailed but small-scale sketch. She then scans this sketch and prints it in a larger scale corresponding to the target illus-tration size. She creates a more detailed sketch on top of that, which then serves as the model for drawing the final picture. She uses pencil for her sketches and an ink pen for the final polished drawing. As a final step, she scans the final drawing and adds colors in Photoshop with the graphics tablet. She also uses the tablet to make small corrections.
S also explained that she also frequently uses extra pieces of paper to draw specific parts of a picture, e.g., the face of a character (Figure 2), in more detail and then merge them with the rest of the scene on separate layers on the computer. We see that in contrast to M, S is only concerned about the final digital version sent to the editor, not the original on paper, which in some cases consists of several different pieces. The light tablehas a prominent role in this process, as it allows the artist to incrementally move from lower to higher-fidelity drawings. Light tables are viewing devices that evenly illumi-nate a subject, e.g., an early sketch, from below by emitting fluorescent light. Artists use light tables to trace their final
Figure 3. Drawing technique used by E for a comic book. Sketches cre-ated on the computer (left) are printed in blue. The artist then draws the detailed contours with a pen ink on top of the printed sketches (right).
images on new pages. Figure 1a shows S drawing the final panels of a graphic novel on a home-made light table. Sketching on Paper vs. Detailed Drawing on the Computer. In addition to the above method, S often uses the graph-ics tablet to work on the final version of a drawing, where the scanned sketches appear in a separate Photoshop layer in transparency. This is a common approach that simulates physical drawing over sketches with a light table. S explained that each method produces a different artistic style. She liked more her illustrations produced with a pencil or an ink pen on paper. However, some clients contacted her for her illustra-tions created with the graphics tablet.
Sketching with the Graphics Tablet. In contrast, C always uses a graphics tablet for sketching. She explained that she can sketch very fast with the tablet as the digital tool allows her to erase easily, copy-paste and quickly explore ideas. In her usual workflow, she exclusively uses the tablet for the whole creative process, from sketching to the very final step. Nevertheless, she expressed the desire to return more often to the traditional drawing method on paper and presented an example from her previous work for a book where she mixed both digital and physical drawing. For this project, she com-pleted all her sketches in Photoshop. She then printed them on paper and used a light table to draw the detailed illustra-tions with an ink pen. She then scanned the final drawing and added colors in Photoshop. C explained that the ink pen al-lowed her to draw fast without paying too much attention on the details. The graphics tablet imposes a different working style, where the artist has to frequently erase and zoom in to refine the drawing or draw additional details.
Working with Masses on Photoshop. Our fourth participant, E, usually creates his sketches on the computer. However, he demonstrated a variety of different styles. He showed his project for a book cover, where he used “masses” (i.e., black volumes) rather than contours to draw in Photoshop. The technique allowed him to define detailed forms incrementally by drawing volumes and then sculpturing them with the eraser tool. E was very effective with this technique and reused it in several projects both for quick sketches and final illustrations.
Printing Sketches in Blue. For another comic-book project, the artist started by creating his sketches on the computer with the “masses” technique. He then printed the sketches on paper in a light blue color and used them as templates to draw the detailed contours with the ink pen. The scanner fil-tered out the blue ink of the printed sketches but preserved the black ink of the pen. This technique replaces the light table: “I cannot support the lamp on my eyes”. As a final step, E used Photoshop to add volume and color.
Summary
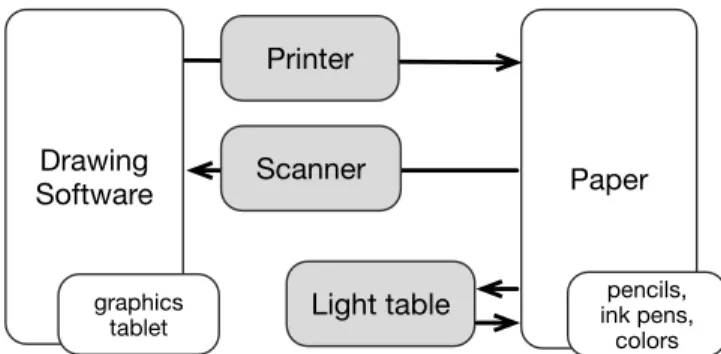
All our four participants have experience with both traditional and digital drawing tools. However, we identified a variety of different ways in which they use these tools in their projects. Sometimes, almost all the work is done on paper. For other projects, paper is never used. In other scenarios, artists switch from paper to software but also from software to paper (see Figure 4) in different variations. Which strategy to choose each time depends on the artistic style that the artist wants to achieve, the quality of the expected result, as well as the drawing speed that each approach affords. These observa-tions are in support of previous approaches [21] that enhance artists’ workflow without affecting their artistic styles. We also found that projects evolve at multiple stages where early sketches and drawings serve as reference and templates for higher-fidelity ones. Artists use either physical layers on top of a light table or virtual ones in computer software to make copies of their images and draw on top of them new versions. Finally, we discovered that although artists develop very personal artistic styles during the years, most of them are still very open to novel technologies and continuously look for new tools and techniques.
LONGER-TERM OBSERVATIONS AND CONCEPT
We continued working with S and have observed the evolu-tion of her work practices during the last two years. We can identify two major milestones in her personal work during this period, very related to the focus of our research.
Six months after our initial interview, the illustrator acquired a 13HD Wacom Cintiq, which replaced her graphics tablet and became her primary computer drawing device. In addi-tion, she started adopting the same strategy as C and E, pro-ducing most of her early sketches on the computer. According to the artist, this approach helped her to significantly improve her productivity. Yet, she kept drawing on paper for most of her projects.
Her major project during this time was the illustration of an 175 page graphic novel in collaboration with a writer. The project was funded by a large publisher and was subject to two major constraints:
1. The artist had eight months to complete all the sequences in the book. As she worked on other projects in parallel, this deadline was not easy to meet.
2. The artist was required to draw all the images with a pen-cil and rarely use color on selected images. Unfortunately, producing high-quality images with this style was very time consuming for her.
Drawing Software Paper Light table Printer Scanner pencils, ink pens, colors graphics tablet
Figure 4. Devices and drawing tools used by our participants as they shift from paper to the computer and vice-versa.
She experimented with various solutions to accelerate pro-duction while struggling to preserve the quality of her final images. She ended up developing an interesting workflow, which eventually became the basis of our system design.
Workflow
Comic-book artists often draw their panels in a scale larger than the size of the printed pages. This gives them more pre-cision in drawing details. However, drawing larger images takes more time. S tried to balance between drawing preci-sion and speed by splitting the image on multiple layers where drawing takes place at different scales. For example, she drew the global scene at a smaller scale and completed details such as faces of people at a larger scale. This approach is similar to the one shown in Figure 2 but involves additional steps: Step 1: The artist scans the initial drawing, adjusts its size on the computer, and prints it at larger scale.
Step 2: She draws details on a different page. She works on the light table by using the printed page as reference. Step 3: She scans the new page and blends the partial draw-ings together with Adobe Photoshop.
Although efficient according to the given time and style con-straints, this process required significant manual effort as the artist had to scan and print her drawings several times in order to switch between paper and electronic versions of her work. The above drawing technique forms the basis of our design concept whose goal is to enable the artist to work seamlessly at different scales on paper through multiple physical layers. To achieve this goal, we had to leverage the best of the two worlds, traditional and digital, and to augment paper with functionalities, e.g., copy, paste, scale, and superimpose, that are only available in computer drawing software. The next section introduces BricoSketch, which realizes this approach.
BRICOSKETCH
The name of the system (bricolage + sketch) is inspired by the observation that professional illustration is not a straight-forward process. Artists often invent new techniques for their projects. Such techniques involve not only sketching and drawing but, sometimes, a lot of engineering, scaffold-ing, and remixing. BricoSketch extends traditional light
ta-bles by combining interactive paper technology with a front-projection augmented-reality system.
Overview
Figure 1b-d shows a scenario of use of the system that cap-tures the workflow presented in the previous section. The artist’s workspace contains the main illustration, drawn on pa-per with a pencil, and a number of rectangular areas around it. These areas represent partial virtual views of the original drawing. The user creates and transposes the views interac-tively by moving the pencil over the drawing surface. In this specific example, the artist has created transposed views to decorate the labels of ingredient boxes. The scale of these views is larger so that the artist can draw small parts of the image with finer control and higher detail.
As shown in Figure 1, the physical ink of the pencil within a given view is blended with projected copies of ink drawn in other views. In order to produce the final illustration, we need to blend the partial images of the physical ink together. We discuss how blending can be performed manually, but we also provide computer tools to automate this process. Hardware and Software Platform
We implemented our first prototype with Anoto paper tech-nology2, but we fast start looking for a different solution.
Anoto is a mature technology, allowing for the detection of the position of a pen on paper with high precision. Neverthe-less, it requires the use of a very limited set of digital pens, and unfortunately, these pens have not been designed with professional illustration in mind. Wacom’s Inkling3is better adapted to design and sketching tasks, but again, it does not let users draw with their own pens or pencils.
We opted for the new iSketchnote4 pen tracking technology.
iSketchnote uses a 7.1 × 9.7 inch magnetic surface (the slate) that captures the 3D position and 3D orientation of small magnetic rings with a latency of about 50 ms. A ring can be fixed on any physical object, and thus, it can serve to de-tect the position of a pen’s or pencil’s tip on a piece of pa-per placed on the slate’s surface. iSketchnote has recently released an SDK (April 2015) that provides low level events about the 3D position of a pen moving on or over the slate within a limited distance range of about 10 cm. However, the iSketchnote SDK is still in progress and presents sev-eral problems. According to our own tests, the space of de-tected events is deformed, which makes calibration highly problematic. We tried to reduce deformation by applying bi-polynomial interpolation functions, but results were not satis-fying. We finally tackled the problem by exhaustive 2D sam-pling on a 15 × 22 grid on the slate’s surface, resulting in cells with a size of 9.4 × 9.4 mm2each. We find the position of
the pen within this grid and then estimate its coordinates with respect to the coordinates of the four closest samples. This solution minimizes the problem of deformation at a global scale. On the other hand, it does not deal with local deforma-tions within individual cells of the grid.
2http://www.anoto.com 3http://inkling.wacom.com 4http://www.isketchnote.com
a
b
Figure 5. Interacting above the surface. (a) Transposition: The user moves the pencil to transpose a selected rectangular area to a new posi-tion. The pointer appears left to the tip of the pencil to avoid occlusion. (b) Rescaling: The user moves the pencil to rescale the selected trans-posed view. Moving away from (or closer to) its top-left corner increases (or decreases) the view size.
The slate is connected with a 13 inch MacBook Pro through USB. Our application is written in Java 2D 1.8 and we use Open Sound Control5 to receive pen events from the native
iSketchnote SDK. To reduce the noise of detected pen events, we use OpenCV’s implementation of a Kalman filter. An ACER K11 mini projector mounted 50 cm above the table displays the virtual space on paper. We apply a perspective transformation to calibrate the virtual with the physical space. Illustrations and Transposed Views
Illustrations take a single A5 page that corresponds to the ac-tive surface of a slate. Each illustration I can consist of multi-ple views Vi = Ti(I), where a view can be created anywhere
on the page. We define Tias a transposition function:
Ti(I) = (si◦ ti)(ci(li(I))) (1)
where li contains a subset of the illustration’s strokes as a
distinct layer, cicrops an area (rectangular in our
implemen-tation) of the illustration surface, while siand tiare scale and
translate transformations performed in any order.
Users can split their work between views. Partial views are then blended together to compose the full illustration:
I =[
i
(si◦ ti)−1(Vi) (2)
According to the above equation, we apply an inverse scale and translate transformation to each view before blending all the views together. Views are synchronized, which means that when the user draws within the space of a view, the other views are updated by rendering the virtual image of new strokes. Users can deactivate, reactivate or delete a view.
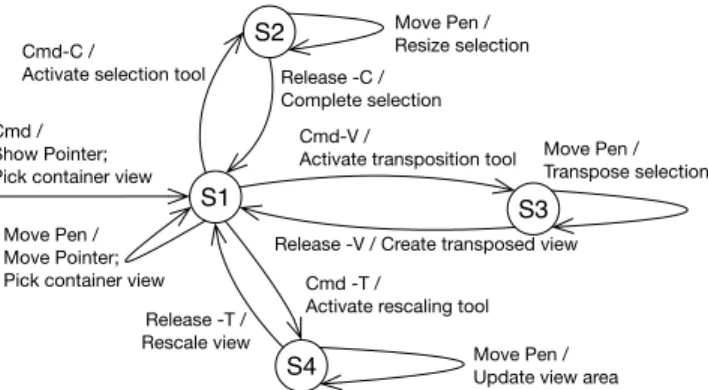
S1 S4 S3 S2 Cmd / Show Pointer; Pick container view
Cmd-C /
Activate selection tool Release -C / Complete selection
Move Pen / Resize selection
Cmd -T /
Activate rescaling tool Cmd-V /
Activate transposition tool
Release -V / Create transposed view Move Pen / Transpose selection Move Pen /
Move Pointer; Pick container view
Move Pen / Update view area Release -T /
Rescale view
Figure 6. State diagram describing the main functionality of the system, i.e., how to create and transform views, through quasi-modes.
They can also nest views by creating new ones over existing ones. These functionalities allow for great flexibility as they let users create alternative versions of different parts of an illustration by working at multiple scales.
Interaction Design
Drawing vs. Command Layer of Interaction
Traditional pens and pencils leave a permanent trace on paper, which constraints interaction design. For example, moving the pen on paper to make a selection and create a new view is not desirable. Our initial Anoto version of BricoSketch avoided this problem by making use of additional inkless pens dedicated to interaction. Other approaches deal with the prob-lem by introducing tiny command gestures that leave minimal trace on paper [26] or using a transparent ink-resistant piece of plastic underneath the pen to avoid writing on paper [25]. Our final design follows PenLight’s [23] approach. More specifically, we distinguish between a command and a physi-cal layer of interaction, where the command layer takes place above the drawing surface. The artist uses the same pen both for drawing, when the pen touches the page, and for carrying out complementary tasks, e.g., creating a transposed view, by interacting over the page (see Figure 5). PenLight uses Anoto technology to detect the 2D position of the pen on paper but also enhances Anoto pens with a Polhemus magnetic tracker that captures their 3D position. In contrast, we take advan-tage of iSketchnote’s ability to capture 3D pen events above the slate’s surface.
Note that the iSketchnote slate has been designed for indirect only input. Deber et al. [4] showed recently that humans per-ceive lower latencies with direct input that are considerably lower than the minimum latency (50 ms) of the slate. This could be considered as an obstacle to high-quality drawing. In our case, however, the latency problem does not affect the quality of the drawing as artists draw directly on paper with traditional zero-latency tools. Latency is only an issue for vir-tual copies of the ink shown in views other than the current view and for user actions taking place above the slate.
Handling Interaction Modes
Related work supports interaction on paper by means of con-textual toolglass palettes and menus [23, 24] or touch sensi-tive devices used in combination with the pen [25]. Although
our approach does not exclude such solutions, we decided to concentrate on expert use of the system and base our interac-tion design on the use of command shortcuts. We have ob-served that illustrators make heavy use of both hands as they work on the computer, where the non-dominant hand controls command shortcuts and drawing modes. Graphics tablets and pen displays like Wacom Cintiq are equipped with hard but-tons to be used as control keys. However, several artists still prefer using the shortcuts of the keyboard. As S explained, the number of the hard buttons in these devices is very limited and cannot cover the diverse range of functionality required by common illustration tasks. In line with such practices, we rely on key shortcuts to support interaction.
We avoid persistent modes by making use of quasi-modes. The state diagram in Figure 6 describes our interaction de-sign. To enter the command mode (S1), the user presses and holds the Command (Cmd) key. This action displays a pointer. The user can move the pen or pencil above the page to control the position of the pointer and select a view. As shown in Figure 5, the pointer appears left to the tip of the pencil to avoid occlusion. The user can then hold an addi-tional key to activate specialized tools: Cmd-C to activate a selection tool (S2) and select a rectangular area in the cur-rent view to transpose, Cmd-V to activate a transposition tool (S3) and create a new view by copying the selected area to a new position, and Cmd-V to activate a scaling tool (S4) to change the size of the view.
Figure 5 illustrates the use of the transposition and the scaling tool. In addition to the above functions, users can deactivate or re-activate selected views A), delete them (Cmd-D), and save their drawing sessions (Cmd-S).
Blending Transposed Views Together
The final illustration can be created from its partial views by first scanning the page and then aligning the drawn images with specialized image-processing software. For example, the user can perform this task in Adobe Photoshop by follow-ing three main steps: (1) select an area of interest, (2) copy and then paste it on a new layer by using the multiply blend mode, and (3) use the transformation tool to align it with the image of other layers.
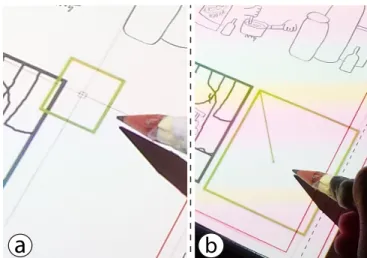
We built a Java 1.8 Swing tool (see Figure 7b-c) to automate the above process. As shown in Figures 1b and 7a, pages contain a red rectangular frame. This printed frame must be aligned with a virtual frame projected on paper. This allows our tool to automatically calculate the exact correspondence between the virtual workspace and the scanned illustration. We use the OpenCV library to detect the red frame of the page and, then based on its boundaries, apply a perspective correc-tion to the image. Users import their saved session containing the detailed description of all the view transpositions. The tool uses this description to automatically crop the image into separate images, where each represents a user-defined view of the illustration. The images are then blended together accord-ing to Equation 2. Our tool currently preserves the strokes of all blended views. As we discuss later, future implementa-tions should consider additional blending techniques.
a
b
c
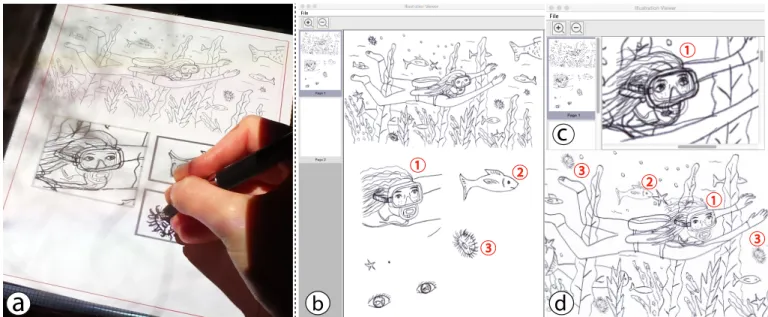
d
1 2 3 3 3 2 1 1Figure 7. Results from our user session. (a) The artist has created three transposed views for: (1) the head of the diver, (2) a fish, and (3) an urchin. (b) The final scanned page on our Java application. The application automatically removes the red frame of the page and corrects perspective deformations due to the scanning process. (c) Automatic blending of the first view with the main scene after loading the saved session description. (d) Manual blending using the tools of Adobe Photoshop. Please, zoom in to view results in more detail.
EARLY USER FEEDBACK
We ran two drawing sessions with S to test the system and get early feedback about our design.
Procedure
The sessions took place in two consecutive days. The first session lasted approximately 40 minutes. We introduced the system and asked the artist to explore its functionality. We discussed and updated our command shortcuts with her and selected a pen and a pencil to use in the second session. The second session was approximately 1-hour long. We asked the artist to draw whatever she liked without giving fur-ther instructions. We also asked her to explain her strategies and report on any problems she found or ideas about features that she would like to see in future versions of the system.
Figure 8. The artist explores different uses of the user interface. Here, she creates multiple copies of the starfish and places them in different positions in the scene. According to our participant, these copies could be integrated into the final scene or, alternatively, they could serve as templates for drawing new variations of the starfish.
Results
The artist worked on two pages, each for a different illustra-tion. She used a black pen for the first page and a pencil for the second one. Figure 7 shows her first page that illustrates a woman diving under water. It consists of a main view with the global scene and several transposed views that zoom into smaller parts of the scene: the head of the woman, a fish, an urchin, a starfish, and the eyes of the woman. The artist cre-ated the views to draw the above elements with finer detail. Figure 1b-d shows the artist interacting and working on the second illustration by using a pencil. The illustration shows a cook preparing a meal. Here, the artist has created views to zoom into labels of ingredient boxes.
The artist learnt quickly how to use the system’s functionality and shortcuts with minimal practice. She was very enthusi-astic about mixing physical ink with projection-based assis-tance. She also found that the user interface was very well adapted to her needs and was exactly the kind of system that she wanted. However, she also found problems. In partic-ular, she complaint that the calibration between the physical and the virtual space was not always accurate (see our ear-lier discussion). The problem became more apparent when she started working between different views as their different scales helped her better perceive calibration errors.
Figure 7c shows how our Java tool automatically blends the detailed head of the diver with the global scene. The result is certainly not optimal. The reason is that our current imple-mentation only deals with situations in which the artist cre-ates a view to add new strokes. In other words, it blends the pixels of the views to preserve the full set of their strokes. In the above example, however, the artist has drawn a com-pletely new version. Figure 7d shows a better result achieved by manually blending the views using Photoshop.
a
b
c
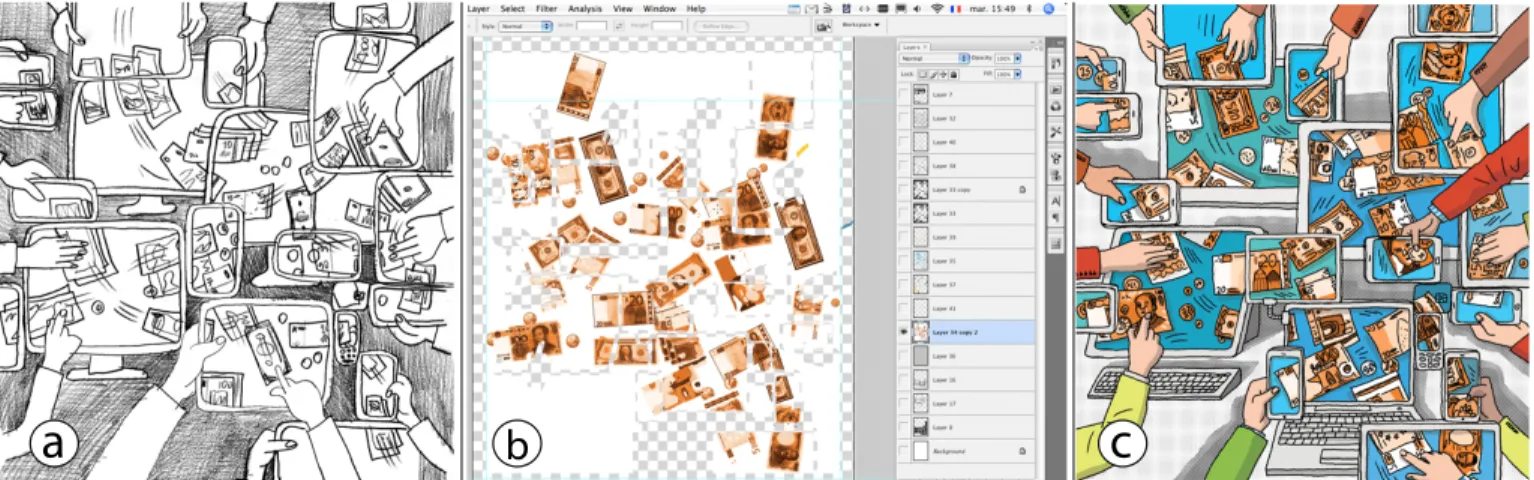
Figure 9. Use of images as models for more realistic drawing: (a) Initial sketch created with pencil on paper. (b) The artist’s workspace in Photoshop containing several overlapping layers. The active layer shows cropped images of banknotes that serve as models for drawing the final illustration on the computer. (c) Final illustration realized with a graphics tablet. Artwork by c Sandrine Martin.
Finally, the artist found that the system is an excellent tool for exploring ideas and trying out alternative versions of draw-ings. She also proposed some new scenarios. Figure 8 shows her using the tool to create multiple copies of a starfish. She explained that such copies can be used to quickly test ideas by reusing parts of her drawings directly on paper. Alternatively, as she proposed, copies can serve as templates for drawing new variations. For example, in a sequence of panels for a comic strip, the artist could copy the face of a character and use it as model to draw its variations in other panels.
DISCUSSION AND FUTURE DIRECTIONS
We showed how BricoSketch can support real tasks and needs of a professional artist. We acknowledge that this is a pre-liminary study and that we need a larger group of experts to validate our approach. Our future goal is to evaluate BricoS-ketch with additional artists and longer projects. We are espe-cially interested in capturing additional illustration tasks such as coloring, adding handwritten captions, and creating ani-mated sequences [15, 21].
According to our current implementation, an illustration can be created from its partial pieces by using either our custom desktop tool or image-editing software like Photoshop. Our blending mechanisms are still primitive and lack the breadth of image-blending and image-processing algorithms of com-mercial software. Our plan is to replace it by a Photoshop plugin that automates the merging of the views and, at the same time, allows users to take advantage of the software’s powerful functionality. Another idea is to move some of this functionality directly on paper. As an example scenario, an artist could test the result of alternative blend modes while she draws. The artist could also add filters and effects or ex-periment with colors, which, as our interviews suggest, are often added with software. We believe that this approach can help the artist preview the outcome of her work earlier in the process and make faster decisions about alternatives. We learnt from our interviews that illustrators often make use of photographs, films or even sceneries and physical objects not only for ideas and inspiration but also as direct support
for their drawings. Famous illustrators like Norman Rock-well are Rock-well known to make extensive use of model pho-tographs in their work. Software tools allow artists to reuse material like photographs in new creative ways. Figure 9 shows a representative example from the previous work of our participant (S). The artists here has created several lay-ers in her workspace to mix sketches with photographs that serve as models. More specifically, she has created a collage of banknotes such that she can depict them with more realis-tic details. We are interested in letting users develop similar strategies when they draw on paper. The current version of BricoSketch does allow for such functionality, so we plan to provide support for virtual layers that accept photographs and videos in addition to sketches.
CONCLUSION
We conducted interviews with four professional illustrators and investigated how they use technology and paper in their creative process. We also studied the evolution of the work of one of these illustrators for a period of two years. In in-teraction with her, we designed BricoSketch, an augmented-reality system for creating illustrations on paper by working at different scales. BricoSketch enables illustrators to interac-tively create partial views of their drawings. Such views can be transposed and rescaled. Artists can then use them to cre-ate variations of their illustrations or add details with higher drawing precision. Our implementation is based on interac-tive paper technology that allows for above-the-surface inter-action and supports traditional drawing tools such as common pens and pencils. We discussed how BricoSketch supports a more effective transition between paper and computer tools. Early feedback from an artist suggests that our approach can support real user needs in new creative ways.
ACKNOWLEDGEMENTS
We thank the four illustrators who participated in our studies. We are especially grateful to Sandrine Martin and Erwann Surcouf for giving their permission to publish extracts from their artwork. This project was partly funded by ANR (ANR-12-JS02-003-01 DRAO).
REFERENCES
1. Aliakseyeu, D., Martens, J.-B., and Rauterberg, M. A computer support tool for the early stages of
architectural design. Interact. Comput. 18, 4 (July 2006), 528–555.
2. Bae, S.-H., Balakrishnan, R., and Singh, K. Ilovesketch: as-natural-as-possible sketching system for creating 3d curve models. UIST ’08, ACM (2008), 151–160. 3. Brandl, P., Forlines, C., Wigdor, D., Haller, M., and
Shen, C. Combining and measuring the benefits of bimanual pen and direct-touch interaction on horizontal interfaces. AVI ’08, ACM (2008), 154–161.
4. Deber, J., Jota, R., Forlines, C., and Wigdor, D. How much faster is fast enough?: User perception of latency & latency improvements in direct and indirect touch. CHI ’15, ACM (2015), 1827–1836.
5. Dixon, D., Prasad, M., and Hammond, T. iCanDraw: Using sketch recognition and corrective feedback to assist a user in drawing human faces. CHI ’10), ACM (2010), 897–906.
6. Fernquist, J., Grossman, T., and Fitzmaurice, G. Sketch-sketch revolution: an engaging tutorial system for guided sketching and application learning. UIST ’11), ACM (2011), 373–382.
7. Fitzmaurice, G. W., Ishii, H., and Buxton, W. A. S. Bricks: Laying the foundations for graspable user interfaces. CHI ’95, ACM (1995), 442–449.
8. Flagg, M., and Rehg, J. Projector-guided painting. UIST ’06, ACM (2006), 235–244.
9. Garcia, J., Tsandilas, T., Agon, C., and Mackay, W. Interactive paper substrates to support musical creation. CHI ’12, ACM (2012), 1825–1828.
10. Hartmann, B., Morris, M. R., Benko, H., and Wilson, A. D. Pictionaire: Supporting collaborative design work by integrating physical and digital artifacts. CSCW ’10, ACM (2010), 421–424.
11. Hertzmann, A. Tutorial: A survey of stroke-based rendering. IEEE Comput. Graph. Appl. 23, 4 (July 2003), 70–81.
12. Iarussi, E., Bousseau, A., and Tsandilas, T. The drawing assistant: Automated drawing guidance and feedback from photographs. UIST ’13, ACM (2013), 183–192. 13. Jalal, G., Maudet, N., and Mackay, W. E. Color
portraits: From color picking to interacting with color. CHI ’15, ACM (2015), 4207–4216.
14. Jun, X., Aaron, H., Wilmot, L., and Holger, W. PortraitSketch: Face sketching assistance for novices. UIST ’14, ACM (2014), 407–417.
15. Kazi, R. H., Chevalier, F., Grossman, T., Zhao, S., and Fitzmaurice, G. Draco: Bringing life to illustrations with kinetic textures. CHI ’14, ACM (2014), 351–360.
16. Kazi, R. H., Chua, K. C., Zhao, S., Davis, R., and Low, K.-L. Sandcanvas: A multi-touch art medium inspired by sand animation. CHI ’11, ACM (2011), 1283–1292. 17. Kazi, R. H., Igarashi, T., Zhao, S., and Davis, R.
Vignette: Interactive texture design and manipulation with freeform gestures for pen-and-ink illustration. CHI ’12, ACM (2012), 1727–1736.
18. Laviole, J., and Hachet, M. Papart: interactive 3d graphics and multi-touch augmented paper for artistic creaton. 3DUI ’12, IEEE (2012), 3–6.
19. Lee, Y., Zitnick, C., and Cohen, M. Shadowdraw: real-time user guidance for freehand drawing. ACM Trans. on Graphics (Proc. SIGGRAPH) 30, 4 (2011), 27. 20. Mackay, W., and Pagani, D. Video mosaic: Laying out
time in a physical space. MULTIMEDIA ’94, ACM (1994), 165–172.
21. Nakajima, M., Sakamoto, D., and Igarashi, T. Offline painted media for digital animation authoring. CHI ’14, ACM (2014), 321–330.
22. Otsuki, M., Sugihara, K., Kimura, A., Shibata, F., and Tamura, H. Mai painting brush: An interactive device that realizes the feeling of real painting. UIST ’10, ACM (2010), 97–100.
23. Song, H., Grossman, T., Fitzmaurice, G., Guimbretiere, F., Khan, A., Attar, R., and Kurtenbach, G. Penlight: Combining a mobile projector and a digital pen for dynamic visual overlay. CHI ’09, ACM (2009), 143–152.
24. Song, H., Guimbretiere, F., Grossman, T., and Fitzmaurice, G. Mouselight: Bimanual interactions on digital paper using a pen and a spatially-aware mobile projector. CHI ’10, ACM (2010), 2451–2460.
25. Tsandilas, T. Interpreting strokes on paper with a mobile assistant. UIST ’12, ACM (2012), 299–308.
26. Tsandilas, T., and Mackay, W. E. Knotty gestures: Subtle traces to support interactive use of paper. AVI ’10, ACM (2010), 147–154.
27. Tsang, S., Balakrishnan, R., Singh, K., and Ranjan, A. A suggestive interface for image guided 3d sketching. CHI ’04, ACM (2004), 591–598.
28. Vandoren, P., Claesen, L., Van Laerhoven, T., Taelman, J., Raymaekers, C., Flerackers, E., and Van Reeth, F. Fluidpaint: An interactive digital painting system using real wet brushes. ITS ’09, ACM (2009), 53–56. 29. Vogel, D., and Casiez, G. Cont´e: Multimodal input
inspired by an artist’s crayon. UIST ’11, ACM (2011), 357–366.
30. Wellner, P. Interacting with paper on the digitaldesk. Commun. ACM 36, 7 (July 1993), 87–96.