Tutorial 1: Introduction to Microsoft (MS) Access
After reading this tutorial and completing the associated exercises, you will be able to:
• Open MS Access
• Create tables using MS Access
• Create forms and use them to enter data into tables
Note: Be sure to work through the examples in this tutorial as you read. This is the way you will learn by doing.
Microsoft Access: A Relational Database Application
Microsoft Access is a relational database application that is part of the Microsoft Office suite of applications. A database is an organized way to store data and database software usually provides features that allow a user to add, delete, update, and manipulate (transform) data. A relational database, like MS Access, stores data in tables. A table consists of rows (records) and columns (fields). Although the appearance of the records and the fields resembles the rows and columns you may have seen in a MS Excel worksheet, Access is a much more powerful tool than Excel for organizing, storing, and retrieving data. Much of this additional power comes from the relational model that is
implemented by MS Access.
If you have already used and studied Excel, you may recall that data tables list all data for a particular entity (customer, product, etc) in a row of the
worksheet. So, if a customer makes 100 purchases and a business tracks their address in a database, that address would be listed 100 times. The relational model used by MS Access allows us to store data in separate tables and then link tables via common fields – the primary key/foreign key relationship.
A primary key is a field in a table that will contain a unique value for each and every record in the table. In other words, if a field is a primary key, you can’t use a specific value more than once in that column. A foreign key is a field in one table that contains values that are stored in a primary key in another table. If we look at the foreign key for a specific record, we can use the value to look up more data in the table where that field is used as a primary key. We are then guaranteed to find only one record that matches that value. Basically, a foreign key field provides a reference to a record in another table.
For example, we would relate tables via the CustomerID (the primary key) in one table, say, the Customer table and a copy of the CustomerID (a foreign key) in another table, say, the CustomerLoan table. The customer’s address is stored only once in the Customer table. This reduces data redundancy and improves updating and other database functions.
Most of this module will be spent learning by building. First you will create a database consisting of one table and then you will create a form to enter data. In later modules, you will learn how to query this table for information and to create
data, then you will create the remaining tables, and finally you will link the tables by creating relationships and to query a multi-table database.
Starting a New Access Database
Let’s start by opening a new Access database and taking a quick look at the MS Access interface.
1. Open MS Access by clicking its icon on the desktop or selecting it from a Windows menu.
You should now see the “Getting Started with Microsoft Office Access” screen shown in Figure 1.
Figure 1 – Opening MS Access
With this screen you have several options. You can work on a database that you created earlier by selecting it from a list of Recent Databases on the right side of the screen or you can start a new database. If you choose to start a new database, it can be a blank one for which you will build all components from scratch or you can choose from a library of pre-built templates. Microsoft has supplied a large library of templates of commonly used database applications. For our purposes, we’ll start a new blank database.
2. Click on the Blank Database icon.
A window will appear on the right of the screen that will prompt you to enter a file name for your database. We’ll enter
Example_Database for now. Note that Access 2007 uses .accdb as the file extension for Access database files.
After entering the file name click on the Create button.
Figure 2 – Starting a New Blank Database
Note that in Figure 2 you can see the location where the new database will be stored just below the textbox where you enter the new database name. To
change this, click on the folder to the right of the textbox, then navigate to the location where you want to store the file.
The MS Access Interface
You should now see the main Access interface that you will be working with as you create or modify an Access database. The basic structure of the Access user interface is shown in Figure 3 and its components are listed in Table 1.
Status bar Object Window Navigation Pane ContextTab Ribbon
Figure 3 – Starting a New Blank Database
Component Description
Context tab The tabs on the ribbon allow you display different commands based on the category that you choose.
Status bar Provides information about the progress of any ongoing process.
Navigation Pane Displays the objects that are included in your current database. You can use this to navigate to the object that you want to work on.
Ribbon Contains commands that reflect the active context tab and the object that you are currently working on.
Object Window The object window displays any open database objects. Table 1 – Components of the Access User Interface
In order to understand the names of a couple of components you need to understand that an Access database is generally a collection of objects. These objects could be tables, forms, queries, reports and macros. In this tutorial, we will work with two of these types of Access objects, tables and forms. You’ll see
other object types in later tutorials. As indicated on in Figure 3 and Table 1, the object window will display the object that you are currently working on. The look of this window will change depending on what the object is. To select an object to work, we usually find it in the navigation pane.
Access Ribbons
In Figure 3, there are 4 main Access ribbon contexts displayed that make it easy to find the commands that you need. (You can actually customize Access and add one or two more if needed) In addition, other ribbons will become available as you work with various objects. For example, the Datasheet ribbon tab is shown in Figure 1 since we started a new Access database and the software assumes that we are currently working with a new table.
The next several figures will provide a quick overview of the primary Access ribbons. You will get very familiar with these as you work through these tutorials so no need to memorize them now. Just take a quick look now and then refer back to these pages as needed.
Notice that each ribbon has some things in common. Commands are
arranged in a series of groups. Each group includes a set of commands that let you do related tasks. Some controls are accompanied by downward pointing arrows. When these are clicked a menu or palette with more related options is displayed. You should also notice that each group has a small arrow in the lower right corner. By clicking this arrow you can open a dialog box for the group that provides even more options that you can use to complete your work.
Figure 4 – The Home Ribbon
The Home ribbon contains the most commonly used Access commands. The Views group provides command that let you change how a particular object is displayed. Commands such as copy, cut and paste are located here in the Clipboard group. Formatting commands are provided in the Font, and Rich Text groups. The Records group provides commands for working with the records (rows) of an Access data table. The Sort & Filter group commands can be used to display only items that fit a given criteria. Finally, the Find group provides tools for searching for items in your database.
Figure 5 – The Create Ribbon
The Create Ribbon includes commands that are used to create various Access object. The Tables group provides commands for creating tables, the Forms group provides commands for creating forms, and the Reports group provides commands for creating Reports. The Other group provides commands for other types of objects like queries and macros.
Figure 6 – The External Data Ribbon
The primary purpose of Access is to work with data. The External Data ribbon provides commands that let you do more with your data. The Import group provides commands for bringing data in to your database from external sources. The Export group provides commands that allow you to use the data in your current database in other applications. The Collect Data group provides commands that let you collaborate to communicate or collect data. The
SharePoint Lists group provides commands that allow you to collaborate using Microsoft Windows SharePoint services.
Figure 7 – The Database Tools Ribbon
The Database Tools ribbon provides commands that let you work with your database is various ways. The Macro group has commands that let you work with macros. A macro is a saved set of instructions for doing something in Access. The Show/Hide group has commands for working with relationships between objects in your database. The Analyze group has tools for checking your database and improving its performance. The Move Data group commands let you make connections to a server to send or retrieve data. The Database Tools group provides miscellaneous commands that do not fit well in the other groups.
Building an Access Table
For this unit on MS Access, we will use a database example involving an
Internet-based bank. We will start with a table that has information on the types of loans that the bank makes, home, auto, student, and so on. This information will include an ID number for each type of loan, the name of the loan type, the interest rate on this type of loan, and the minimum amount on this type of loan that the bank will extend. Later on we will add tables on the bank’s customers and the loans made to customers.
1. Start by opening Access and creating a new database. Name the database:
Bank_Database_Example.accdb You should be looking at a screen like that shown in Figure 8.
A new database table is shown in the Access object Window. Notice that the navigator pane shows only one object, i.e. the
current table. Figure 8 – The New Bank Database Example Database A new Access database table is now shown in its datasheet view. We’ll see it using another view, the design view, a little later. Notice that the current context ribbon matches what you are seeing, namely the datasheet ribbon.
While the datasheet view of a table resembles the grid that you may have seen if you have used Excel, it does not work the in the same way. When the table has been completely created, you will be able to enter data in rows and columns but the cells (intersection of rows and columns) usually do not refer to each other like they might in Excel.
Let’s continue and see how we can create a table that fits our requirements. To create the table, we need to define the fields. Remember that a table
represents some “things” that we want to keep data about. In this case, the things are types of loans that a bank wants to offer. The fields are the categories of data that we want to remember for each thing.
Usually, field names are created by combining the name of the entity that corresponds to the table and a logical name for the attribute that will be stored in the field. Since this table will store data about a Loan, all of our fields will start with the word Loan. We will then use a name for the particular field. Note that it is often acceptable to abbreviate the first part of the name. For example, CustID might be an acceptable name for the primary key in a Customer table. Also, it is customary to capitalize the first letter of each word in the field name. You will do this later in this module when you create the fields LoanType, LoanRate and LoanMin. The goal is to keep the names easily identifiable, understood, and “non-mixup-able”.
For this example, we would like to store a Loan ID, a loan type, a loan rate, and a minimum loan amount for each type of loan. These will be our fields. There are several ways to add fields to our table. We’ll show you how to add fields in several of these ways.
2. Our first methods for entering a new field will be right on the datasheet. Double-click on the tab that reads Add NewField.
Type the field name LoanType.
That’s almost it! You’ve actually added a new field. Fields have several settings that we may want to change. The settings for this field are
the defaults. Figure 9 – Adding the LoanType Field
When you create a field for your database table you need to set several field properties. It turns out that there are a lot of field properties you could set, but only a few are essential. Table 2 lists the most commonly set field properties. Some of these we can set using commands on the Datasheet ribbon.
Data Type Used to define the type of data that is to be stored in the field. Some Access data types include: text, number, date/time, currency, autonumber, and others. This is probably the most important field property that you need to set. If not changed, the field is Text data type by default.
Format Determines how the data is displayed. Examples are percent and currency formats. The format does not affect the actual data that is stored in the field, only how it looks.
Unique Sets whether a value in a field must be unique. When this property is set, Access will not allow you to add a new record if the entered value has been used in another record.
Is Required Sets whether a value is required in this field. When this property is set, Access will not allow you to add a new record unless a value is entered for this field.
Field Size Technically, this determines the amount of memory needed to store a data value in the field. With Text fields it can be set by specifying the number of characters that can be used in the field (Maximum – 255). With numeric data types, the size is determined by specifying the type of number to be stored in the field (Long Integer, Double, etc.).
Input Mask With this property you can specify a pattern for all data values that you want to enter into the field. It’s a good way to help make sure that all data will be entered with correct values.
Default Value A value that will be included in the field unless changed by the user entering the data.
3. Some of the field properties can be set using the
commands in the Data Type & Formatting group on the Datasheet ribbon.
While the LoanType field is selected, click the arrow for the Data Type list to see the possible data types you can select.
Select the Text data type for
this field. Figure 10 – Setting the LoanType Data Type
Note the other field properties that you can set using the commands on this group.
4. Let’s try another way to add a new field.
Click on the New Field command in the Fields & Columns group on the Datasheet ribbon.
Figure 11 – Using the New Field Command
5. You should now see the Field Template list appear on the right of the Access workspace.
This is a list of predefined fields that you can choose from. Most of the commonly used field types are there. You can choose one that should be close to what you want and then adjust field properties to tailor the field to your needs.
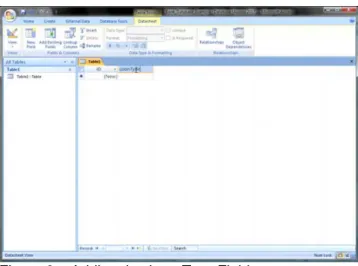
Select a Number field from
the list.
6. A new field has now been added to the table with the Number data type.
Notice that the field name has also been filled in with the rather unimaginable name Number.
Let’s change that quickly.
Figure 13 – The Number Field
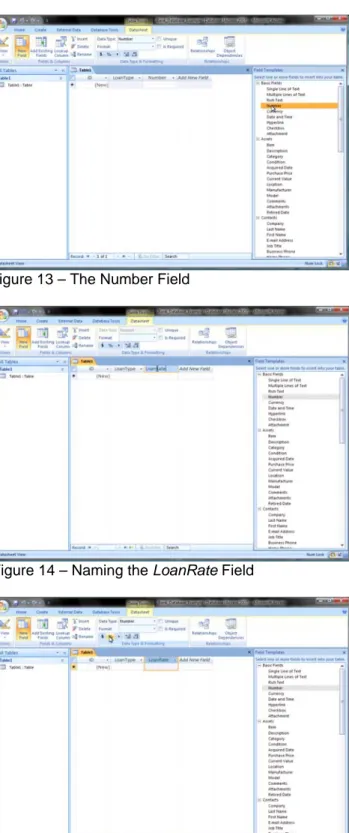
7. To rename the field, double-click on the field name in the table.
Then type the field name LoanRate.
Figure 14 – Naming the LoanRate Field
8. Interest Rates on loans are generally expressed as percentages.
Notice the quick formatting icons available in the Data Type and Formatting group. Click the % icon to format this field to percents. You should see that the Format box now displays the word Percent.
Figure 15 – Formatting the Field to Percent.
We’ve been working in the Data Sheet view. We’ll find that we have far more options if we work in design view.
9. To get to there, select Design View from the View options on the DataSheet ribbon.
Before switching to design view, Access will prompt you to save your new table.
Figure 16 – Changing to Design View
10. Type the name loans into the textbox and click OK. Important: Saving in Access is unlike other Office software like Word or Excel. Access saves the components that you create and the data that you enter as you work. You only have to hit the Save icon on special, rare occasions.
Figure 17 – Saving the Table
11. The object window should now change to display a listing of the fields in your table.
Notice that the names and data types of the fields that that we have entered are already listed in the upper table.
We’ll use the Design View to add another field and change some properties of
12. To add a new field in the Design View, simply type a new field name in the Field Name list in the upper part of the Object Window. Add the field name LoanMin to the list.
When you do, the Data Type will automatically show up as Text and the lower part of the Window will display a list of field settings with their
default values. Figure 19 – Adding LoanMin Field in Design View 13. A minimum loan amount is
a number that represents currency.
Click the arrow on the data type box for this field and select the Currency data type from the list.
You should notice that the field setting list will change to present options available for fields of this data type.
Figure 20 – Setting LoanMin Data Type in Design View
Let’s take a look at the fields in our table and make any adjustments needed to complete the table. First, have a look at the first field name ID. Recall that this field was automatically included when we created a new table. This is the primary key for the table. Remember, a primary key is a field in a table that will contain a unique value for each and every record in the table. It’s important that all tables in your databases include a field that can serve as the primary key. So, Access simply assumes that you want a field that can do this and includes the ID field by default. You can tell that this is the primary key field because there is a key icon displayed to the right of the field name in the list.
Access also assumes that you want this field to use the AutoNumber data type. AutoNumber is a special data type provided by the Access software to use with primary keys. Access will automatically fill a field using the AutoNumber data type with the next unique value. Access makes sure that an AutoNumber field is unique by never assigning a value to the field again – even after a record is erased. The default Field Size for an AutoNumber field is Long Integer. The field size determines how much memory will be used to store numeric data in each field. For numbers, the amount of memory and format is set when you choose a
numeric data type for the field type. You need to be aware of this. When a
primary key is used as a foreign key in another table, you need to make sure that the foreign key uses a data type that is compatible with data type of the primary key (Long Integer for AutoNumber.)
Thinking Critically: Would you use the AutoNumber data type if the bank has its
own loan identification system? Why or why not?
For our needs, the AutoNumber data type will work well, but it would be nice to have a more descriptive field name.
14. Click the field name for ID and change the name to LoanID.
Have a look at the field properties available for this field and their current settings. We’ll leave the rest of these settings as is.
Figure 21 – Adjusting LoanID Field Name
15. Let’s also add a description for this field.
Type “A unique ID for a Loan Type” in the
Description column for the LoanID field.
Descriptions can be a very important part of
documenting your
database. They can help others working with your database recognize the
16. After entering the
description, you’ll probably see an icon that looks like a lightning bolt with an arrow next to it.
This provides a list of Property Update Options. Whenever you see this icon, you should click the arrow (Don’t ignore it!) to see available options and select the one more
appropriate for your use. Figure 23 – Property Update Options
For now, select the option that starts: “Update Status Bar…” 17. You’ll probably get the
same message that we got: “No objects needed to update”
This is because we have no other objects in our
database besides this table. If there were, it’s a good idea to update the property as we did in step 16. So, it’s good to start getting into the habit now.
Figure 24 – Message from Property Update
18. Now go ahead and add field descriptions for the rest of the fields as shown in figure 25.
19. The default field width for a text field is 255 characters. This is longer than we will need for our LoanType field.
Select the LoanType field. Now, adjust the Field Size in the field property list to 100.
This means we can enter any text into this field that is
100 characters or less. Figure 26– Setting Field Size for LoanType 20. Now have a look at the
LoanRate data type. The default field size for a Number data type is Long Integer. This means that we can only store integer values (values with no fractional part) in the field. Of course, percents are all about fractions.
Click the arrow for the field size box and select
Double. Figure 27– Setting Field Size for LoanRate
Double will allow us to store values with decimal portions. The difference between Double and Single is that the values stored in a Double field can be more precise.
Thinking Critically – Are there any other field properties that you think should
be changed? If so, what? Go ahead and make those changes before moving on. At this point, we are finished with designing the structure for our table. Next, we will take a look at how we can enter data into the table. In general, we could enter data using the datasheet view or, even better, we can create a form object to use for data entry. If you are creating a database with more than one table, you should wait to enter data only after all tables and their relationships are created. We’ll add more tables to this example database in a later tutorial.
Using an Access DataSheet for Data Entry
With the table in DataSheet view we can simply type a data value into its
1. Click the View command on the Design ribbon. You’ll notice that you have a few more options this time to choose from including PivotTable and PivotChart Views.
We’ll select DataSheet view. Go ahead and select that now.
Figure 28 – Selecting DataSheet View
2. Access requires that you save significant changes to the database as you go along.
So, before moving to the DataSheet view, you will be prompted to save the table. Click Yes to save the table and move to the DataSheet view.
Figure 29 – Saving Table Changes
3. Now you’ll see the table in the DataSheet view once again. Only this time all of the fields that you’ve added to the table are displayed. Notice the bar at the bottom of the DataSheet that shows which record you are currently
highlighting (1 of 1). Later, you can use these controls here to browse through the table if desired.
4. To enter data using the DataSheet view, you simply click in the field where you want to type data and type it. Click the LoanType field. Now type the loan type: “15 Year Mortgage”
Notice that the number 1 appeared automatically in the LoanID field. Why?
Figure 31 – Entering LoanType Data
5. As you enter data into a field, the (New) record moves to the line below the one in which you are typing. Go ahead and enter the two records shown in Figure 32. In the next section, we’ll see another way to enter data into a database table.
Figure 32 – Entering Database Records
Using an Access Form for Data Entry
You will now learn how to create a MS Access form to use in data entry. Forms are used to provide a more formal and sometimes easier method of data entry than simply using the datasheet view of a table. They are also important when you want users to enter data but you don’t want them to have access to the actual table. To enter more data into the loans table, you will create the loans form. Let’s begin.
1. While viewing the table, click on the Form command. You’ll find it in the Forms group of the Create ribbon.
Figure 33 – Creating a Form
2. You should now see a form for the loans table.
Notice that this form
contains a label and textbox pair for each of the fields in our database.
These textboxes are provided for data entry. This form is bound to our table. When a value is entered into a textbox, the value will be entered into the corresponding field of
the table. Figure 34 – The loans Form
As you can see in Figure 34, the binding between the form and the table works both ways. The data in the currently selected record, record 1, is displayed in the form. You can move through the records using the browsing buttons
( ) at the bottom of the form. The and arrows will move one record at a time and the and arrows will move either to the first record in the table or the last. The number indicates the number of the record that is currently displayed.
The form is functional as is, but it’s not very pretty. Let’s first make the form look a little better. Then, we’ll use it to add a new record or two. The new form is currently in Layout View. While in Layout View, you’ll notice that two form related ribbons are available, the Format and Arrange ribbons. These ribbons include commands that let us change how the format looks and how its elements are arranged.
3. On the Format menu you’ll find the AutoFormat group. Click the More arrow to get a menu of format choices. Pick one that you like and see how the look for the form changes.
We chose one called “Trek.
Figure 35 – Selecting a Form AutoFormat
4. We can also easily adjust the labels on the form. Notice that the labels used are derived from the table name and the field names. As users (not you the designer) may be likely to enter data, we want to make these labels clearer for them.
Click on the Form title. Replace “loans” with the form title “Loan Type Entry Form.”
Figure 36 – Editing the Form Title.
5. You can edit the field labels in the same way.
Click the label “LoanID.” Edit it by adding a space to make “Loan ID.”
6. Edit the rest of the field labels to be more user friendly as shown in Figure 38.
Figure 38 – Editing Field Labels
7. Let’s make sure that our changes to the form have been changed.
Click the Save icon on the quick access toolbar at the top of the Access window.
Save the form with the name loans.
You’ll notice that this is the same name as the table. Won’t it cause a problem to name two components with
the same name? Figure 39 – Saving the loans Form 8. After saving, you’ll notice a
change in the navigation pane.
You should see that the components in your database, the loans table and the loans form are listed in separate areas by object type.
If you don’t see this, click the arrow at the top of the
navigation pane and select
All Access Objects. Figure 40 – Database Components in Navigation Pane Now that our form looks like we want and we have it saved, let’s use it to add some new data records.
9. Make sure that the form is in Form View so that we can add data.
Do this by selecting Form View from the View menu.
Figure 41 – Changing to Form View
10. Now click on the New Record button, , that is part of the form navigation button.
Figure 42 – The New Record Navigation Button
11. You’ll see a new, blank record on the form.
Notice that the LoanID field gives you a big clue that this is a new record.
12. To enter data, simply type data into the appropriate textbox.
For this example, enter “Auto Loan 36-Month” for the loan type, 8.5 for the loan rate, and 5000 for the loan minimum.
No need to type the % or $ symbols for the loan rate and minimum. They are automatically added because of the field data types and formats.
Figure 44 – Adding A New Record
Using your form, add data until you have all six of the records shown in Table 3. If you have been following along, then the first three records should already be entered.
Loan ID Loan Type Loan Rate Loan Minimum
1 15 Year Mortgage 4.50% $50,000.00 2 30 year Mortgage 5.50% $75,000.00 3 Auto Loan 36-Month 8.50% $5,000.00 4 Auto Loan 48-Month 9.50% $7,500.00 5 Auto Loan 60-Month 10.50% $10,000.00
6 Student 5.00% $2,000.00 Table 3 – loans Data
13. When completed, you
should see the last record in the form.
You can use the navigation buttons to browse the records and make any necessary correction. Let’s check to see what the new records look like in the DataSheet View of the table.
14. Click on the loans table in the Navigation pane. Select the DataSheet view from the View options. What’s this? Only the first two records that we entered directly into the DataSheet are listed. What the heck is going on?
Figure 46 – The loans Table DataSheet View
15. It turns out that there’s nothing wrong. The view just needs to be refreshed. To do this, go to the Home ribbon and click Refresh All.
Figure 47 – Refreshing the DataSheet View
16. After refreshing the
DataSheet view, you should now see all 6 of the records that you added.
Whew! Nothing lost!
Figure 48 – The Refreshed DataSheet View
Now, you’ve got a good start at building an Access database. You can build a table for storing data and you can build a related form to use for entering the data. In later tutorials we’ll add to your skills so that you can include multiple tables, ask questions about the data using queries and make reports based on the data in the database.
Exercises to Build Your Knowledge of Access.
Match each of the Access terms with its description.
1. ___ DataSheet view a. A way to store data by organizing it into tables made up of columns and rows.
2. ___ Design View b. A collection of data about an entity or object in a relational database.
3. ___ field c. A data value about an entity. Represented by the columns in a relational database table.
4. ___ foreign key d. A collection of data about an instance of an entity. Represented by the rows in a relational database tab le.
5. ___ form e. A field in a relational database that is required to contain a unique value for each record in the table.
6. ___ object window f. A field in a relational database table that is used to refer to records in another table.
7. ___ primary key g. A type of object that you can create in Access that makes it easier for users to enter data. 8. ___ record h. The section of the Access window where you
work on the current object (table, form, query, etc.)
9. ___ relational database i. A view of a table that shows the data in rows and columns.
10. ___ table j. A view of a table that lists the fields, field data types and other field parameters.
Fill in the blank with the Access ribbon and group that is home to each of the following commands. Some ribbons only appear with a particular view of an object. You’ll have to look for them because we have not discussed some of them yet. Also, for a few there may be more than one correct answer.
Command Ribbon Group View
11. Refresh All ____________ ____________ ____________ 12. Query Wizard ____________ ____________ ____________ 13. Saved Exports ____________ ____________ ____________ 14. Relationships ____________ ____________ ____________ 15. Data Type ____________ ____________ ____________
16. New Field ____________ ____________ ____________ 17. Primary Key ____________ ____________ ____________ 18. Gridlines ____________ ____________ ____________ 19. Tab Order ____________ ____________ ____________ 20. Text Box ____________ ____________ ____________ 21. Create the database table and form discussed in the tutorial. You should do
the following to complete this exercise:
Complete the design of the database loans table as described in the tutorial. Note: in this and in all future creations of tables, it is essential that you spell the field names exactly as they are show in the tutorial. Failure to spell them correctly will result in your database not working as planned!
Complete the design of the loans form as described in the tutorial. Enter the data shown in Table 3 into loans using the loans form. Use Access Help to find the answers to the following questions:
22. How many different display formats are available for a field with the Date/Time data type?
23. What data type would you use if you want to store a large amount of text (more than 255 characters)?
24. What is a validation rule and how could you create one?
Access Tutorial 1 - Mini-Case 1:
Scenario: Nick, the owner of a small shop catering to the local fishermen
decided to expand his product line when the lake started to dry up due a drought. Blessed with a large parking area, he decided to add car sales and thus his business was reborn as Nick’s Bait, Tackle and Used Cars. Determined to keep his used car inventory as organized as his assortment of shiners and larvae, Nick decided that he needed to build a database. He’d start small with one table and then expand it as necessary. Nick realized that it’s generally better to create a design with all of the tables that would be needed first, but he figured that a one table database would be sufficient for awhile and anyway, it would be a good way to learn how to use Microsoft Access.
Your Task: Create an Access database with a table called vehicles to keep up with the list of cars on the lot of Nick’s store. Your database should conform to the following requirements:
Create your vehicles table to hold the following data for each vehicle. Set the various parameters for the field to match the description of the field provided. Field Description
ID Number This is a 6-digit identification chosen by Nick that may use both numbers and letters.
Dealer Cost The price that Nick paid for the car. Should be stored in the appropriate currency format.
Blue Book The estimated used car sales price based on the industry standard “Blue Book” estimates. Should be stored in the appropriate currency format.
Type The type of vehicle. Data values here can include car, truck, SUV, etc.
Sold A Yes/No field that can be checked as Yes for vehicles that have been sold.
Table 4 – Fields for Mini-case 1 Database
Create a form for entering data into the vehicles table. Use your form to enter the following data:
ID Cost Blue Book Type Sold
01086 $13,550 $17,888 Car Yes
01145 $10,500 $12,599 Truck No
01319 $8,100 $9,300 SUV No
A0554 $11,430 $12,800 Car Yes
Access Tutorial 1 - Mini-Case 2:
Scenario: Since getting their digital cameras the Couleur family takes a lot of pictures. As the family computer expert, Amy, is usually the one who has to upload the photos to the family computer and keep them organized. She noticed that everyone seems to take and keep a lot more photos now that everything is digital. Amy would like to create an application to help her keep track of the photos that her family takes. She wants to be able to search based on date, family member or location to find the file names of the photos on her computer. Having just studied Access at school, Amy has decided that a database might be the perfect application for storing her photo information.
Your Task: Create an Access database with a table called photos to keep up with the list of photos on the lot of Amy’s family. Your database should conform to the following requirements:
Create your photos table to hold the following data for each digital photo. Set the various parameters for the field to match the description of the field provided. Field Description
photo_ID A photo ID number that can be automatically generated. photographer The name of the family member who took the photo. date The date when the photo was taken.
location The location where the photo was taken
subject A brief description of the photo’s subject matter
color A Yes/No field that can be checked as Yes for color photos and No for black/white photos.
filename The filename of the photo stored on Amy’s hard drive.
Table 6 – Fields for Mini-case 2 Database
Create a form for entering data into the vehicles table.
Use your form to enter data. Enter about 10 records. An example record is provided in table7
the various parameters for the field to match the description of the field provided.
Field Data photo_ID 1
photographer Julie
date 8/7/2007 location Burgundy, France
subject The Roche de Solutre. A natural and pre-historic site in France. color Yes
filename roche001.jpg