Dual Position Locking Joint Design for a Medical Walker
by Eric M. Beecher
Submitted to the Department of Mechanical Engineering in Partial Fulfillment of the Requirements for the
Degree of Bachelor of Science
at the
Massachusetts Institute of Technology June 2010
© 2010 Eric Beecher All rights reserved
ARCHIVES
MASSACHUSETTS INSTITUTE' OF TECHNOLOGY
JUN 3 0 2010
LIBRARIES
The author hereby grants to MIT permission to reproduce and to
distribute publicly paper and electronic copies of this thesis document in whole or in part in any medium now known or hereafter created.
Signature of Author.
.. ...
Department of Mechanical EngineeringMay 27, 2010
C ertified by ... ...
Warren P. Seering Weber-Shaughness Professor f Mechanical Engineering and Engineering Systems Thesis Supervisor
Accepted by ...
...
John H. Lienhard V eimus Professor of Mechanical Engineering Chairman, Undergraduate Thesis Committee
Dual Position Locking Joint Design for a Medical Walker by
Eric M. Beecher
Submitted to the Department of Mechanical Engineering on May 27, 2010 in partial fulfillment of the requirements for the Degree of Bachelor of Science in
Mechanical Engineering
ABSTRACT
In this thesis we analyzed a joint created for a medical walker currently in the prototyping stage of development. The walker is designed to help a user stand up from a seated position. The joint holds two legs of the walker together in an 'x' shape. It must be able to lock in two positions and support the full weight of the user while he or she is getting up. We looked at four different locking mechanisms including a spring loaded pull pin, a friction bearing, a clutch, and an electronic solenoid. After weighing the pros and cons of each mechanism we recommend and present a design using the pull pin. In order to determine the strength and deflection of the loaded pin we modeled it both as a cantilevered beam, and a simply supported beam with three points of
contact. We compared the hand calculations to FEA of solid models and found that modeling the pin as a simply supported beam is more accurate than the cantilever representation.
Thesis Supervisor: Warren Seering
Acknowledgments
The first prototype of the medical walker described in this paper was designed by a group of 16 mechanical engineering majors at MIT. The product was created for MIT Professor David Wallace's senior design class, 2.009: The Product Engineering Process. Those primarily
responsible were the 2.009 purple team for fall of 2010 and their mentor, Eric Sugalski, as well as other class staff and mentors. The majority of post-class work on the technical aspects of the walker to date can be attributed to Luke Cummings, Garth Grove, and Eric Beecher, the author of this paper. All three were part of the 2.009 purple team and completed theses featuring the walker, advised by MIT Professor Warren Seering.
Table of Contents
A b stract ... 2
1.0 Introduction ... . .. 5
2.0 Joint Specifications ... 6
3.0 D esigns C onsidered ... 8
3.1 Spring Loaded Pull Pin ... 8
3.2 Friction B earing ... 9
3.3 Tooth Engaging Clutch ... 10
3.4 E lectronic Solenoid ... ... 11
4.0 Detailed Analysis of the Pin Locking Mechanism ... 11
4.1 Pull Pin Modeled As a Cantilevered Beam ... 14
4.2 Simply Supported Beam Representation ... 15
5 .0 C onclusion ... 17
R eferences ... 19
List of Figures Figure 1: First Walker Prototype ... 6
Figure 2: Separated Halves of New Joint Design ... 12
Figure 3: Exploded Assembly of Joint ... 12
Figure 4: Cross Sectional Drawing of the Pull Pin ... 13
Figure 5: FEA Displacements on Loaded Cantilever Solid Model ... 15
1. Introduction
Medical walkers are designed for just that, walking assistance. Unfortunately, they fail to address one of the greatest challenges their users face: standing up. There are walkers that double as chairs, motorized full body lifting devices, and nurse aiding support structures with wheels, but no successful walker is designed to help the user independently transition from a sitting to a standing position. We set out to design an affordable walker which enabled unassisted users to stand upright without detracting from its primary use as a walking aid.
After extensive market and user research we narrowed down our product specifications so that we could start designing the walker. We decided on producing an affordable walker; sold for less than $200. In order to serve its primary function as a walker it had to be comparable to leading competitors in weight, mobility, and usability. Although it filled a unique market niche, we still wanted the walker to be aesthetically pleasing with standard features like height adjustability and comfortable handles.
Several iterations of research later we produced a detailed set of product specifications and following that a walker prototype. The design of the walker was based on a two position concept. Obviously one position would allow our product to be used like a standard walker. Throughout this paper it will be referred to as the upright, standing, walking, up, or top position. The second is the position designed to help the user stand up. It will be referred to as the sitting, down, or bottom position. Additionally the walker had to be able to remain in these separate positions and transition between them when desired.
Many walker users have plenty of leg strength to move around on their own. They often have trouble with balance, endurance, joint pain, or other similar issues. These users can also get most of the way into their walkers from a chair without assistance. The problem is in starting the
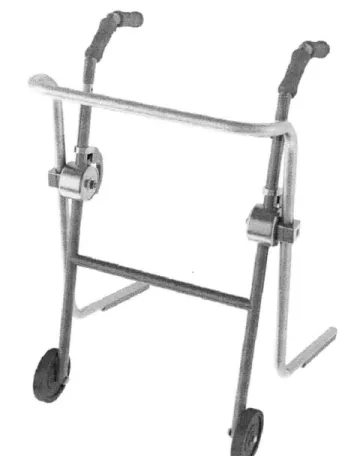
standing motion. It is hardest on the legs and joints when they are just starting to get up from a sitting position. Walker users whom we interviewed said that they go through great lengths to sit in firm chairs with armrests because they can use them to get up when they would not have been able to otherwise. The down position of our walker is inspired by this solution. It acts as a pair of firm armrests, capable of supporting the user's entire weight, regardless of the chair he or she is sitting on. You can see a picture of our prototype below in figure 1.
Figure 1: First prototype of our walker designed to help users stand up.
Much to our dismay, the prototype only worked for a few hours before failing. The joint
connecting the legs in the 'x' shape seen above broke under the user's weight. Even thought the joint was painfully over designed in some areas, it turned out to be much more complicated than
we originally anticipated. At the same time, the joint is critical to the function of the walker and we can't test any of the components without it. The goal of this paper is to present a joint design for the second walker prototype. Ideally this joint could be used in the final market ready product with some additional design changes for manufacturing on a large scale. At this point the
primary concern is creating a joint which can be used to reliably test the walker with potential users and to compare with analytical models. In this paper we will cover the specifications of the joint, look at several high level designs, and then dive into the details of the specific design recommended for the next generation walker prototype.
2. Joint Specifications
In order to design an improved joint we started by creating a set of specifications. As is true with any list of specs, it included both hard requirements which had to be met and desired features that the walker could function without, but would improve its marketability. In this section we'll focus on the essential specifications and our means of measuring how close we came to meeting those specs.
First and foremost the joint has to hold the walker legs together and support the desired range of motion. This includes the top and bottom positions and a way to transition between the two. At the very least the walker needs to be able to lock in the upright position. Gravity and the forces applied by the user are enough to keep the walker down. Additional locking positions between the two extremes change the user experience. They add safety to the walker because there are more places where user can rest his or her weight on the walker. At the same time they increase the chance of misuse and complicate the process of lowering the walker.
The joint also has to support the weight of the user. We're targeting customers with a maximum weight of 300lbs. Anyone heavier than that would probably have trouble using a walker and designing for users of their stature is extremely expensive. We wouldn't be able to make an affordable walker that could accommodate their body size and the physical loading from their weight. Assuming that the walker frame is strong enough, the entire weight of the user is transferred through the joint. All the parts and their interfaces must be capable of holding the legs in place when the user pushes downward on the walker to stand up. The locking mechanism also has to be strong enough to withstand these forces.
The specifications mentioned thus far are required for minimal functionality of the joint. They are the most basic and important properties which the joint must have. The next few
specifications are tailored to ensuring that the user can and will want to operate the walker. It needs to be a user friendly product, taking into consideration the target consumers. The users are most likely elderly and have problems with mobility and or their cognitive abilities. If there is a way to misuse the walker then it will probably happen and precautions must be taken to ensure that the user will still be safe. The design needs to be intuitive so that it can be operated without instructions. Methods of misuse must be thought of and removed so that the only choice is correct operation. Although it is impossible to completely eliminate user error, the design can focus on this and make it a priority.
Transitioning between the upright and down positions should be as simple as possible. This entails a minimal number of steps between positions and actions performed by the user. Most of the work required to change the position of the walker is a result of having to release the locking mechanism. The act itself should be so intuitive that it is like second nature to the user. Releasing the lock needs to be physically easy as well. Many of our target users have joint pain, loss of dexterity, and weakened hand strength.
The walker must be completely safe for the user, even before testing of a prototype can begin. We need to be sure that the walker can withstand anything thrown at it without failing. In order to create a marketable product we must go one step further. The walker has to feel safe to the user. For example, a chair designed with pencil thin titanium legs could serve its purpose quite well but no one will want to sit in it because it looks weak and unstable. When our users place their full weight on the walker it cannot shift a noticeable amount underneath them. A small
displacement could be perfectly safe and maybe even increase the stability of the walker, but no one will use the product if it moves when they lean on it. Therefore the joint needs to deform and shift as little as possible when it is loaded. This is especially relevant at the interface between the individual components within the walker because the method of connecting them has a huge effect on the overall deformations experienced by the product.
The last, and possibly most difficult to achieve, specification that we will mention is the need for safe failure modes. If the walker should fail, it needs to be in a way that will minimize harm done to the user. This spec is especially hard to meet because failure, by definition, is something going wrong. It's difficult to foresee failure modes and mitigate the damages done when you plan on designing a joint which functions correctly. When designing the joint we have to think
proactively, look for ways that the walker might be misused, and then put in backup supports and safety features to protect the user.
Knowledge of the above specifications is a pre-requisite to understanding the joint designs presented below. Although not complete, the list covers many of the essential specifications which were considered in designing the joint. While keeping these specs in mind it is also
important to weigh in factors like cost and manufacturability. At the end of the day we're making a commercial product and it needs to be profitable if the idea is going to get off the ground.
3. Designs Considered
There were many mechanisms which provided the necessary locking capabilities for the joint. We primarily looked at four overarching designs with the following key components: a spring loaded pull pin, friction held ratchet, clutch, and battery powered solenoid. When comparing designs we first ensured that all our definitive product specifications were met. Then we looked at cost, reliability, safety factors, and other relevant attributes. Following is a summary of each locking mechanism.
3.1 Spring Loaded Pull Pin
This is the simplest of the four designs. It uses a spring loaded pull pin to lock the walker in the upright position. When the pin is pulled the walker can be pulled down into its lowest position where a hard stop is built into the shape of the joint. One half of the joint is used to house the threaded pin sleeve and the other half has a hole drilled in it to secure the extended pin. The user releases the pin by pulling a lever attached to it.
The relatively straight-forward pull pin design offers many advantages over its counterparts. Fist of all, it's the most modular design. If our product specifications change, as is common with young products in the prototyping phases, then we can easily adjust the pin as needed. All we have to do is find a different pull pin if we want to change the maximum loading capabilities, deflections, or other characteristics. The pull pin joint assembly also has the fewest number of parts, none of which are critically dependent on the pin used. In the worst case scenario, switching the pin requires changing the size of the holes drilled into the joint halves. Having fewer parts in the final assembly generally reduces costs, increases repeatability, and simplifies manufacturing.
This design is also very dependable when used correctly. The pin will behave the same way every time as long as the walker is pulled into the fully upright position before the user begins walking. The spring should be reliable for the lifetime of the product and the pin itself is resistant to general wear and tear. The danger of this design comes when the user doesn't put the walker
into the locked position. After rising from a sitting position, the user has to pull the walker all the way up or else the pin won't be engaged. It would be extremely dangerous if someone put their weight on the walker and tried to walk when it wasn't in the locked position because it would drop down to the lowered height. This is especially harmful for our target user group, the majority of who have balance issues and can't handle a fall. Elderly users might also have difficulty in remembering to check that the walker is locked in the upright position before attempting to walk.
At this stage of design the pull pin also allows flexibility in the choice of release mechanism. Many different release mechanisms, including handles, levers, cables, etc. can be used with the pull pin. If desired, a model could also be built with swappable handles for extensive user testing because one end of the pull pin can be left exposed. The mechanical analysis for the pin design is accurate and easily adjustable as well. As will be shown in the detailed analysis sections below, most of the uncertainty is produced from the interface between parts. The pull pin has the fewest number of separate parts, simplifying and increasing the accuracy of the analysis. There are also a minimal number of adjustable factors which can be quickly changed in the analysis, having little effect on the other variables.
Unfortunately, no design is without its drawbacks. The biggest weakness of the pull pin is the number of locked positions which can be maintained. The walker needs a minimum of two positions to function: the down position used for standing up, which can be accomplished with a hard stop in joint geometry, and the up position for walking. With our design the user must manually move the walker between positions. He or she has to stand up and pull up the walker with no steps in between. A third position, between the top and bottom, would allow the user to pause and support his or her weight if rest was desired. Additional positions also act as a safety precaution in case the walker fails to lock in the up position, due to either user or mechanical failure. Each extra position requires a machining operation in the manufacturing of the joint and there is only enough room for a maximum of four or five steps. More positions also increase the chance of misuse of the walker. The user has to make sure the pin is depressed while moving the walker into the down position and can't release it on the way. Depending on how the extra positions are machined, either drilled holes or milled slots, the user might also have to release the pin on the way up. After looking at these tradeoffs we decided that it was best to make operation of the walker as simple as possible and created our design with two positions.
3.2 Friction Bearing
The friction bearing joint was designed so that the walker can be locked into a static position anywhere between the up and down extremes. In order to accomplish this it makes use of two bearings. The first is a one-way bearing which only allows motion in the upward direction. This bearing is always free to rotate so the user can pull the walker up toward the standing position at any time but the bearing prevents motion in the other direction. The second is a standard sleeve or roller bearing which can be locked into place with a spring loaded rubber stopper. The sleeve bearing allows motion in either direction when the stopper is disengaged, and is fixed otherwise. The overall effect is a joint which allows the walker to be raised at any time and only lowered when the rubber stopper is released. Additionally, the user can rest his or her weight on the
walker in any position and it will always be locked as long as the stopper isn't disengaged by the user.
This design solves the major problem with the pull pin by providing a continuous range of
locked positions. The joint minimizes misuse errors during the transition from the down to the up position. This extra safety comes at the cost of complexity. The friction bearing design has many more components than the pull pin, greatly increasing the cost of manufacturing and assembly. Changing one part also has a significant effect on the entire joint because the sizes and positions of the moving components are dependent on each other within the design. The interface between the user and the rubber stopper is slightly more limited than the pull pin design but there is still plenty of freedom to use different methods for disengaging the stopper.
The biggest challenge with this design is creating a friction stopper which can withstand the moments generated by the forces applied at the walker handles. The joint needs to bear the entire weight of the user while he or she is standing up. In order to calculate the necessary strength of the joint we take the moments about the center of the axis of rotation. The handles are roughly half a meter away from the center, compared to a couple inches for the friction locking
mechanism within the joint. We have to plan for the worst case scenario when looking at the weight on the handles. The weight limit for our target users is 300lbs. If we assume some uneven distribution of weight and use a reasonable safety factor then we're applying forces on the order of 7,OOON at the surface of the friction stopper due to the difference in moment arm length. This number changes with the size of the joint, decreasing as the joint increases in size due to the larger moment arm, but it's accurate enough for a first order design analysis. Using forces of this magnitude we can see that a friction stopper can't be used in a reasonably sized joint. The
smallest possible joint that could support forces of that magnitude with the friction stopper is at least a foot in diameter. Additionally, the stopper is as reliable as the frictional forces between the rubber and bearing surface. Even if the forces are large enough, they aren't as dependable as the other locking mechanisms mentioned in this paper. The walker needs to be completely
reliable, especially when the user is trying to stand up when there is the most potential for injury.
3.3 Tooth Engaging Clutch
The goal of the clutch joint is to improve upon the friction bearing design using a more reliable locking mechanism. The clutch joint still uses a one-way bearing or a ratchet to maintain the continuous locking range of the friction bearing joint. In order to improve the reliability and
strength of the locking mechanism we replaced the friction stopper with a toothed clutch, similar to that found in an automobile transmission. This is effectively a combination between the pull pin and friction bearing designs, capitalizing on the reliability and strength of the pull pin coupled with the safely locking range of motion of the friction bearing. The drawback to this mixture of locking mechanisms is in the complexity. It has more separate parts than either of the previous designs, and many more interfaces between those parts causing deformations in the loaded joint.
Another concern with this design is the number of locking positions on the clutch. Although it achieves a continuous locking range for raising the walker, it can only be lowered to a position where the clutch will lock. If we assume that the clutch uses interlacing teeth, then the walker
can only be safely lowered into a finite number of positions based on the distance between the teeth. The range of possible end positions can be increased using angled teeth and gaps, but this comes at the cost of increased movement perceived by the user after he or she thinks it is locked into place. Fewer positions help to ensure that the walker is fully lowered before the user tries to stand up, but that also increases the chances of the user trying to get up when the walker isn't locked into place.
We decided that at this stage of prototyping it was best to construct a simple and reliable joint for further user testing. Design changes need to be made for the entire walker and the next
generation joint has to be dependable or the rest of the walker can't be tested. The pull pin fit this criteria the best, but the clutch design shouldn't be ruled out for the final walker, especially if the users are looking for more steps between the up and down positions. The clutch design provides this in exchange for higher costs and more complexity.
3.4 Electronic Solenoid
We also considered electronic solenoids and other powered devices as locking mechanisms. They offered advantages in the area of usability. The trigger could be located anywhere on the walker. With the mechanisms listed above it was advantageous to have the release mechanism
near the joint to minimize mechanical losses and more parts to the assembly. It is also much easier to switch the state of the solenoid because it requires no force or dexterity on the part of the user. Manipulating levers and handles can be difficult for our target user group, especially for those with joint pain or cognitive impairments. However, easier to release can also be a problem because it increases the chances of the user accidentally setting the joint in an unlocked state.
After performing some user research we decided that it was best to stay away from electronic components unless they offered an extreme advantage over the alternatives. Many of our target users said that they would be more comfortable with an entirely mechanical walker. The electronic locking mechanism isn't a clear indicator of the state of the joint and some users would fails to notice signaling lights or sounds. It would also require batteries for use and our users might have trouble replacing them if they ran out. We want to create a walker that won't require maintenance for the lifetime of the product after the proper height has been set.
4. Detailed Analysis of the Pin Locking Mechanism
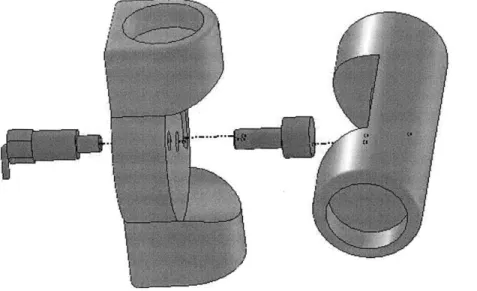
We designed the joint which can be seen in figures 2 and 3 for use in the second iteration of the walker prototype. It uses a pull pin as the locking mechanism. Two aluminum halves are attached to the separate legs and to each other. A threaded cam roller is used to connect the halves because it is easy to install and incorporate into the joint, and it allows us to achieve the
functionality of a typical bearing assembly with one part. This is cost effective in the prototyping stages, but must be redesigned before the product is market ready and produced on a large scale. The pull pin casing is threaded so that it is also easily inserted into one half of the joint. The pin extends into a single hole drilled into the other half so that the walker can lock in the upright position and the legs are unable to move relative to each other.
Figure 2: Both halves of the spring loaded pull pin locking mechanism joint assembly.
Figure 3: Exploded view of the joint assembly including pull pin, both halves, and cam
Both halves are designed so that they fit together to save space. The walker legs can be oriented in parallel or in series, meaning next to each other or in the same plane respectively. The differences between the possible orientations create an interesting set of trade offs between saving space, strength, attachment methods for the legs, and assembly repeatability. We used a series orientation to decrease the size of the joint, but that selection isn't critical to the design. It can easily be altered by increasing the size of the joint and allowing the legs to run through the halves. The interlocking design allows us to use a hard stop to support the walker in the down position. The user's weight is then supported when standing up by the solid piece of aluminum which makes up the joint, as opposed to the pull pin in the upright position.
There are two primary areas of interest we need to model before constructing the joint. We want to know the strength of the locking mechanism and the maximum loading it can safely handle before failing. In order to calculate the ultimate strength of the pull pin we looked at the three most likely methods of failure: high stresses within the material, shearing, and fatigue over the lifetime of the product. Out of those three the limiting factor was the stresses caused by loading the pull pin so we calculated the maximum stresses in all of our models. We also want to know the total deformation experienced by the joint when it is loaded. Preliminary user testing has shown that deformations under a centimeter for the entire walker are ideal and 2cm is the upper allowable limit. Knowing the joint's contribution to the total deformation of the walker is critical for optimizing the overall product design. Interfaces between the joint parts are some of the largest sources of deformation. Unfortunately, it's difficult to model these connections accurately and we found that using estimates based on the type of connection allowed us to put our time to better use elsewhere. In order to reduce those deformations we tried to minimize the number of parts and used widely accepted assembly methods. We were then able to focus our modeling efforts on the deflection experienced by the loaded pull pin. This calculation helped us to estimate the total joint deformation and produce a ballpark number for other deflections within the joint.
We used two analytical models to calculate the stresses on the pull pin and the resulting deflection. The first represents the pin as a simple cantilevered beam with a cylindrical cross
section. It looks at the exposed length of the pin and assumes that the cylinder casing acts as connection with a wall. The second is a simply supported beam with three points of contact: the top and bottom of the casing and the other half of the joint. We calculated the stress and
deflection in both cases using the beam bending equations. Then we ran a Finite Element
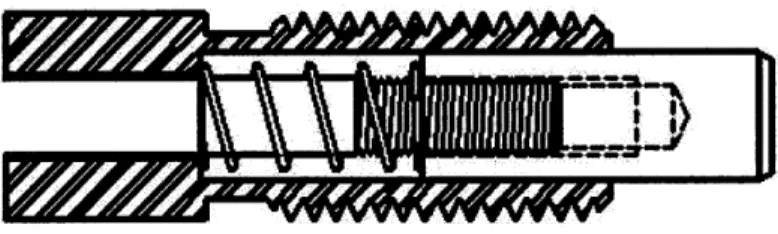
Analysis (FEA) on both models to compare results. The models and calculations are described in greater details below. Figure 4 contains a simplified cross sectional drawing of the pull pin used in our design.
4.1 Pull Pin Modeled As a Cantilevered Beam
We used the cantilevered analysis for our first order design calculations. It incorrectly assumes that the pin casing acts as a moment supporting wall, but the results are good for quick and reasonable estimates. The model sacrifices accuracy for speed and can be used to select a pin size in the correct ballpark. After that more tedious can be performed to determine the exact pin specifications. In our design we used a 15mm long steel pin with 5mm of exposed length and an 8mm diameter. The cantilevered model looks at the exposed length and treats contact with the other half of the joint as a point force applied anywhere along the beam. In order to design for the worst case loading conditions we made our calculations with the force applied at the end of the pin.
It should be noted that we used the Euler-Bernoulli beam bending theory for our analysis. This theory assumes that the beam length to width ratio is much greater than one, which is incorrect for the push pin. The Euler-Bernoulli theory ignores shear terms which the Timoshenko theory does not. The shear terms are insignificant in longer beams, but reduce the accuracy of analysis for short and stubby beams like ours. For our purposes we expect that the Euler-Bernoulli theory will get us close enough to the actual values. We're also comparing our answers to a computer model using finite element analysis so we opted to use the faster but less accurate method of hand calculation.
In order to find the stresses within the pin we need to find the maximum moment, M. It occurs at the end of the beam closest to the wall and is equal in magnitude to the resultant force, F,
multiplied by the exposed length of the beam, a, producing the simple equation
Mmax = Fa. (1)
From there the maximum stress, -, is easily calculated to be
max Mmax Y (2)
where y is the distance from the center of the beam and I is the moment of inertia of the cylinder's cross section. The maximum deflection, 6, occurs at the free end of the beam. It follows the relationship
Fa3
gmax = 3E1 (3)
3EI'
where E is the Young's Modulus of the steel. The equations above are simplified versions which apply specifically to the case in which the force is applied at the end of the beam. We used different versions of the equations to model contact forces applied between the two ends of the cantilever beam.
Using the above equations, the 7,OOON loading mentioned above, and the material properties for steel we found a deflection of 73prn and a maximum stress of 70MPa. For comparison, we ran
the same analysis using SolidWorks 2009 Simulation FEA and found a deflection of 20 tm and a maximum stress of 90MPa. Our cantilevered section for FEA can be seen in figure 5 which also depicts the exaggerated deformations. The stresses from both methods of calculation were close enough that we can use them in our design analysis. They predicted stresses well under the yield strength of steel showing that the pin is likely to hold up under maximum loading conditions without failure. The displacements on the other hand are significantly different and don't
correspond to the stress values. We would expect the higher stress to yield a greater displacement but that was not the case here. This is probably due to the neglected shear forces in the hand calculations. We can use the values for the deflection as a ballpark value for the actual pull pin but they aren't close or accurate enough to compare to testing of an actual product.
Figure 5: Simple cantilever solid model depicting exaggerated displacements after loading.
4.2 Simply Supported Beam Representation
We used an additional model to improve the reliability of our predictions. It treats the pin as a simply supported beam with three points of contact: the top and bottom of the pull pin sleeve and the other half of the joint. This is a more accurate representation than the cantilevered beam. The equations are a more complex but the analysis is still far from anything detailed enough for a marketable product. It will however serve our purpose of determining if the joint will fail when loaded and give us and idea of the displacements experienced by the pin. The assumptions behind the Euler-Bernoulli beam bending theory still don't completely hold but they're more
applicable than in the cantilever model which had suitable results for our analysis.
Two additional variables are needed for this model. b is the unexposed length of the pull pin inside the cover and L is the total length of the pin. Using these new variables the moment is
M max= Fab (4) L
The maximum stress is calculated in the same manner as before using equation 2. The maximum displacement is now
Fa 2b2 (5)
3EIL
Using the equations above, we found a maximum stress of 139MPa and a deflection of 290ptm. Unlike the cantilever model, the FEA yielded similar results for both values this time with a stress of 136MPa and a deflection of 219pm. The values were close and the higher maximum stress relates to a larger displacement as expected. However, we were surprised to see the FEA predict a smaller displacement than the hand calculation. Generally the opposite is true because the FEA accounts for the forces and displacements at each node in the mesh and the previously neglected shear forces contribute to the end result.
This unexpected relationship between the hand calculation and the FEA could be a result of the way in which we modeled the pull pin in SolidWorks. We created a part representing the full length of the pull pin. Then we added flexure-like extensions where we expected the point forces due to loading of the joint. The flexures representing the top and bottom of the pull pin sleeve were fixed at the ends. Then the 7000N force was applied to the end of the remaining flexure to
simulate the force transferred from the other side of the joint. The flexures allow us to better model the moments caused by the constraints and point forces on the pin because they're compliant along the axis of the pin. Our solid model representation of the pin can be seen in figure 6 along with the exaggerated deformations under loading.
Figure 6: Pull pin solid model with additional flexures exhibiting predicted deflections under fully loaded conditions.
Although we have no joint to compare the results with at this time, it looks like the simply supported beam with three points of contact is significantly more accurate. The FEA matches the hand calculation well and the predictions seem more likely than the results of the cantilever model. We think that the supported beam model could be relied on to make quick calculations if the pin needed changes or the joint was redesigned. Additionally, it's just as fast as the cantilever analysis whenever the point force is applied at the end. If the force is applied elsewhere then the supported beam model becomes more computationally intensive than the cantilever model, but still easily manageable.
The simply supported beam model is a cost effective way to estimate the performance of our joint. All of the necessary number can be plugged into the model quickly and the answer is
reliable enough to depend on for a first order design analysis. Care should be taken if the
maximum stresses are near the material yield strength but we had enough of a safety factor in our calculations. The predicted pin deflection allows us to estimate that the overall loaded
deformation of the handles due to the joint will be on the order of a few millimeters, which is within our acceptable range for the joint's contribution.
5. Conclusion
In this paper we presented a new joint design for a walker created to help users stand up from a sitting position. The walker is currently in the beta prototype stage and needs a reliable joint for user testing. The joint needs to be able to lock in at least two positions while it is supporting the weight of the user. In addition to the minimal requirements, the joint should also have safe or
mitigated failure modes, intuitive methods of operation, and it should be easy to transition between states.
We considered four different locking mechanisms for the joint. A spring loaded pull pin proved to be the most promising solution at this stage of production due to its reliability and simplicity. Ideally we want a joint that is easy to design and guaranteed to work when manufactured so that the entire walker can be user tested. We ruled out friction rollers and electronic locking
mechanisms for our current walker concept. The locking clutch has potential to produce a higher quality joint at the expense of increasing costs. It would be more time and cost effective to produce a simple joint and then determine if the detailed design of a clutch is necessary after extensive user testing.
Modeling the pull pin as a simply supported beam allowed us to quickly determine if the pin will fail under maximum loading conditions. There are three forces on the beam representing the three points of contact where the pin meets the top and bottom of the sleeve bearing and the other half of the joint. This model also provided an estimate of the deflection experienced by the loaded pull pin. The results of the calculations performed by hand matched closely with FEA analysis of the same loading conditions. Although this isn't as accurate as comparing to a loaded physical manifestation of the model, it's still a satisfactory indicator for our purposes. Modeling the exposed end of the pin as a cantilever beam proved to be less accurate than the simply supported beam model and offered negligible savings in time and cost of calculations, so it shouldn't be used in future redesigns of the joint.
The next step to continue work on the walker would be to build a second prototype using the new joint design presented above and begin user testing. We need to know what our target user group thinks of the product and the changes they would like to see before it is brought to market. At the same time a patent application should be filed after the initial design is finished. It could take years for the patent to be accepted and the application will be refined as the joint is, but it's important to establish ownership of the idea before someone else claims it. The walker has exceptional market potential because it fills a currently non-existent niche within medical walker sales. We recommend building a second version of the prototype with this redesigned joint to turn this concept into a profitable venture.