Design for Low Power Irrigation Systems for Small
Plot Farming in Eastern India
by
Marcos A. Esparza
Submitted to the Department of Mechanical Engineering
in partial fulfillment of the requirements for the degree of
Bachelor of Science in Mechanical Engineering
at the
MASSACHUSETTS INSTITUTE OF TECHNOLOGY
June 2015
Massachusetts Institute of Technology 2015. All rights reserved.
Author
Signature redacted
/
Department of Mechanical Engineering
May 22, 2015
C ertified by ...
Signature redacted
. Winter V
Assistant Professor
Thesis Supervisor
Signature redacted
A ccep ted by
...
Anette Hosoi
Professor of Mechanical Engineering
MASSACHUES INSTITUTE
OF rECHNOLOLGY
SEP 3
0
2015
LIBRARIES
Design for Low Power Irrigation Systems for Small Plot
Farming in Eastern India
by
Marcos A. Esparza
Submitted to the Department of Mechanical Engineering on May 22, 2015, in partial fulfillment of the
requirements for the degree of
Bachelor of Science in Mechanical Engineering
Abstract
In this thesis, I designed and tested a low-power pump that would be used for drip irrigation on small-scale farms (~ 1 acre) in Eastern India. The pump is part of a
larger irrigation system powered by 300 watts of solar panels and includes batteries as an energy buffer. The pump was designed for and achieved a performance point of
13 gal/min and a pressure head of 1 bar and surpassed the efficiency of every other
pump of its kind currently on the market with an efficiency of 29%. The irrigation system is being tested in the field in two pilot studies (ongoing as of this writing since
February 2015) in two villages outside of Chakradharpur, Jarkhand, India. Thesis Supervisor: Amos G. Winter V
Acknowledgments
I would first like to thank Kevin Simon and Katherine Taylor, my teammates on this project. We've been working together since the beginning of this low cost irrigation project of which this thesis is just a part of. They've made every portion of this adventure - from traveling around rural India to spending countless ours in lab -very enjoyable and I've learned a lot from them. I'm very excited continue to work with them on the project beyond this thesis.
I would also like to thank Professor Winter for setting us on this course and advising us throughout the project. I would also like to thank Dan Dorsch for his time and the invaluable help he gave us in constructing the pump and the nonprofit, PRADAN, for their help connecting us to farmers for our pilot study. Lastly, I'd like to thank my family for their unending support through this project and my undergraduate career.
Contents
1 Introduction 13
2 Pump Design 19
2.1 Basic Centrifugal Pump Theory ... 19
2.1.1 Energy Balance ... 19
2.1.2 Velocity Diagrams and Nondimensional Parameters . . . . 21
2.2 Im peller Design . . . . 24
2.2.1 Determining Hydraulic Efficiency . . . . 24
2.2.2 Outlet Parameters . . . . 25
2.2.3 Inlet Parameters . . . . 27
2.2.4 Hub and Shroud Geometry . . . . 29
2.2.5 Blade Geometry . . . . 29
2.2.6 Theoretical Pump Curve . . . . 31
2.3 Volute D esign . . . . 33 3 System Design 39 3.1 Battery Sizing . . . . 39 3.2 M otor Selection . . . . 42 4 Pump Testing 43 4.1 Experimental Setup . . . . 43 4.2 Experimental Results . . . . 44 4.3 Pilot Study . . . . 46
4.3.1 System Adjustments . . . .4
5 Conclusions and Future Work
49
46List of Figures
1-1 Several fallow fields near Chakradharpur in the dry season. . . . . 15
1-2 Map of India showing the depth of the water table in each region. . 16 1-3 Map of India showing the average solar resource in March 2013 . . . . 17
1-4 A chart showing pumps near the performance point needed to irrigate these sm all plots. . . . . 18
2-1 A CAD model of the designed impeller . . . . 20
2-2 A cross-section of the impeller as seen from the top. . . . . 22
2-3 A cross-section of the impeller without blades as seen from the side. . 23 2-4 Rotational speed vs. hydraulic efficiency for a flow rate of 16 gpm and
head of 1 bar shown by the black solid line. Maximum efficiency of
62.5% at 4390 rpm is shown by the red dotted line. . . . . 262-5 Chart indicating the type of pump that should be designed based on the specific speed determined by the desired performance point. . . . 27
2-6 Empirical data showing ideal head and exit flow coefficient as a function of specific speed. Ideal head and exit flow coefficient corresponding to this pump is indicated with the red, dotted line. . . . . 28
2-7 Width between hub and shroud as a function of radius. . . . . 30
2-8 Coordinates for a single impeller blade. . . . . 32
2-9 Theoretical pump curve. . . . . 33
2-10 CAD model of the volute. . . . . 34
2-11 CAD model of a section view of the volute. . . . . 35 L 2-12 A CAD model of the fully assembled pump . . . . 36
2-13 The fully assembled pump . . . .
3-1 Solar power captured by the panels on a typical day and power draw
from the pum p . . . . 40
3-2 Different power flow configurations depending on sunlight throughout the day. . . . . 41
3-3 Motor curve showing speed, current, and efficiency as a function of torque... ... 42
4-1 Diagram of the experimental setup. . . . . 43
4-2 Results of pump testing . . . . 44
4-3 Results of pump testing . . . . 45
4-4 Results of pump testing . . . . 45
4-5 Panels, charge controller, motor controller, Arduino Uno, and batteries wired up for use along with some tools for debugging. . . . . 47
4-6 Solar panels leaning on a bamboo structure made by the farmers at Som bra. . . . . 47
4-7 A plastic lined hole called a jalcund that gets filled with water. The water flowing into the jalcund is being lifted by our pump. . . . . 48
Chapter 1
Introduction
Currently, the vast majority of the 23 million small-plot owning farmers (~ 1-acre) in Eastern India (including the states of Uttar Pradesh, Bihar, West Bengal, Jharkand, and Orissa) are only capable of cultivating their land during one out three of the farming seasons during the year and that is the monsoon season as water is free during that time. During the other two seasons, the winter and "dry" season, they let their lands lay fallow as can be seen in Fig. 1-1. The few that irrigate during the winter season do so with costly and environmentally unfriendly diesel pumps that incur the recurring cost of fuel on the farmers. This cost is so prohibitively expensive that even if farmers choose to irrigate during the winter season, they will forgo irrigating in the "dry" season due to increased water needs.
There is an opportunity to make small solar powered irrigation systems for these farmers. This is due to the fairly constant low water table seen in Fig. 1-2[3] and the vast solar resource that is available to the region, as seen in Fig. 1-3[1]. Pumps powered by solar power exist but are over-sized for the amount of water needed by these 23 million small plot farmers. They are often systems larger than 1 kilowatt which leads to a large number of solar panels that a small farmer cannot afford. The goal of this project is to design and test an irrigation system specifically fit for a 1 acre farm. This design requirement fixes the water needed at about 5,300 gallon per day assuming that the farmers are in the driest part of Eastern India and irrigating the most water intensive crops.[4] If the farmer were to irrigate for seven hours out of the
day, this would amount to a flow rate of 13 gal/min.
Now that the flow rate of the irrigation system has been determined, the needed pressure head can be found. Eastern India was chosen specifically because it should have much higher agricultural productivity than it currently does because of its fairly constant shallow water table and solar resource previously mentioned. Predominantly, the water level is no more than ten meters deep so the system should be designed to provide 1 bar of pressure head as that corresponds to about 10 meters of lift. With these two design points determined the power draw of the pump can be found to be
235 watts if the pump is assumed to be 35% efficient, which will be shown to be a
realistic efficiency in Chapter 2.
This pump can be powered by 300 watts of solar panels and a pair of sealed lead acid motorcycle batteries that act as an energy buffer. The design of the pump is described in Chapter 2, the rest of the system design is detailed in Chapter 3, experiments and pump testing is reported in Chapter 4, and conclusions and future work are in Chapter 5.
Depth to Water Level Map (Pre Monsoon
-2014~
ilonieftesA CHINA PAKISTAN 1- DESH SIRM NAG ARABIAN SEA ADESH S-LAKSHADW ER -KE BAY OF BENGAL IndexDepth to Water Level (m bgl)
2 to 5 ] 5to10
m10
to 20 20 to 40m
>40 Andaman d Nicobar Hilly AreaFigure 1-2: Map of India showing the depth of the water table in each region.
-.Fk W "
A#
-16
K 0
64- 68 72* 76' sO' 84- 88* 92' Woo*
India Solar Resource
Globai Horizontal liradiance -March
36-This map depicts model 'stImats o"n"fy avaragegibsbal rnrbiafilrradiance (GiHl, at 10 km resoluton based on houdy estumates of radiation o0 er 10 years (2092-2011). The inputs
are visible imnagery from geostationary satellites,
aerosol optical depth, water vapor, and ozone. The country boundary shown is that whi-is officIally sa:onedi byheIepublic of ndia
ne il, hennal -Kavaratti Cod Trivai r >7.5 CountryCapita 76.-75 StateCapital 6.5~~ -60-63 OheCity
j
-55-"~ S -53 Port Blair 4.5-5.01 4.0-45 3.5-40 33 - AID 3.0-3.58 2.5-30 2.0-2 <2.0 1,000 m1 1,500 kmSolar Energy Cere
tNAL RENEWABLE oERGY LABOr2ATO lAtny Lopez, Billy Roberts ; April 25, 2D13M
32' 24' 2W' 16' 12* 68' 76* 80 84* 88 92- 96* P'
Figure 1-3: Map of India showing the average solar resource in March 2013
r 36* 32' 28* 24-20 16* 4' 0 rmr 0 500 500 1,000
Company and Rotomag Rotomag Honda Taizhou, Ours
Model RS1200 MBP60 WX10K1Ap.q Nimbus
Submersiblepi Surfacepi
50KB[
_ _Type Solar, Solar, Diesel, Diesel Solar,
CentrifugaL DC CentrifugaL Centrifugal Centrifugal,
DC DC
HP 1 2 1 pi 3.4 1/3
Motor goD 1500 185pa
Capacity (W) Panel/Plate 1200 1800 300 Requirement PV voltage 11oV 60V 24V Max Total 30 15 35 26 18 Head (m)
Max 12,000 (at 20m 24,000 (at 8400 22,000 4680
Discharge head)* 1In hea,
(L/hr)
7.5hr dary)*Material Stainless steel Stainless Aluminum and Metal Plastic
Steel Ceramic
Size (cm) 33x23x30 3.5 x42x 25x 11x11 51
Weight t_) 6 27 4
Price (Pump 75000 43000 29000 5400**iM 9000
Only) in Rs Price Panels 76000 114000 19000 (63 INR/W) Price 32000 48000 Diesel/Yr/Acr Lifetime 10 10 7 3 10 Price/yrTotal 15100 15700 36000 50000 2800
Figure 1-4: A chart showing pumps near these small plots.
Chapter 2
Pump Design
The proposed solar-powered pump system has an operating point of 13 gal/min at a pressure of 1 bar. In order for the system to be economical, the pump must be 35% efficient, requiring only 235 watts of power. The process of designing this pump
was followed as outlined in Pump Handbook [51, an invaluable resource for engineers looking to design pumps. Before diving into the design of the pump I will discuss basic centrifugal pump theory (Section 2.1). I will then continue with the impeller design (Section 2.2), followed by volute design (Section 2.3). Motor selection will be discussed in the following chapter.
2.1
Basic Centrifugal Pump Theory
2.1.1
Energy Balance
The internal flow of a centrifugal pump is often turbulent, has three-dimensional components, and is locally unsteady. However it is possible to use one-dimensional analysis to approximate the performance of a particular pump. We begin by looking at an energy balance, Eq. (2.1), in a control volume consisting of the volute of the pump'.
'Heat transfer in and out of the control volume is neglected as the system is assumed to be adiabatic
Figure 2-1: A CAD model of the designed impeller
PE
. =
gAH +
Au (2.1)m
In Eq. (2.1), PE represents the electrical power going into the pump and AH represents the change in total dynamic head, Eq. (2.2), from the inlet to the outlet of the pump. Au is the change in thermal energy and is not a useful kind of energy transfer for this system and represents the inefficiencies of the pump, and g is the acceleration due to gravity. This total dynamic head includes the static pressure head, velocity head, and the elevation head.
static pressure head velocity head
S elevation head
p V2 (
H= + - + Z (2.2)
pg 2g
In Eq. (2.2), p is the static pressure at the outle of the volute, V is the velocity of the water at the volute outlet, and Z is the elevation difference between the inlet of the pump and the point of the irrigation system in which the water reaches atmospheric pressure. As can be seen in Eq (2.1), not all of the power goes into the change in total dynamic head. The efficiency of the pump is then represented by Eq. (2.3). As the goal of this project is to design a very efficient pump, it is important to look
efficiency 7
1h, and the volumetric efficiency 7,.
gAHrai
g A = (2.3)
PE
motor efficiency, qe mechanical efficiency, 77m
Ps P1
E (2.4)
hydraulic efficiency, 77h volumetric efficiency, 77v
AH
Q
X
AHi Q+QLIn Eq. (2.4), AHj is the ideal pump head,
Q
is the flow rate, and QL is the lost flow due to leakage. At each step of the pump design process, attempts were made to mitigate each of these inefficiencies. At this initial pump design stage of determining the impeller geometry, maximizing hydraulic efficiency was the goal.2.1.2
Velocity Diagrams and Nondimensional Parameters
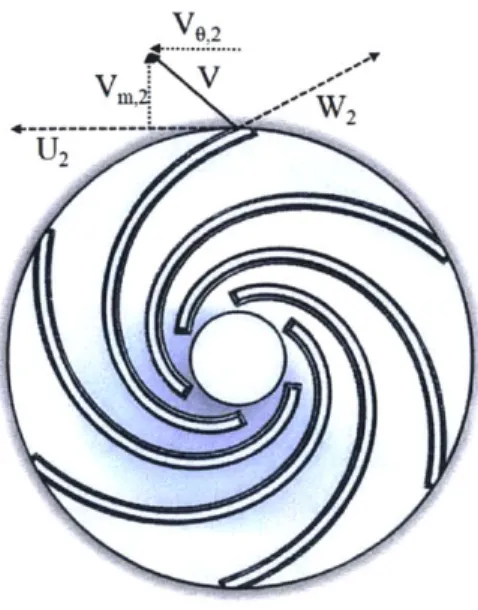
Before going further, it is important to complete our vocabulary regarding pump design. Fig. 2-2 depicts a bird's eye view of the blades of the impeller with a velocity diagram of the water at the tip of one of the blades. The resultant vector V is made up by the addition of two velocities: U2 the velocity of the water tangent to
the circumference of the impeller and W2 the velocity of the water tangent to the
blade. V can also be broken up into its normal components: the meridional flow Vm,2
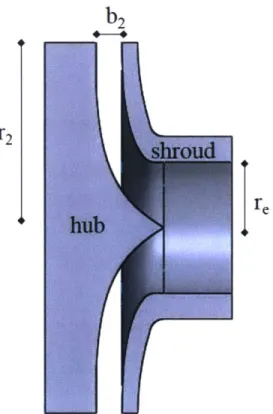
and its tangential flow V,2. Fig. 2-3 shows a cross-section of the impeller the general dimensions of the pump: the outer radius r2, the radius of the inlet (also known as
eye) re, and the width at the exit b2.
In order to greatly simplify the process of pump design, dimensionless variables are used and can be seen in Eq. (2.5)-(2.9).
VO,2
4.--V
Fc o t W2
U2
Figure 2-2: A cross-section of the impeller as seen from the top.
Q
Qs = 3 Qrj gAH 02 Vm,2 _Q
U2 - 21rQr2b2 Ve eUe Q/Ae Specific Flow Head Coefficient Exit Flow Coeffcient Inlet Flow Coefficient Cavitation Coefficient-
Q
7r2r3
In Eq. (2.5)-(2.9) Q is the angular velocity of the impeller, g is the gravitational constant, 1V is the average meridional flow at the inlet, Ue is the tangential velocity at the inlet, Ae is the area of the inlet opening2, and NPSH is the net positive suction
2gNPSH T = Q2r2 (2.5) (2.6) (2.7) (2.8) (2.9)
re
Figure 2-3: A cross-section of the impeller without blades as seen from the side.
head, given by Eq. (2.10)
NPSH
=Pin -Pv
(2.10)
P9
= 9.87 meters (2.11)
where Pin is the atmospheric pressure (1 bar) and p, is the vapor pressure of water
(0.032).
2.2
Impeller Design
2.2.1
Determining Hydraulic Efficiency
When designing the impeller, I attempted to optimize the hydraulic efficiency, r7h, about the performance point,
Q
= 16 gpm3 and AH = 1 bar. The optimal shape ofthe impeller is determined by the specific flow,
Q,
of the pump when there is negli-gible viscous influence, no two-phase fluid effects, and no solid particles in the flow. However, the designer will not know the radius of the impeller or the angular velocity at this stage of the design process. For this reason, the square root of the specific flow (Eq. (2.5)) can be divided by the -power of the head coefficient (Eq. (2.6)), 'in order to cancel out the radius term r2 in each parameter. The resulting parameter
the specific speed and is given by Eq. (2.12).
Ns = N(rpm) * Q(gpm) _ V (2.12)
AH(ft)3/4 - 3/4
Although we have eliminated the radius term in our parameter, the speed at which the impeller will spin is also unknown at this point. Fortunately, an empirical correlation that relates efficiency to impeller speed exists
[21
and is given by Eq.nh= 0.94 - 0.08955 x
[Q(gpm)
x X-0.2 1333 - 0.29x [logio(2
)]2 (2.13)
N(rpm)
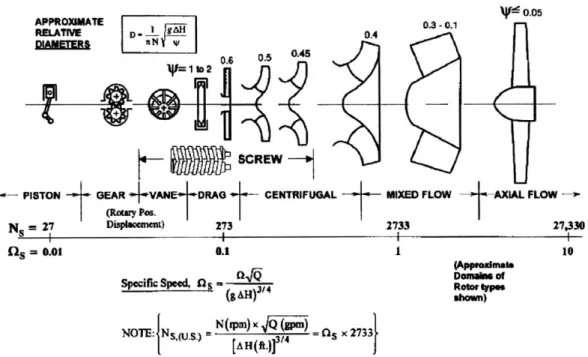
28The impeller speed, N, was plotted versus the hydraulic efficiency 71h of the
im-peller for our desired flow rate and can be seen in Fig. 2-4. The optimal imim-peller speed and specific speed were calculated to be 4390 rpm and 1281 respectively and gave a maximum hydraulic efficiency of 62.5%. The specific speed also indicates the type of pump that should be designed as can be seen in Fig 2-5. Our specific speed of 1281 indicates that a centrifugal pump is the pump that should be built.4 Due to the motor selection that will be described in Chapter 3, the actual impeller speed was 4000 rpm leading to a specific speed of 1170. As can be seen in Fig. 2-4, this variation in speed leads to a negligible decrease in maximum hydraulic efficiency.
2.2.2
Outlet Parameters
Now that the speed and type of pump to be designed has been determined, the impeller can now be sized. By rearranging Eq.(2.6) and (2.7) it can seen that the outlet parameters r2 and b2 can be determined once the pump head coefficient,
4,
and the impeller exit,#
flow are found.1 gAH
1r2
= A(2.14)
b2 = 2r (2.15)
This can be done using existing empirical correlations between the pump head and flow coefficients and the metric specific speed. (Eq. (2.6)-(2.7))and the metric specific speeds (in this case Omegas = 0.41) of the impeller.
[7].
4One may also notice that a screw pump could also be used for our application and it could be
argued that its superior efficiency would make it a better choice. However, its construction requires precision parts which greatly increases the cost of the pump. For this reason it was not chosen.
0 1000 2000 3000 4000 Impeller Speed
5000
(rpm)
6000 7000
Figure 2-4: Rotational speed vs. hydraulic efficiency for a flow rate of 16 gpm and head of 1 bar shown by the black solid line. Maximum efficiency of 62.5% at 4390 rpm is shown by the red dotted line.
0.8
0.7 0.6 0.5 0.4 0.3 0.2 0.1 CD CD C) E m- m--I - --I -I - -08000
APPROXIMATE RELATIVE 0A -0.1 0.05
Dof~H 0.4
0.6 0.5 0.4
190
SCREW
PISTON + - GEAR 4.VANEtDRAG
4-
CENTRIFUGAL MIXED FLOW AXIAL FLOW--t (10twy pos.t N = 27 DisplOament) 273 2733 27,330 Li= 0.01 0.1 1 10 (Appiodmala Specific Spwcd, fls 0Q-D RI of ( 34H) 3 hW) NOTE: Ns,(uS.) =N(pm) x IQ (?x) = Cs 2733} [A H.QL)f'
Figure 2-5: Chart indicating the type of pump that should be designed based on the specific speed determined by the desired performance point.
The correlation of the ideal head and flow coefficients vs. the metric specific speed can be seen in Fig.2-6. Using these correlations, the head coefficient and the outer radius were calculated to be 0 = 0.49 and r2 = 1.51 inches respectively. The channel
height at the exit can also be calculated from the ideal impeller exit flow coefficient which is calculated to be
#
= 0.11, indicating a channel height of b2 = 0.20 inches at the outer edge of the impeller.2.2.3
Inlet Parameters
Next, in order to determine the inlet radius re, we must use the cavitation (Eq. (2.9)) and inlet flow (Eq. (2.8)) coefficient. Empirical data exists for the ideal cavitation
coefficient as a function of the inlet flow coefficient and is shown in Eq. (2.16)[5].
The specific suction speed Q,, (similar but not the same to specific speed) must also be used. Q,, can already be calculated directly using known values (Eq. (2.17)) but
-- Pump Head Coefficient
0.6- - Impeller Exit Flow Coefficient
0.5 0.4- 0.3-0.2
-
-0.1 -0 0 0.2 0.4 0.6 0.8 1 1.2 1.4 1.6Metric specific speed
Figure 2-6: Empirical data showing ideal head and exit flow coefficient as a function of specific speed. Ideal head and exit flow coefficient corresponding to this pump is indicated with the red, dotted line.
Eq. (2.8) and (2.9) can also be rearranged in order to give Q,, in terms of
#,
and T. r = 1.7922 + 0.102 (2.16)Q
=- (2.17)(gNPSH)
3/
4 -~
(2.18) (-T/2)3/4 re =(
)1/3 (2.19)Using the empirical correlation (Eq. (2.16)) and an iterative solver, a solution for
#,
was found so that Eq. (2.17) and (2.18) are equivalent.#,
was found to be 0.31 and re was found to be 0.503 inches.2.2.4
Hub and Shroud Geometry
Now that the general dimensions of the impeller have been determined, we can now find the shape of the hub and shroud. The restrictions on the design of the shroud are pretty loose and only require that the minimum curvature of the shroud is less than the inlet radius re = 0.503 inches. The width between the shroud and the hub
should be designed so that the meridional velocity (and therefore the cross-sectional area) increases linearly.15] The height of the channel as a function of radius can be seen in Fig 2-7.
2.2.5
Blade Geometry
Finally, the blade geometry must be determined. There are a few different techniques to determine blade geometry including those in which blade angle changes with height at the same radius so that the blade is tilted. However, for this application a simplified technique was used in which the blade geometry is constant with height. This was to facilitate future ease in manufacturing as the current 'simplified' impeller can more easily be made in two parts using injection molding. This would be much more
6.5 C C 6--05. 5 10 15 20 25 30 35 40 Impeller radius (mm)
difficult if the blades were tilted.
A constant blade angle of
#
= 22.5' was chosen according to [5]. The polar coordinates of the blades can be determined using a summation of a discrete form ofEq. (2.20).
dr
dO
= r (2.20)r tan(#)
Figure 2-8 shows the coordinates of a single blade on the impeller. The number of blades can be determined using Eq. (2.21). The number of blades is important as it influences the pressure difference between blades; too great a pressure difference can lead to cavitation.
0-
= X(2.21)
27rr2
In Eq. (2.21), o- is the solidity, and
I
is the arc length of the blade (which for our case is1
= 2.69 inches). For a pump of our specific speed, its recommended that thesolidity is about 1.8.[5] With six blades (nb = 6) the solidity is o- = 1.94. This is closer to 1.8 than when using any other integer value for nb. The designed impeller can be seen in both Fig. 2-1,2-2, and 2-3.
2.2.6
Theoretical Pump Curve
A conservative theoretical pump curve can be constructed using the ideal head
equa-tion (2.22) and multiplying the result by the empirical hydraulic efficiency (2.23) at every flow rate.[5] The theoretical pump curve for our pump can be seen in Fig 2-9. This curve assumes perfect efficiency at all other points of the pump (motor, leakage etc.) so it is expected that the maximum head reached is higher than our target of 1 bar. Also, the pressure head will not go to zero as flow rate goes to zero as ,in reality, the lack efficiency will instead translate into loss of flow rate rather than pump head at this low flow rate. Instead it will likely be larger than the max shown, the empirical formula (2.23) does not capture this. This not our operating point so this discrepancy is unimportant.
30- 25-20 E 15- 10-0
0--5 -10--40 -30 -20 -10 0 10 x-coordinate (mm)
1 .5
CD
-0.5
--0'
0 5 10 15 20 25 30 35 40 45
Flow Rate (gal/min)
Figure 2-9: Theoretical pump curve.
H U2 U2 cot(3)Q (2.22)
g 17rr2b29
'7hy = 1 - 0.8/Q[gp]0.25 (2.23)
2.3
Volute Design
The volute (Figure 2-10) converts the rotational kinetic energy of the water into a desired pressure head. Kevin Simon took the lead on the volute design but I will include a brief description of the process for completeness. A more detailed expla-nation of the process can be found in his thesis.[61 In order to mitigate recirculation and progressive acceleration the pressure head must remain constant at every point
Figure 2-10: CAD model of the volute.
9 along the edge of the impeller. In order to do this, the cross section of the path the water takes in the volute must increase proportionately as it makes its way around the volute as shown in Eq. (2.24). Fig.2-11 shows this linear increase of cross section along the circumference of the impeller.
Q(9)
Avo (0) = (2.24)V
6(
Q(9)
=
Q(
27r)--
(2.25)
27rV
0((0)
= Vo(27r)r(27r) (2.26)r(9)
Fig. 2-12 shows a model of the fully assembled pump. The volute was made out a
ABS plastic with a FDM 3D printer. In order to prevent leakage through the plastic
and increase the volumetric efficiency, a combination coating the volute in epoxy and an acetone vapor bath was used. Fig. 2-13 shows the fully assembled pump and the resulting smooth features on the volute is a result from the painting and acetone vapor bath.
Chapter 3
System Design
3.1
Battery Sizing
The irrigation system consists of the pump described in the previous chapter, 300 watts of solar panels, a charge and motor controller, and batteries that act as an energy buffer. The batteries are necessary because, as seen in Fig. 3-1, the captured solar power is not constant and is more often than not greater or less than the power necessary to run the pump. The battery assists the pump during the times when it is running but there is not enough sunlight to run the pump solely off the panels (Fig. 3-2c). When there is more sunlight than is necessary, the extra power is stored in the battery (Fig. 3-2a). Lastly, at the beginning and end of the day, when there is low sun and the pump is off, the power from the panels is again stored in the battery for when it is needed (Fig.3-2b). The size of the battery can be determined by measuring the difference in the curves of Fig. 3-1 at one point where the power draw is greater than the solar radiation. Assuming that we only discharge the batteries by 30% in order to allow them to last longer, 131.6 watt-hours are needed to ensure that the pump can run when there is not sufficient sunlight. For a 12-volt battery this corresponds to about 11 amp-hours which is a little less than two motor cycle batteries (each being 7 amp-hours).
300 CD, 0t 250 -200 - 150-100 -I I I 50 F 0 0 5 10
Hour of the Day
15 20
Figure 3-1: Solar power captured by the panels on a typical day and power draw from the pump
-- Pump power draw Solar radiation
L
IPower for Pump Energy to be used Solar Power Energy to be stored (a) Power flow configuration at peak
sun-light times. (middle of the day)
Solar Power
(b) Power flow configuration light times (begining and end
Power for Pump
Energy to be stored
(c) Power flow configuration at times of medium sunlight.
Figure 3-2: Different power flow configurations depending on sunlight throughout the day. I Solar Power at low sun-of the day).
6000 . . . 30 0.7
0.6
-0.5 4 0 0 0 .. ----.. .. . .. . .-.. ---..
..
..
-- -..
-. ---... --2
0
0.4 CL. a) 0 0.3 CO W -0.20
----
- - - -
- - - -
.
-
.
--
-1-
0
0
0 50 100 150 Torque [oz-in]Figure 3-3: Motor curve showing speed, current, and efficiency as a function of torque.
3.2
Motor Selection
A brushless DC motor was chosen from Anaheim Automation.1 A brushless motor
was chosen over a brushed motor because of its longer lifetime and its higher efficiency. It was selected as it had a rated speed of 4000 rpm which is close to are design point of 4390 rpm and it had the necessary torque to maintain that speed. Using the manufacturer supplied motor specifications, a motor curve could be created and is seen in Fig. 3-3. As can be seen on the curve, at our performance point of 4000 rpm, the efficiency is 62%. The effect of this low efficiency will be discussed further in Section 4.2.
Chapter 4
Pump Testing
4.1
Experimental Setup
The pump was tested using a basic fluid circuit shown in Fig. 4-1. It included the pump in a basin full of water, a pressure gaugel,a valve to control the line pressure and a flow meter2. The voltage supplied to the pump was controlled by a DC power
supply and current was measured with a clamp-on ammeter3
'High-Accuracy Pressure Gauge supplied by McMaster (product #4007K2) with an accuracy of
0.5%.
20mega FTB792 with an accuracy of 1.5%.
3
Fluke 373 True-RMS Clamp-On meter with an error of 1%.
Power Supply
with readings Pressure Gauge
Pump Curves - Flow
-- Pp1 -+ "Pm 22
1.8
1.6
x10
0.6
0.8
Flow [m3/s]1
3 4 51.2
1.4
x10-3Figure 4-2: Results of pump testing
4.2
Experimental Results
Five pumps were built and tested. The results of these tests showing pressure, power draw, and efficiency vs flow rate can be seen in Fig. 4-2, 4-3, and 4-4. First of all, as can be seen in Fig. 4-2, our performance point of 13 gal/min (here in metric as 0.8m3/s) and a pressure of 1 bar (also in meteric at 100 kPa) was met. However, a great deal of variation between the pumps can be seen. One can also see that our most efficient (represented by the black line in each figure) reaches an efficiency 29% which is short of our goal of 35%. This leads to a power draw of 305 watts at our performance point which is greater than what was expected. This is easily explained by the uncharacteristically low efficiency of our motor, which was 62% efficient. With
a more typical brushless DC motor with 90% efficiency, a pump with our impeller
p U - Pump Pump' .4 .2 1 C,, (D V) 1~
0.2
0.4
0.8
0.6
0.4
) 5 IPump Curves - Power Consumption
330-
320-
310-
-'300-c
290
0S280 d-270-260 - 250-240-)
0.2 0.4 0.6 0.8 Flow [m 3/s] 1 1.2 1.4 x 10⁻³Figure 4-3: Results of pump testing
Pump Curves - Efficiency
-* ump 1 -+ ump 2 -- Pump 3 -- Pump 4 -*Pump 5
-
I
I I I I I I I I I I I I I I I I I I I I I I 0 0.2 0.4 0.6 0.8 1 1.2 1.4 Flow [m3/s] x103Figure 4-4: Results of pump testing
-+ Pump 1 -+ Pump 2 + Pump 3 --+ Pump 4 -*- Pump 5
30-25
-
20-
3-15-
10-54.3
Pilot Study
As of February 2015, two pilot studies of the system are taking place in the villages of Jenasai and Sombra, near the town of Chakradharpur, Jharkhand.
4.3.1
System Adjustments
Given that the pump that was designed and built had a much larger power draw than what the rest of the system was designed for, some adjustments had to be made. This includes increasing the battery storage to two 12 volt, 9 amp-hour batteries (as opposed to 7 amp-hours). 300 watts of panels (two 150 watt panels) were still used in order to keep the number of solar panels the farmer had to carry manageable and because the panels represent the bulk of the system cost. Because the power from the panels was not sufficient to power the pump on its own at any time, the batteries needed to be charged while the pump was off in order to assist the panels when the pump was running. In order to accomplishment this, a hard timer was programed into an Arduino Uno and allowed the battery to charge for 25 minutes before the Arduino signals a motor controller to turn on the pump. Once the pump ran out the battery, which the Arduino was powered by, the Arduino would shut down for a few seconds until the solar panels charged the batteries enough to power the Arduino and the timer would start again. This reduction in running time led to a reduction in the amount of water total per day by about half of what we expected. Fortunately, rather than using flood irrigation the farmers we are working with employ an efficient irrigation technique in which they fill a plastic lined hole called a jalcund (Fig 4-7), fill watering cans from the jalcund and spot water the plants. For this reason, we
Figure 4-5: Panels, charge controller, motor controller, Arduino Uno, and batteries wired up for use along with some tools for debugging.
Figure 4-6: Solar panels leaning on a bamboo structure made by the farmers at Sombra.
Figure 4-7: A plastic lined hole called a jalcund that gets filled with water. The water flowing into the jalcund is being lifted by our pump.
Chapter 5
Conclusions and Future Work
As was explained in Section 4.2, although a the pump that was designed did not meet the 35% efficiency goal (instead getting 29% efficiency), it is still at a much higher efficiency point than any other pump of its kind on the market. Also, by replacing the current motor with a more efficient one, an efficiency of 42% can be reached. Further work includes getting a more accurate cost of the system, acquiring said high efficiency motor, designing a more repeatable manufacturing process and improving the electronics design to manage power moving between the pump, panels, and batteries. There are also plans to redesign each of the pump parts with large scale manufacturing in mind.
As of the writing of this thesis, the farmers in Jenasai and Sombra have continued to use our system and are irrigating in the Dry season for the very first time. We plan on continuing to work with these farmers and improve the pump and system to further meet their needs. The project will be continued through the Global Founder's Startup Accelerator at the Martin Trust Center at MIT, with the goal of starting a company so that we can help as many farmers as we can irrigate through the year.
Bibliography
I11
India solar resource, global horizontal irradiance - march. Technical report, Na-tional Renewable Energy Laboratory, 2015.12]
H. H. Anderson. Prediction of head, quantity and efficiency in pumps - the area ratio principle. Performance of Centrifugal Pumps and Compressors., 1980.[3] Central Ground Water Board. Ground water scenario, premonsoon 2014.
Tech-nical report, Ministry of Water Resources, Government of India, 2014.
[4] Aditi Mukherji et al. Major insights from india's minor irrigation censuses:
1986-87 to 2006-07. Review of Rural Affairs, 2013.
[5] Igor J. Karassik. Pump Handbook. McGraw Hill, 2008.
[61 Kevin Simon. Applications of design for value to distributed solar generation in
indian food processing and irrigation. Master's thesis, Massachusetts Institute of Technology, 2015.