The Design of an Educational Tool for Visualizing Freedom and
Constraint Topologies
by
Juan Pablo Mendieta
SUBMITTED TO THE DEPARTMENT OF MECHANICAL ENGINEERING IN PARTIAL FULFILLMENT OF THE REQUIREMENTS FOR THE DEGREE OF
BACHELOR OF SCIENCE IN MECHANICAL ENGINEERING AT THE
MASSACHUSETTS INSTITUTE OF TECHNOLOGY
JUNE 2008
02008 Juan Pablo Mendieta. All rights reserved.
The author hereby grants to MIT permission to reproduce and to distribute publicly paper and electronic copies of this thesis document in whole or in part
in any medium now known or hereafter created.
Signature of Author:
(/V
I
Dep rtment of Mechanical Engineering/,
/
7
May 9, 2008Certified by:
T- - Martin L. Culpepper
Associate Professor of Mechanical Engineering Thesis Supervisor Accepted by: MASSACHLUSETTS INSTITUTE OF TECHNOLOGY
AUG 14
2008
LIBRARIES
John H. Lienhard V Professor of Mechanical Engineering Chairman, Undergraduate Thesis CommitteeARCHIVES
lr - - \
The Design of an Educational Tool for Visualizing Freedom and
Constraint Topologies
by
Juan Pablo Mendieta
Submitted to the Department of Mechanical Engineering on May 19, 2008 in Partial Fulfillment of the
Requirements for the Degree of Bachelor of Science in Mechanical Engineering
ABSTRACT
The purpose of this thesis project was to figure out how to make a parametric
CAD model of a cylindroid, hyperboloid and a hyperbolic paraboloid. These models will
help designers better visualize and understand flexure motion and constraint topologies. The models needed to include the lines that form the ruled surface of each shape. It was difficult to model these lines. The equations that represent the shapes define the position of the points on the surface, not the lines of the ruled surface. I had to figure out how to model each line such that the shape's geometric parameters were satisfied and the surface would still be ruled.
Using the equations and specific points on the surface, I developed a method to make the parametric CAD models of each shape with the lines on the ruled surface. With this approach, anyone with basic SolidWorks skills can model these shapes to meet their preferences, whether it is a matter of size, resolution of lines or curvature.
These shapes will be displayed and handled at conferences to give flexure designers a better physical intuition of the complex geometric entities that make up the essential building blocks of the FACT design process. These geometric shapes were solid modeled with the intention of 3-D printing them.
Thesis Supervisor: Martin Culpepper
ACKNOWLEDGEMENTS
I would like to thank Professor Martin Culpepper and Jonathon Hopkins. If it wasn't for their support and patience, this thesis would not have come to fruition. I really enjoyed working with them and I feel I got a lot out of this experience.
TABLE OF CONTENTS
ABSTRACT... ... ... 2 ACKNOWLEDGEMENTS... 3 TABLE OF CONTENTS... ... 4 1. Introduction ... ... ... 5 1.1 Purpose...5 1.2 Impact...52. Background and Theory... ... 6
2.1 "Freedom and Constraint Topologies" (FACT)...6..
2.2 Ruled Surfaces ... 8
2.2.1 Cylindroid... ... 8
2.2.2 Hyperbolic Paraboloid ... 10
2.2.3 Circular Hyperboloid...12
3. Design and Modeling...13
3.1 Alternative Designs ... 13
3.2 Modeling a Cylindroid ... 15
3.3 Modeling a Hyperbolic Parabloid... ... 20
3.4 Modeling a Circular Hyperboloid ... 23
3.5 Geometric shapes with rigid stages ... . ... 25
4. Conclusions ... .. 28
5. R eferences...29
1.
Introduction
1.1
Purpose
The purpose of this project was to figure out how to make a parametric CAD model of a cylindroid, hyperboloid and a hyperbolic paraboloid to help designers better visualize and understand flexure motion and constraint topologies. These shapes will be displayed and handled at conferences to give flexure designers a better physical intuition of the complex geometric entities that make up the essential building blocks of the "Freedom and Constraint Topologies" (FACT) design process.
FACT enables designers to consider every possible flexure design concept for achieving any given motion. Designers cannot use FACT, however, if they don't understand the spaces within which the solutions lie. The importance of this project, therefore, is to help designers comprehend and visualize these spaces and their parameters so that they will be able to use and adapt them in the implementation of FACT.
Most of the shapes used in the FACT design process are easy to visualize and don't require physical models to aid in the comprehension of their geometry. Three of the shapes, however, are very complex and do require tangible models to understand their parameters through viewing and physical handling. These three shapes, cylindroids, circular hyperboloids, and hyperbolic paraboloids, are essential building blocks of FACT and must be understood before they can be used to design complex flexure systems. The objective of this project is to construct these three shapes in a parametric CAD.
1.2 Impact
This thesis will impact the fields of nanotechnology, MEMs devices, and microscopy in that it will enable designers learn how to create multi-axis, precision motion stages that move with complex motions that could not have been designed prior to the creation of the FACT design process. Physically handling the models of the complex geometric shapes will make it easier for designers to grasp and apply the FACT design process. Through FACT, designers will be able to compare and select the best possible
flexure system for a product from an array of possible flexure concepts. With this
understanding, designers will be better equipped to develop flexure systems for precision components in consumer products, such as hard disks, blu-ray systems, digital cameras
and plasma and LCD monitors. Other fields wherein flexures play an important role are in nanotechnology fabrication, lens fixtures and scanning-probe microscopy. Improving the design process of flexure systems could increase the quality and decrease the cost of these products and equipment.
2. Background and Theory
2.1
"Freedom and Constraint Topologies" (FACT)
Traditionally, when developing a constrain-based design, a designer had to
undergo a visual iterative process, relying on his visualization skills to find an appropriate flexure system. FACT, on the other hand, uses three-dimensional geometric shapes to represent quantitative information about a flexure system's geometry (its constraint topology) and its degrees of freedom (its freedom topology) [1]. A first set of geometric entities contains information about the flexure system's freedom topology and a second set contains information about the flexure system's constraint topology, as shown in Figure 2.1. These entities may be used to visualize coupled rotations-translations with respect to the constraining flexural elements.
(i) (ii) (iii)
Figure 2.1: An example of a freedom and constraint topology. The red line represents the permissible motion. The blue planes represent the appropriate geometric entities that contain the constraints. These two entities are used to generate 3 concepts for a flexure system. [1]
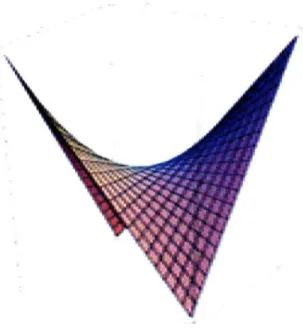
The geometric shapes used by the FACT method that are hardest to visualize are the cylindroids, hyperbolic paraboloids and hyperboloids. These geometric shapes represent a collection of freedom and constraint lines as shown in Figure 2.2.
Figure 2.2: A hyperbolic paraboloid has two orthogonal lines crossing every point on its surface. The set of blue lines represent the constraint lines. The set of red lines consists of freedom lines. The direction that is orthogonal to every constraint line is a translation. [1]
The purpose for modeling these complex geometric shapes is to make it easier for designers to understand FACT. The FACT process helps designers develop three-dimensional, multi-axis flexure systems. The importance of FACT is that it provides designers with all of the possible design solutions for parallel flexure systems. This is an important step forward in the design of flexure systems. Prior to FACT, it wasn't
guaranteed for an experienced designer to generate all of the possible designs that would satisfy the required motion.
In a flexure system, the flexural components are attached at one end to a rigid stage that will move in a desired motion and at the other end to a grounded body, as shown in Figure 2.3. Ideal constraints restrict motion in only one direction. FACT will help designers determine the optimal constraint topology for a set of desired motions such that the part in question will move with the desired degrees of freedom.
Optimal Constraint Topology
nslk I
Grounded Compliant Constraints
Figure 2.3: FACT provides designers with all of the possible design solutions for parallel flexure systems, allowing designers to determine a flexure system's optimal constraint topology. [1]
2.2
Ruled Surfaces
This section introduces the three ruled surfaces in which the design of the models was based on. The three ruled surfaces, which appear often in the 26 freedom and constraint spaces, are the cylindriod, hyperbolic paraboloid and the circular hyperboloid. A ruled surface is a surface made of an infinite number of lines. A surface is ruled if through any given point on the surfaces there is a straight line that intersects it and lies completely on that surface. These surfaces are common in many freedom and constraint spaces since freedom and constraint sets are spaces that contain twist and constraint lines.
2.2.1 Cylindroid
A cylindroid is a cylinder with an elliptical cross-section. It is a quadric, ruled surface as shown in Figure 2.4.
Figure 2.4: A common cylindroid. [1]
With a suitable coordinate system, a cylindroid can be represented using polar coordinates as
x = rcosO
y = r sin O (2.1)
z = -h cos 0 sin 0
where h is the height of the cylindroid along the z-axis. E1] For these equations to be true, a coordinate system must be properly assigned to the center of the cylindroid as shown in Figure 2.5.
h
Figure 2.5::ipal
ators
Extreme
Generators
A cylindroid with a coordinate system at its center. [1]
Every cylindroid has two orthogonal principal generators that intersect each other at the origin. Every point along the z-axis between the two extreme generators is the
intersection point of two lines within the cylindroid that both lie on a plane that is parallel to the x-y plane. An approach to thinking about ruled nature of a cylindroid is by rotating a straight line about the axis of the cylindroid and moving it straight up and down to get the desired shape. The radius of the cylinder is not important since the lines extend to infinity.
2.2.2 Hyperbolic Paraboloid
A hyperbolic paraboloid is a doubly ruled, quadric surface that is shaped like a saddle. It contains hyperbolic and parabolic cross-sections. A surface is doubly ruled if at any point on a surface, the point is intersected by two straight lines that both lie entirely on the surface. A hyperbolic paraboloid is shown in Figure 2.6.
~'"~····,...
rC~I`~JC~.··:aa..
-o
..Figure 2.6: A hyperbolic paraboloid. Every line is a straight line that lies entirely on the surface of the hyperbolic paraboloid. [1]
In a suitable coordinate system, a hyperbolic paraboloid can be represented by the equation"l l
X2 y2
z = 2 b2 (2.2)
a b
where a and b may be any real numbers. This equation is true only when the coordinate system is assigned to the center of the hyperbolic paraboloid as shown in Figure 2.7.
Asymptotic
Primary
Figure 2.7: A hyperbolic paraboloid with a coordinate system assigned to its center. [1]
2.2.3 Circular Hyperboloid
A circular hyperboloid is a quadric surface with hyperbolic and circular cross-sections. A hyperboloid of one sheet is a doubly ruled surface. A circular hyperboloid is shown in Figure 2.8.
Figure 2.8: A one sheet, circular hyperboloid. [1]
C
A circular hyperboloid can be represented by the equation['1
X2 y2 2
-=1
L2 C2 (2.3)
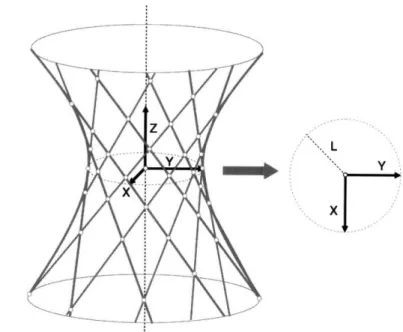
where L is the radius of the circular cross-section on the x-y plane and c is a real number that determines the rate that the hyperboloid extends out as it travels away from the x-y plane. This equation is true only when a coordinate system is assigned to the center of the circular hyperboloid as shown in Figure 2.9.
L
Figure 2.9: A circular hyperboloid with a coordinate system at its center. Circular hyperboloids are also doubly ruled surfaces as shown in Figure 2.9.
3. Design and Modeling
3.1
Current Designs
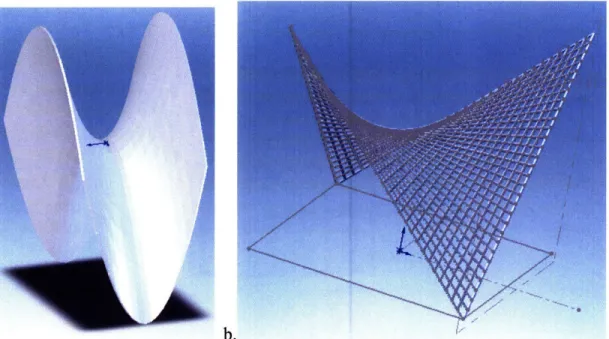
The purpose of this project was to figure out how to make parametric CAD models of these complex geometric shapes to help designers better visualize and understand flexure motion and constraint topologies. In order for the designers to visualize the flexure motion and constraint topologies, it is necessary to model the lines that make up the ruled surfaces of the different shapes. If the surface is modeled as a solid plane, it would not be clear as to where or how the desired object would be
constrained, as seen in Figure 3.1. The lines that define the ruled surface represent how the flexural elements would be applied to a rigid stage.
··
'··.
h i..
Figure 3.1: The lines on the ruled surface of Figure 3.lb represent the constraint topologies of a rigid stage whose desired motion follows the path of a hyperbolic
paraboloid. Figure 3.1a is a solid surface of a hyperbolic paraboloid and does not provide any information on the spaces and constraints.
An alternative design was to model the surfaces as solid planes and mark them with the lines that define the ruled surface of the shapes. The problem with this design is that it is hard to visualize the lines without having any curvature since they are drawn on a curved surface. These type of shapes are on display in the first floor of Building 2.
Current models of these complex geometric shapes often use string to represent the lines of the ruled surface as shown in Figure 3.2. String makes the models very delicate and necessitates the use of extra parts to hold the model together. These extra parts take the focus away from the aim of the model. Our goal was to design and build only the ruled surfaces and make the models strong enough so as not to break during travel or handling. This analysis steered the direction of the project towards solid modeling and 3-D printing the models. A 3-D printer will print the model as one piece. This is great because we do not have to worry about building extra parts to help hold the model together. The rubber-like materials used in the 3-D printer also offer excellent toughness, durability and high resistance to tearing.
The following sections lay out the steps in solid modeling a hyperbolic paraboloid, a circular hyperboloid and a cylindroid so that these models could be
reproduced and modified in the future. SolidWorks Education Edition was used to model these shapes.
-Fr I
Figure 3.2: A hyperboloid built with strings to represent the straight lines on the ruled surface. Strings are delicate and often require extra parts to hold the model together. [2]
3.2 Modeling a Cylindroid
The cylindroid that we modeled is defined by Eq. 2.1 where r=7.5cm, h=20.0cm and 0 = 2.5+/- 5 gn, where n is an integer and 0 is between 90 degrees and -90 degrees. This models a line on the ruled surface at every 5 degrees.
The first step in modeling the cylindroid is to model a cylinder made up of 72 faces as shown in Figure 3.3. This way, there would be a flat surface for every 5 degrees.
Figure 3.3: The base sketch of a cylinder made up of 72 faces. First, sketch a circle. Place a construction line every 5 degrees. Delete the circle then connect the ends of the construction lines to form the polygon. Use the offset feature to get the outer polygon. When extruding the cylinder, make sure to use the Mid Plane option so that the origin of the coordinate system lies in the center as shown in Figure 3.4.
Figure 3.4: The cylinder with a 72 faces is extruded from the Mid Plane.
In order to correctly position the lines of the ruled surface, the 3D Sketch option is used. This option enables the user to sketch and extrude shapes from already extruded parts, in this case, the cylinder. Arbitrarily pick one of the faces of the cylinder to start working on. Use the centerline option to find the center of the face, which is at 0=2.5 degrees. Use the Point option in 3D Sketch to place a point along the centerline. The point's coordinates are displayed as shown in Figure 3.5.
Figure 3.5: Positioning the point where the tirst line modeled.
on the ruled surtace will be
Inputting theta=2.5 degrees into EQ. 2.1 yields x =- 7.98cm
y =.349cm (3.1)
z = -. 872cm
The values for the x- and y-coordinates are already represented by the r and theta values in the polar coordinate system. What is important, is the z value, which determines the height of the point at theta=2.5 degrees. Change the Z-coordinate of the point to the correct height. Sketch a circle with its center at the point. Make sure the circle fits inside the plane as shown in Figure 3.5.
Extrude the circle such that it extends across the cylinder from one side to the other as shown in Figure 3.6. This is the first line on the ruled surface of the cylindroid.
Figure 3.6: The yellow bar is extruded from one of the faces of the cylinder. Go to the adjacent face of the cylinder and repeat the steps where theta is now 7.5
degrees. Continue this process until all of the faces of the cylinder has a "line" extruded from it as shown in Figure 3.7. Note that only one line can be extruded at a time.
Figure 3.7: The points where the lines will be extruded from.
Once all of the lines are in place, right-click the top face of the cylinder and insert a sketch (this step should not be in 3D Sketch.) Sketch a circle with a radius of 1cm with its center at the center of the cylinder as shown in Figure 3.8. Extrude the circle such that it extends from the top of the cylinder to the bottom. This is the backbone of the
cylindroid.
Insert another circle at the top of the cylinder. The radius of this circle will set the radius of the cylindroid, in this case the radius is 7.5cm. Extrude Cut the circle such that it completely cuts out the cylinder (you may need to Extrude Cut beyond the height of the cylinder since some of the lines extend slightly further than the top and the bottom
surfaces of the cylinder).
The final cylindroid is shown in Figure 3.9.
Figure 3.9: The final cylindroid solid model. Note the coordinate system at the center of the cylindroid.
To make the cylindroid more detailed, the step size of theta could be reduced. This would cause the cylinder to be divided into even more faces. For example, if we wanted a line on the ruled surface at every 2 degrees, we would have to divide the cylinder into 180 faces, with each face extruding a line on the ruled surface.
3.3 Modeling a Hyperbolic Paraboloid
A more pragmatic approach is used to model the hyperbolic paraboloid. First, sketch a square 15cm by 15cm with its center at the origin of the coordinate system and extrude it to 15cm. View the cube in the Front mode. Click on the 3D Sketch option and draw a construction line from the top-right corner of the face to the bottom-left corner of
the face. Change the view to the Left mode. Sketch a construction line from the bottom-right corner to the top-left corner of the face, such that, if viewing at an angle, the two construction lines make a "V". Repeat these steps for the back face and the right face of the cube. At this step, it should look like Figure 3.9.
/
Figure 3.9: The gray lines are the construction lines.
View the cube from the Front. Click on 3D Sketch then click on the Point option. Place the point on the top-right comer of the front face. Sketch a circle with its center at the point. The diameter of this circle will be the thickness of a line on the ruled surface. Now, place a point on the bottom-left comer of the back face of the cube. Sketch a circle with the same radius as the previous circle and with its center at the point. Go to Lofted Boss/Base under Features and insert the two circles into the Profiles (make sure there is no twisting along the lofted boss). The result can be seen in Figure 3.10.
Figure 3.10: The first line on the hyperbolic paraboloid.
The lofted boss inside the cube represents one of the lines on the ruled surface. Note that at the end of the process, we will delete the cube and will only be left with the ruled surface.
To add the rest of the lines, evenly position a set number of points along the diagonal construction lines of the front and back faces and repeat the previous steps. An example is shown in Figure 3.11. Repeat these steps for the left and right faces of the cube. Only one line can be lofted at a time.
Figure 3.11: Position points along the V's, which will be connected by the Loft feature.
After all of the lines have been lofted, click on Extrudel in the Design Tree (this should be the cube). Delete this extrusion. The result is a hyperbolic paraboloid, which can be
seen in Figure 3.12.
Figure 3.12: The final hyperbolic paraboloid solid model.
3.4 Modeling a Circular Hyperboloid
First, model the base of the circular hyperboloid with a radius of 7.5cm. Save the part then insert two of these bases into an assembly. Align the bases and separate them by a distance of 20cm. This will be the height of the hyperboloid. Save this assembly as a Part. Sketch a circle on the inside face of one of the bases. The center of this circle should be 7cm from the center of the base. The diameter of this circle will be the thickness of one of the lines of the ruled surface. Similarly, draw a circle with the same radius on the inside face of the other base. Make sure these circles do not line up. If viewed from the top, these circles should be separated by a certain angle. In this model, the circles are separated by 90 degrees. The greater the angle between the circles, the more curved the surface will be.
The Lofted Boss/Base feature is used again to connect the circles and, thus, creating a line on the ruled surface as shown in Figure 3.13.
Figure 3.13: The circles with which the line was lofted from are 90 degrees apart.
Repeat these steps to create the rest of the lines. The circles that form the lines should be evenly spaced out around the bases. In this case, the circles are separated by 10 degrees, yielding 36 lines on the surface. The final hyperboloid is shown in Figure 3.14.
Figure 3.14: The final hyperboloid solid model.
3.5 Geometric shapes with sample rigid stages
The following are examples of rigid stages whose constraint topologies are defined by a cylindroid, a hyperbolic paraboloid and a circular hyperboloid, respectively.
Figure 3.17: A circular hyperboloid with a rigid stage on its surface.
4. Conclusions
The purpose of this thesis was to figure out how to make a parametric CAD model of a cylindroid, hyperbolic paraboloid and a hyperboloid. With the method developed in this thesis, anyone with basic Solidworks skills can model these shapes to meet their preferences, whether it is a matter of size, resolution of lines or curvature. These models will give flexure designers a better physical intuition of the complex
geometric entities that make up the essential building blocks of the FACT design process. By handling the models, designers will grasp the principles of ruled surfaces better and understand how they affect desired constraint topologies.
The importance of this thesis is to help designers comprehend and visualize these spaces and their parameters so that they will be able to use and adapt them in the
implementation of FACT. This thesis will impact the fields of nanotechnology, MEMs devices, and microscopy in that it will enable designers to create multi-axis, precision motion stages that move with complex motions that could not have been designed prior to the creation of the FACT design process.
It would be useful to 3-D print the models in Section 3.5 to show how flexural elements could be applied to a rigid stage whose motion follows the corresponding surface path.
Of the different methods of building these shapes, solid modeling and 3-D printing them is the best option for the purpose of this thesis. The 3-D printer uses a strong, rubber-like material, which is resistance to tear, making the models unlikely to break while being transported to conferences and handled by designers. The 3-D printer also prints out the models as whole pieces, allowing us to concentrate the modeling only on the ruled surface.
For the next steps, it would be useful to figure out a more mathematical approach to modeling these complex geometric shapes. The modeling approach presented here, though, is enough to build the complex geometric models so as to visually help flexure designers understand FACT. This approach can also be used as a guide to make more of these models with different physical characteristics, such as with size or resolution.
5. References
[1] Hopkins, J., "Design of Parallel Flexure Systems via Freedom and Constraint Topolies (FACT)," M.S. thesis, MIT, Cambridge, MA, 2007.


![Figure 2.4: A common cylindroid. [1]](https://thumb-eu.123doks.com/thumbv2/123doknet/14685917.560254/9.918.263.660.104.446/figure-common-cylindroid.webp)