233
Kris Vleminckx (ed.), Xenopus: Methods and Protocols, Methods in Molecular Biology, vol. 1865,
https://doi.org/10.1007/978-1-4939-8784-9_16, © Springer Science+Business Media, LLC, part of Springer Nature 2018
Chapter 16
X-FaCT: Xenopus-Fast Clearing Technique
Pierre Affaticati, Sébastien Le Mével, Arnim Jenett, Laurie Rivière,
Elodie Machado, Bilal B. Mughal, and Jean-Baptiste Fini
Abstract
Accessibility and imaging of cell compartments in big specimens are crucial for cellular biological research but also a matter of contention. Confocal imaging and tissue clearing on whole organs allow for 3D imag-ing of cellular structures after beimag-ing subjected to in-toto immunohistochemistry. Lately, the passive CLARITY technique (PACT) has been adapted to clear and immunolabel large specimens or individual organs of several aquatic species. We recently demonstrated tissue clearing on one-week old tadpole brain (Fini et al., Sci Rep 7:43786, 2017). We here describe a further simplified version with clearing of small tissue samples (thickness inferior to 500 μm)) carried out by immersion in a fructose-based high-refractive index solution (fbHRI). By refining steps of the protocol, we were able to reduce the overall procedure time by two thirds. This offers the advantages of reducing the time of experimentation to a week and mini-mizes procedure-induced tissue deformations. This protocol can be easily adapted to be performed on thick section. We present an example of immunohistochemistry performed on NF45 Xenopus laevis brains with anti-pH 3 (phosphorylated histone H3) antibody used to stain chromatin condensation commonly associated with proliferation.
Key words Tissue clearing, Fructose-based high-refractive index solution, 3D imaging
1 Introduction
There is an exponential increase in the number of studies on neu-rodevelopmental diseases, which show evidence of embryonic ori-gin, especially during neurogenesis processes. Many molecules in the direct environment of the embryo, mammalian, or non- mammalian can interfere with neurodevelopment, especially by interfering with hormonal signaling. It is therefore essential to be able to precisely study the changes in the proliferation, migration, or maturation of neural cells in the developing brain. The external development of aquatic larvae makes the ontology of their central
Electronic Supplementary Material: The online version of this chapter (doi:10.1007/978-1-4939-8784-9_16) con-tains supplementary material, which is available to authorized users.
nervous system tractable over time. Moreover, these larvae are small and have a natural almost transparent appearance. However, pigmentation and relative structure of different tissues make 3D-imaging challenging.
Recently, tissue clearing methods have been developed in par-allel with confocal, biphoton, or light sheet imaging techniques. The CLARITY technique [1, 2] and the passive CLARITY tech-nique, also called PACT [3, 4], were originally developed on rodent organs and human tissues. These clearing strategies permit deep image acquisition of thick 3D objects.
The Tefor Core Facility adapted the PACT technique to clear and immunolabel large specimens or organs of aquatic species. We modified and adapted the CLARITY method for use in aquatic species including fish, such as medaka (Oryzias latipes) [5], and zebrafish (Danio rerio) [6]. We also transposed this protocol, named Z-PaCT, to NF45 Xenopus larvae and brains where we were able to label neurons and oligodendrocytes in tadpole brains [7]. However, one limitation of this technique, besides the image system accessibility, is the time needed to reach sensitivity. Indeed, immuno-labeling using specific antibodies took 2.5–3 weeks for the whole procedure and slightly affected tissue integrity.
Here, we describe a simplified version of this recent protocol where we obtained tissue clearing by simple immersion in a fructose- based high-refractive index solution (fbHRI). By refining numerous steps of the protocol, we were able to reduce the overall procedure time to 1 week instead of 2.5/3 weeks previously. This offers the double advantage of reducing the time of experimenta-tion but also minimizes tissue modificaexperimenta-tion during the procedure.
We here present the use of this protocol and results of immu-nohistochemistry performed on the brains of NF45 Xenopus
lae-vis. The tadpoles were exposed to thyroid hormone, which is
known to trigger cell proliferation, for 72 h fixed and stained with anti-pH3 antibody marking chromatin condensation. We used anti-pH3 because it is commonly acknowledged as a proliferation marker. We are confident that this protocol will be useful for in toto immunohistochemistry on both heads and brains but also on thick sections.
2 Materials
1. Aquatic system water, chlorine-free.
1. T3 stock solution: 10 mM 3,3′,5-Triiodo-l-thyronine sodium
salt (T3) in 30% NaOH) (Sigma Aldrich). The 10 mM stock
solution of T3 is made by adding 100 mg of T3 powder to
14.86 mL of 30% NaOH (obtained by mixing 4.458 mL of 1 N NaOH with 10.402 mL Milli-Q (ultrapure) water). Vortex
2.1 Tadpole Rearing 2.2 Treatment with Thyroid Hormone T3
the T3 stock solution well, aliquot and store at −20 °C. Prevent
multiple weighing due to the hygroscopic properties of the powder.
2. Dimethyl sulfoxide (DMSO) (Carl Roth). 3. 1 mL transfer pipettes (Samco Scientific). 4. 50 mL polypropylene conical tube (Corning). 5. 6-well plate TPP (Thermo Fisher Scientific). 6. Incubator at 23 °C protected from light.
1. Dumont tweezers, #2 straight (World Precision Instruments). 2. 60 × 15 mm Petri dishes (Greiner Bio One International). 3. 1× Phosphate-buffered saline (PBS): 137 mM NaCl, 2.7 mM
KCl, 10 mM Na2HPO4, 1.76 mM KH2PO4, pH 7.4.
4. 2× Phosphate-buffered saline (PBS): 274 mM NaCl, 5.4 mM KCl, 20 mM Na2HPO4, 3.52 mM KH2PO4, pH 7.4.
5. PBST: 1× PBS, 0.01% Tween® 20, pH 7.4.
6. Ethyl 3-aminobenzoate methanesulfonate salt (MS222) (Sigma-Aldrich).
7. 8% paraformaldehyde in distilled water prepared from parafor-maldehyde powder (Sigma Aldrich). Prepare aliquots of 8% PFA in H2O (dissolved at 60 °C and stored at −20 °C). For 4%
PFA dilute in 2× PBST. Another option is to buy ready-to-use 16% formaldehyde (w/v), methanol-free capsules (Thermo Fisher Scientific).
8. Fixing solution: 4% paraformaldehyde (PFA) in PBST.
9. Storage solution: 0.5% PFA in PBST with 0.05% sodium azide. 1. Pre-incubation solution: 0.5× SSC (150 mM NaCl, 15 mM
sodium citrate, pH 7.2), 0.1% Tween® 20.
2. Depigmentation solution: 5% formamide, 0.5× SSC, 3% H2O2.
1. 2 mL glass vials (Carl Roth).
2. Blocking solution: 10% normal goat serum (Antibodies Incorporated), 10% DMSO, 1% Triton X-100 in PBST.
3. Primary antibody: e.g., mouse anti-pH3, 1/200 (Millipore). 4. Secondary antibody: e.g., goat anti-mouse Alexa fluor-555,
1/200 (Thermo Fisher Scientific, Invitrogen).
5. Staining solution: 2% normal goat serum, 10% DMSO, 0.1%Triton X-100, 0.05% sodium azide, in PBST.
6. DiI (DiIC18(3)) (Thermo Fisher Scientific, Invitrogen). Prepare 1 mM Dil stock solution by dissolving DiI powder in DMSO.
2.3 Brain/Head Preparation
2.4 Depigmentation
7. DiD (DiIC18(5)) (Thermo Fisher Scientific, Invitrogen). Prepare 1 mM Dil stock solution by dissolving DiI powder in DMSO.
1. Refractometer (e.g., KRUSS Optronic DR 301-95). 2. d(−)-fructose (Carl Roth).
3. Fructose-based high-refractive index solution (fbHRI): This clearing solution is obtained by mixing three solutions
pre-pared separately in advance:
(a) fbHRI Diluent: 0.2× PBS, 0.002% sodium azide.
(b) 90% fructose solution (RI = 1.457 (F1457)). In a beaker, dissolve 800 g of fructose in 300 mL fbHRI diluent. Cover the solution to avoid evaporation and stir with a strong magnetic stirrer. Make up the volume to 800 mL with fbHRI diluent. Measure RI and adjust the fructose solution to an RI of 1.457 with fbHRI diluent.
(c) 85% DMSO solution (RI = 1.457 (DMSO1457)). Adjust the DMSO solution to an RI of 1.457 with fbHRI diluent. Mix F1457 and DMSO1457 in the ratio of 4/1 (v/v). Adjust RI with 100% fructose to raise RI or diluent to lower RI. This solu-tion can be stored for 6 months at 4 °C.
1. Low-melting point agarose (e.g., Sigma-Aldrich).
2. Fluorescent microscope, for example Leica TCS SP8 laser scanning microscope (Leica Microsystems, model: Leica TCS SP8) with two photomultipliers (PMT) and equipped with a Leica HC FLUOTAR L 25×/1.00 IMM motCorr objective (Leica Microsystems).
3 Methods
Xenopus laevis embryos and tadpoles are reared at 20 °C in
chlorine- free water (photoperiod = 12 h/12 h light/dark), in groups of 70 individuals per 15 L tank. All procedures are per-formed in accordance with European Union Directive 2010/63/EU.
1. Make a 10−4 M intermediate solution of T3 fresh every day by
adding 5 μL of 10 mM stock solution of T3 to 495 μL of
chlorine- free water (see Note 1).
2. Add 2.5 μL of 10−4 M T3 to 50 mL of chlorine-free water to
create a final 5 nM T3 solution. Vortex the solution thoroughly
(see Note 2). 2.6 Tissue Clearing in Fructose–Based High–Refractive Index Solution (fbHRI) 2.7 Mounting and Imaging 3.1 Tadpole Rearing 3.2 Treatment with Thyroid Hormone T3
3. Using a 1 mL transfer pipette with open section cut, transfer fifteen st.45 tadpoles into one well of a 6-well plate containing 8 mL chlorine-free water. In this standard assay, 15 tadpoles are used per exposure group per replicate. Rinse every 6-well plate with chlorine-free aquarium water before use.
4. Empty the liquid in the 6 wells using transfer pipette. Add 8 mL of 5 nM T3 test solution previously prepared in
Subheading 3.2, step 2 into the well. Place the 6-well plate into a dark incubator at 23 °C for the next 72 h.
5. Renew the solutions every day at the same time (±1 h). Remove any dead tadpoles (see Note 3).
1. Prepare the anesthetic solution: 1 g/L MS222 solution (1 g MS222, 1 g sodium bicarbonate in 1 L chlorine-free water). Adjust the pH between 7.2 and 7.8. Protect from light, store for 3 weeks (see Note 4).
2. Under the fume hood, prepare fresh 4% PFA fixing solution from thawed 8% PFA (H2O) in 2× PBST (see Subheading 2.3,
item 7). Prepare 40 mL of fixing solution 4% PFA in PBST in a 50 mL conical tube for 5 tadpoles. Keep the tubes at 4 °C for 1 week.
3. Kill the specimens in 1 g/L MS222 solution in accordance with local regulations. Usually 2–3 min are enough for one-week-old tadpoles.
4. Fix tadpoles overnight at 4 °C in fresh fixing solution or at room temperature for 3 h.
5. If needed, store the sample in storage solution at 4 °C until further use.
6. Brain dissection: place tadpoles in 1× PBS under fume hood. Dissect brains in the liquid. Remove skin, move a small forceps under brain tissue, and cut spinal cord (see movie dissection accessible at URL www).
(Optional for ventral acquisition of brain tissues)
1. Wash in 1× PBST samples at least 1 day before starting the depigmentation needed.
2. Pour 10 mL of pre-incubation solution in a 60 mm Petri dish and transfer the fixed samples to the Petri dish with 1 mL transfer pipette.
3. Incubate at room temperature for 1 h.
4. Prepare the depigmentation solution under the fume hood. 5. Under the fume hood, remove the samples with some liquid
and place them in the lid of the Petri dish. Remove all of the pre-incubation solution from the dish and replace it with
3.3 Brain/Head Preparation
depigmentation solution. Return the samples to the dish. Keep the Petri dish uncovered and under light to accelerate the depigmentation process.
6. Check the progress of the depigmentation every 10 min. 7. Once the depigmentation is complete (see Fig. 1), under a
fume hood rinse twice in PBST. The standard depigmentation time is 90–120 min for intact Xenopus NF45 larvae and 45 min for dissected brains.
8. Rinse samples overnight or for a minimum of 4 h in several changes of PBST.
Fig. 1 Tissue clearing of Xenopus brains stage NF45. Final clearing of NF45 Xenopus laevis brains and heads after passive clearing by homogenizing the refractive index in fructose based high refractive index medium (fbHRI). (a) Dissected NF45 Xenopus laevis brain in PBS after PFA fixation (Subheading 3.3). (b) Removal of superficial pigments by H2O2 bleaching (Subheading 3.4). (c) After incubation in 50% fbHRI the opacity is
sig-nificantly reduced (Subheading 3.6, step 2). (d) The tissue clearing process is finished after incubation in 100% fbHRI (Subheading 3.6, step 4) (e) NF45 Xenopus laevis head in PBS after PFA fixation (f) same head after depigmentation. Scale bar = 500 μm. All brains/heads are anterior to the left
1. Transfer the samples to 2 mL glass vials using a truncated transfer pipette.
2. Remove the liquid and add 1 mL of blocking solution. 3. Incubate overnight at 4 °C or for 2–4 h at room temperature. 4. Remove the blocking solution and add 600 μL of staining
solution.
5. Add primary antibody to obtain the working dilution.
6. Incubate at room temperature for 2–3 days, with gentle shaking.
7. Rinse 3 times, for 20 min each, in PBST.
8. Remove all the PBST and add 600 μL of staining solution per tube.
9. Add fluorescent secondary antibody.
10. Incubate at room temperature for 2 days, with gentle shaking.
11. Rinse for 1 day in several changes of PBST.
12. Optional: Incubate the samples for 2 days in 600 μL of staining solution containing 1 μM DiI/DiD.
13. Rinse the DiI-stained sample in PBST for a minimum of 3 h. 1. Prepare fbHRI (see 2.6 point 3), make sure to adjust the
fbHRI to the desired refractive index.
2. Incubate the samples in 50% fbHRI/50% (v/v) diluent for at least 6 h (Fig. 1).
3. Remove the solution and replace by fbHRI. 4. Incubate for at least 12 h (Fig. 1).
Mounting strategies depend on the microscopy technique one may want to apply. Confocal microscopy, multiphoton microscopy, or light sheet microscopy are well suited techniques to image cleared samples. An example of a mounting method is given here. It is optimized for the use of an upright confocal microscope equipped with a dipping lens RI-corrected objective (Leica 15507703). 1. Place your sample in a 60 mm petri dish and remove as much
liquid as possible.
2. Pipet 2–5 μL of 1% agarose (50 °C) and use it to glue the sample to the petri dish.
3. Allow the agarose to solidify at 4 °C for 2 min.
4. Fill the petri dish with fbHRI adjusted to the right RI.
5. Dip objective into the fbHRI and capture fluorescence signals by exciting the fluorophores with the appropriate laser wave-length. Tilescan imaging followed by mosaic stitching is required to capture images of the whole brain.
3.5 Fluorescent Staining
3.6 Tissue Clearing
3.7 Mounting and Imaging
1. Translation movies (connected to Fig. 2a, b) are accessible at the link URL under the names Movies 1, 2, and 3. These mov-ies are showing tapdole brains, which were exposed for 72 h to T3, processed using X-FaCT with pH3. The translation movies
constitute a direct conversion of the raw data into mp4 movie file format. In this process, using a combination of fiji [8] and libav (https://libav.org/), each slice (z-step) of the raw-data stack is turned into a frame of the movie turning the z- dimension of the stack into the temporal domain of the movie. Lossy compression (×246-driven h246-compression) provides sig-nificant data reduction while keeping the image information largely intact. The original 12 bit histogram of the original data is linearly converted to the necessary 3 × 8 bit (RGB) without application of any contrast enhancement or noise reduction. This allows insight into a multi-GB-dataset while dealing with only tens of MBs.
2. Rotation movies (connected to Fig. 2c, d) are accessible at link www. Under the names Movies 4 and 5. The rotation movies can be generated using amira 6.0.1 (FEI, SAS) on a Dell T630 running Ubuntu 16.04.
Since in the original data of the pH3-channel we found a low but distinct amount of signal bleed-through from the DiD stain, we subtracted a fraction of the DiD-channel from the pH3- channel ([pH3]-([DiD]/5). The division coefficient thereby was deter-mined empirically for selectively removing the background signal. This process allows subsequent enhancing of the contrast of the pH3-signal by global linear histogram stretching (GLHS), which results in the pH3-positive cells appearing brighter, which again
3.8 Visualization of 3D Data Sets (Supplementary Material)
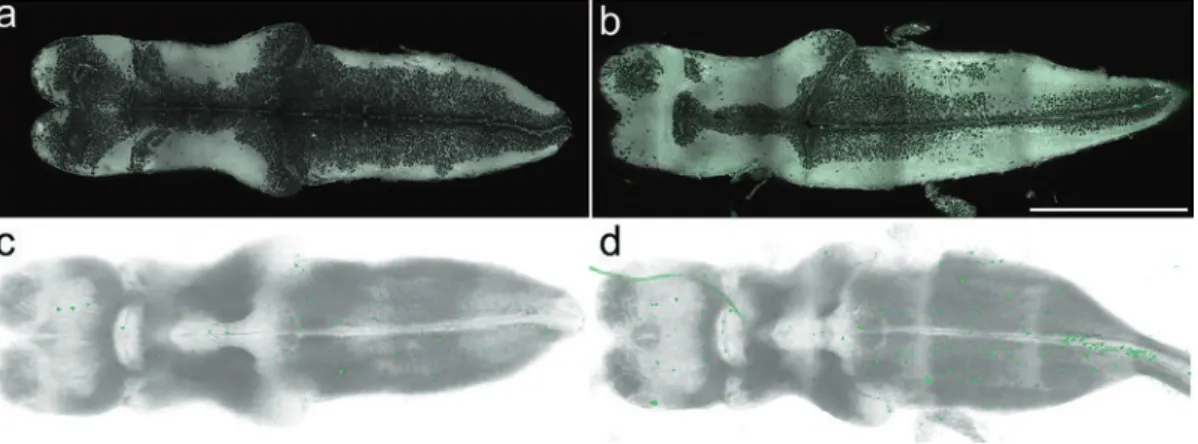
Fig. 2 NF45 Xenopus laevis whole-brain immunolabeling and imaging. Single confocal plane of a NF45 control brain (a) or treated with 5 nM T3 (b) stained with DiD (gray), immunolabeled for pH 3 (green). The visualisation
of the whole dataset is provided by two translation movies, control brain (Movie 2) or T3 treated (Movie 3) provided at the URL www. Scale bar = 500 μm. Ventral 3D views from rotation movies of control brain (c and Movie 4) or T3 treated (d and Movie 5) accessible at the URL www. All brains are anterior to the left
facilitates their detection in the 3D-visualization. To the reference channels (DiD) we applied only GLHS without any other pretreat-ment. Due to slightly different acquisition settings between the specimens the GLHS settings were optimized for each dataset individually.
[[untreated: pH3: 150–1300, DiD: 0–3500; treated: pH3: 150–2000, DiD: 0–2800. All values on the basis of a 12 bit histo-gram (0–4095)]].
4 Notes
1. Pay attention that neither precipitate nor crystals are present in the T3 stock.
2. Be careful to rinse every 50 mL plastic tube with dechlorinated animal system water before use.
3. If the mortality exceeds 20% in a well, stop and repeat the experiment.
4. Consider making a stock solution at 4 g/L. References
1. Chung K, Wallace J, Kim SY, Kalyanasundaram S, Andalman AS, Davidson TJ, Mirzabekov JJ, Zalocusky KA, Mattis J, Denisin AK, Pak S, Bernstein H, Ramakrishnan C, Grosenick L, Gradinaru V, Deisseroth K (2013) Structural and molecular interrogation of intact biological systems. Nature 497(7449):332–337. https://doi. org/10.1038/nature12107
2. Tomer R, Ye L, Hsueh B, Deisseroth K (2014) Advanced CLARITY for rapid and high- resolution imaging of intact tissues. Nat Protoc 9(7):1682–1697. https://doi.org/10.1038/ nprot.2014.123
3. Treweek JB, Chan KY, Flytzanis NC, Yang B, Deverman BE, Greenbaum A, Lignell A, Xiao C, Cai L, Ladinsky MS, Bjorkman PJ, Fowlkes CC, Gradinaru V (2015) Whole-body tissue stabilization and selective extractions via tissue-hydrogel hybrids for high-resolution intact cir-cuit mapping and phenotyping. Nat Protoc 10(11):1860–1896. https://doi.org/ 10.1038/nprot.2015.122
4. Yang B, Treweek JB, Kulkarni RP, Deverman BE, Chen CK, Lubeck E, Shah S, Cai L, Gradinaru V (2014) Single-cell phenotyping within transparent intact tissue through whole- body clearing. Cell 158(4):945–958. https:// doi.org/10.1016/j.cell.2014.07.017
5. Dambroise E, Simion M, Bourquard T, Bouffard S, Rizzi B, Jaszczyszyn Y, Bourge M, Affaticati P, Heuze A, Jouralet J, Edouard J, Brown S, Thermes C, Poupon A, Reiter E, Sohm F, Bourrat F, Joly JS (2017) Postembryonic fish brain proliferation zones exhibit neuroepithelial- type gene expression profile. Stem Cells 35(6):1505–1518. https:// doi.org/10.1002/stem.2588
6. Affaticati P, Simion M, De Job E, Rivière L, Hermel J, Machado E, Joly J, Jenett A (2017) zPACT: tissue clearing and immunohistochem-istry on juvenile zebrafish brain. Bio-Protocol 7(23):e2636. https://doi.org/10.21769/ BioProtoc.2636
7. Fini JB, Mughal BB, Le Mevel S, Leemans M, Lettmann M, Spirhanzlova P, Affaticati P, Jenett A, Demeneix BA (2017) Human amni-otic fluid contaminants alter thyroid hormone signalling and early brain development in Xenopus embryos. Sci Rep 7:43786. https:// doi.org/10.1038/srep43786
8. Schindelin J, Arganda-Carreras I, Frise E, Kaynig V, Longair M, Pietzsch T, Preibisch S, Rueden C, Saalfeld S, Schmid B, Tinevez JY, White DJ, Hartenstein V, Eliceiri K, Tomancak P, Cardona A (2012) Fiji: an open-source platform for bio-logical-image analysis. Nat Methods 9(7): 676–682. https://doi.org/10.1038/nmeth.2019