HAL Id: hal-02297688
https://hal.archives-ouvertes.fr/hal-02297688v2
Submitted on 23 Apr 2020
HAL is a multi-disciplinary open access
archive for the deposit and dissemination of
sci-entific research documents, whether they are
pub-lished or not. The documents may come from
teaching and research institutions in France or
abroad, or from public or private research centers.
L’archive ouverte pluridisciplinaire HAL, est
destinée au dépôt et à la diffusion de documents
scientifiques de niveau recherche, publiés ou non,
émanant des établissements d’enseignement et de
recherche français ou étrangers, des laboratoires
publics ou privés.
TinyBlog: Develop your First Web App with Pharo
Olivier Auverlot, Stéphane Ducasse, Luc Fabresse
To cite this version:
Olivier Auverlot, Stéphane Ducasse, Luc Fabresse. TinyBlog: Develop your First Web App with
Pharo. Square Bracket Associates, In press. �hal-02297688v2�
TinyBlog: Develop your First
Web App with Pharo
Olivier Auverlot, Stéphane Ducasse and Luc Fabresse April 1, 2020
Copyright 2017 by Olivier Auverlot, Stéphane Ducasse and Luc Fabresse.
The contents of this book are protected under the Creative Commons Attribution-ShareAlike 3.0 Unported license.
You are free:
• to Share: to copy, distribute and transmit the work, • to Remix: to adapt the work,
Under the following conditions:
Attribution. You must attribute the work in the manner specified by the author or licensor (but not in any way that suggests that they endorse you or your use of the work).
Share Alike. If you alter, transform, or build upon this work, you may distribute the resulting work only under the same, similar or a compatible license.
For any reuse or distribution, you must make clear to others the license terms of this work. The best way to do this is with a link to this web page:
http://creativecommons.org/licenses/by-sa/3.0/
Any of the above conditions can be waived if you get permission from the copyright holder. Nothing in this license impairs or restricts the author’s moral rights.
Your fair dealing and other rights are in no way affected by the above. This is a human-readable summary of the Legal Code (the full license):
http://creativecommons.org/licenses/by-sa/3.0/legalcode
Contents
Illustrations iv
1 About this book 1
1.1 Structure. . . 1
1.2 Pharo Installation . . . 2
1.3 Naming Rules . . . 2
1.4 Resources . . . 3
2 TinyBlog Application: Core model 5 2.1 TBPost Class . . . 5
2.2 Post Visibility. . . 6
2.3 Initialization . . . 7
2.4 Posts Creation Methods . . . 7
2.5 Creating a Post . . . 8
2.6 Adding Some Unit Tests . . . 8
2.7 Post Queries . . . 9
2.8 Conclusion. . . 10
3 TinyBlog: Extending and Testing the Model 11 3.1 TBBlog class . . . 11
3.2 Only One Blog Object . . . 12
3.3 Testing the Model . . . 12
3.4 A First Test. . . 13
3.5 Increasing Test Coverage . . . 14
3.6 Other Functionalities . . . 14
3.7 Testing data . . . 16
3.8 Possible Extensions . . . 17
3.9 Conclusion. . . 17
4 Data Persitency using Voyage and Mongo 19 4.1 Configure Voyage to Save TBBlog Objects. . . 19
4.2 Saving a Blog . . . 21
4.3 Revising Unit Tests. . . 21
4.4 Querying the Database . . . 22
4.5 If we would Save Posts [Discussion] . . . 22
4.6 Configure an External Mongo Database [Optional] . . . 23
Contents
5 First Steps with Seaside 27
5.1 Starting Seaside . . . 28
5.2 Bootstrap for Seaside . . . 28
5.3 Define our Application Entry Point . . . 29
5.4 First Simple Rendering. . . 31
5.5 Architecture . . . 32
5.6 Conclusion. . . 33
6 Web Components for TinyBlog 35 6.1 Visual Components . . . 35
6.2 Using the TBScreenComponent component . . . 37
6.3 Pattern of Component Definition . . . 37
6.4 Populating the Blog . . . 38
6.5 Definition of TBHeaderComponent . . . 38 6.6 Usage of TBHeaderComponent . . . 38 6.7 Composite-Component Relationship . . . 39 6.8 Render an header . . . 39 6.9 List of Posts . . . 41 6.10 The PostComponent. . . 42 6.11 Display Posts . . . 43 6.12 Debugging Errors . . . 44
6.13 Displaying the List of Posts with Bootstrap . . . 44
6.14 Instantiating Components inrenderContentOn: . . . 45
6.15 Conclusion. . . 46
7 Managing Categories 47 7.1 Displaying Posts by Category . . . 47
7.2 Category Rendering . . . 49
7.3 Updating Post List . . . 50
7.4 Look and Layout . . . 50
7.5 Modular Code with Small Methods . . . 52
7.6 Conclusion. . . 54
8 Authentication and Session 55 8.1 A Simple Admin Component (v1). . . 56
8.2 Adding ’admin’ Button . . . 56
8.3 Header Revision . . . 58
8.4 Admin Button Activation. . . 58
8.5 ’disconnect’ Button Addition. . . 59
8.6 Modal Window for Authentication. . . 60
8.7 Authentication Component Rendering . . . 62
8.8 Authentication Component Integration . . . 63
8.9 Naively Managing Logins . . . 64
8.10 Managing Errors . . . 64
8.11 Modeling the Admin . . . 65
8.12 Blog admin . . . 67
Contents
8.13 Setting a New Admin . . . 67
8.14 Integrating the Admin Information . . . 68
8.15 Storing the Admin in the Current Session . . . 68
8.16 Definition and use of specific session . . . 68
8.17 Storing the Current Admin . . . 70
8.18 Simplified navigation . . . 70
8.19 Managing Deconnection. . . 70
8.20 Simplified Navigation to the Public Part . . . 71
8.21 Conclusion. . . 71
9 Administration Web Interface and Automatic Form Generation 73 9.1 Describing Domain Data. . . 73
9.2 Post Description . . . 75
9.3 Automatic Component Creation. . . 76
9.4 Building a post report . . . 76
9.5 AdminComponent Integration with PostsReport . . . 77
9.6 Filter Columns . . . 78
9.7 Report Enhancements. . . 79
9.8 Post Administration . . . 80
9.9 Post Addition . . . 81
9.10 CRUD Action Implementation . . . 81
9.11 Post Addition . . . 81
9.12 Refreshing Posts. . . 84
9.13 Better Form Look . . . 85
9.14 Conclusion . . . 86
10 Loading Chapter Code 87 10.1 Chapter 3: Extending and Testing the Model . . . 87
10.2 Chapter 4: Data Persitency using Voyage and Mongo. . . 88
10.3 Chapter 5: First Steps with Seaside . . . 88
10.4 Chapitre 6: Web Components for TinyBlog . . . 88
10.5 Chapitre 7: Managing Categories . . . 88
10.6 Chapitre 8: Authentication and Session . . . 89
10.7 Chapitre 9: Administration Web Interface and Automatic Form Generation . 89 10.8 Latest Version of TinyBlog . . . 89
Illustrations
1-1 The TinyBlog application. . . 2
2-1 TBPost: a really basic class mostly handling data.. . . 5
2-2 Inspector on a TBPost instance. . . 8
3-1 TBBlog: A simple class containing posts. . . 11
5-1 Starting the Seaside server. . . 27
5-2 Running Seaside. . . 28
5-3 Browsing the Seaside Bootstrap Library. . . 29
5-4 A Bootstrap element and its code. . . 30
5-5 TinyBlog is a registered Seaside application. . . 31
5-6 A first Seaside web page. . . 31
5-7 Main components of TinyBlog (public view). . . 32
5-8 Architecture of TinyBlog. . . 33
6-1 Component Architecture of the Public View (opposed to the Administration View). . . 35
6-2 Visual Components of TinyBlog.. . . 36
6-3 ApplicationRootComponent temporarily uses a ScreenComponent that contains aHeaderComponent.. . . 37
6-4 First visual rendering ofTBScreenComponent.. . . 38
6-5 TinyBlog with a Bootstrap header. . . 40
6-6 TheApplicationRootComponent uses PostsListComponent. . . 41
6-7 TinyBlog displaying a basic posts list. . . 42
6-8 Using PostComponents to diplays each Posts. . . 42
6-9 TinyBlog with a List of Posts. . . 44
7-1 L’architecture des composants de la partie publique with categories. . . 47
7-2 Categories and Posts. . . 51
7-3 Post list with a better layout. . . 52
7-4 Final TinyBlog Public UI. . . 54
Illustrations
8-1 Authentication flow. . . 55
8-2 Simple link to the admin part. . . 57
8-3 Header with an admin button. . . 57
8-4 Admin component under definition. . . 59
8-5 Authentication component. . . 61
8-6 Error message in case wrong identifiers. . . 66
8-7 Navigation and identification in TinyBlog. . . 69
9-1 Post managment. . . 74
9-2 Administration components. . . 74
9-3 Magritte report with posts. . . 78
9-4 Administration Report. . . 80
9-5 Post report with links. . . 82
9-6 Basic rendering of a post. . . 83
C H A P T E R
1
About this book
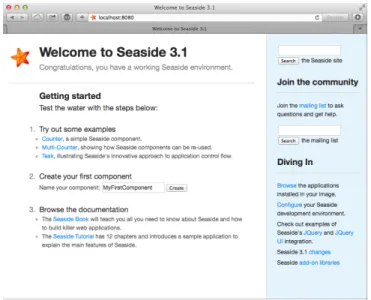
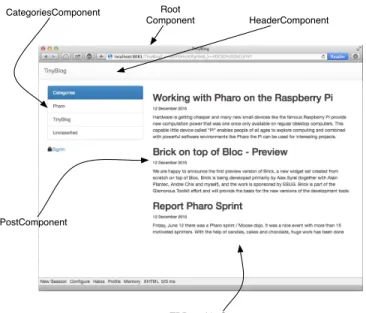
In this book, we will guide you to develop a mini project: a small web appli-cation, named TinyBlog, that manages a blog system (see its final state in Figure 1-1). The idea is that a visitor of the web site can read the posts and that the post author can connect to the web site as admin to manage its posts (add, remove and modify existing ones).
TinyBlog is a small pedagogical application that will show you how to define and deploy a web application using Pharo / Seaside / Mongo and frameworks available in Pharo such as NeoJSON.
Our goal is that you will be able to reuse and adapt such an infrastructure to create your own web applications.
1.1
Structure
In the first part called ”Core Tutorial”, you will develop and deploy, Tiny-Blog, an application and its administration using Pharo, the Seaside applica-tion web server framework as well as some other frameworks such as Voyage and Magritte. Deployment with Mongo DB is optional but it allows you to see that Voyage is an elegant facade to persist your data within Mongo.
In the second part and optional part, we will show you some optional aspects such as data export, use of Mustache or how to expose your application using a REST API.
Presented solutions are sometimes not the best. This is done that way to offer you a room for improvement. Our goal is not to be exhaustive. We present one way to develop TinyBlog nevertheless we invite the reader to read further references such as books or tutorials on Pharo to deepen his ex-pertise and enhance his application.
About this book
Figure 1-1 The TinyBlog application.
Finally, to help you to get over possible errors and avoid to get stuck, the last chapter describes how to load the code described in each chapter.
1.2
Pharo Installation
In this tutorial, we suppose that you are using the Pharo MOOC image (it is currently a Pharo 8.0 image) in which many frameworks and web libraries have been loaded: Seaside (component-based web application server), Magritte (an automatic generation report system based on descriptions), Bootstrap (a library to visually tune web applications), Voyage (a framework to save your objects in document databases) and some others.
You can get the Pharo MOOC image using the Pharo Launcher (http://pharo. org/download).
1.3
Naming Rules
In the following, we prefix all the class namesTB(for TinyBlog). You may: • either choose another prefix (by exampleTBM) to be able to load the
solution side by side to your own. This way you will be able to compare
1.4 Resources
the two solutions,
• either choose the same prefix to fusion the proposed solutions in your code. The merge tool will help you see the differences and learn from the changes. This solution may be more complex if you implement your own extra functionalities.
1.4
Resources
Pharo has many strong pedagogial resources as well as a super friendly com-munity of users. Here is a list of resources:
• http://books.pharo.orgproposes books around Pharo. Pharo by Exam-ple can help you to discove the language and its libraries. Entreprise Pharo: a Web Perspective presents other aspects useful for web devel-opment.
• http://book.seaside.stis one of the books on Seaside. It is currently
un-der migration as an open-source bookhttps://github.com/SquareBracketAssociates/ DynamicWebDevelopmentWithSeaside.
• http://mooc.pharo.orgproposes an excellent Mooc with more that 90 videos explaining syntactically points as well as object programming key concepts.
• A discord channel where many Pharoers exchange information and help each other is accessible here:http://www.pharo.org/community
C H A P T E R
2
TinyBlog Application: Core
model
In this chapter, we start to develop a part of the domain model of TinyBlog. The model is particularly simple: it starts with a post. In the next chapter we will add a blog containing a list of posts.
2.1
TBPost Class
We start with the post representation. It is super simple as shown by Figure 2-1. It is defined by the classTBPost:
Object subclass: #TBPost
instanceVariableNames: 'title text date category visible' classVariableNames: ''
package: 'TinyBlog'
A blog post is described by 5 instance variables.
isVisible isUnclassified visible date title text category Post
TinyBlog Application: Core model
Variable Signification
title post title
text post text
date date of writing
category name of the category of the post
visible is the post publicly visible or not?
All of these variables have corresponding accessor methods in the ’accessing’ protocol. You can use a refactoring to automatically create all the following methods:
TBPost >> title ^ title
TBPost >> title: aString title := aString TBPost >> text
^ text
TBPost >> text: aString text := aString TBPost >> date
^ date
TBPost >> date: aDate date := aDate TBPost >> visible
^ visible
TBPost >> visible: aBoolean visible := aBoolean TBPost >> category
^ category
TBPost >> category: anObject category := anObject
2.2
Post Visibility
We should add methods to make a post visible or not and also test if it is visi-ble. Those methods are defined in the ’action’ protocol.
TBPost >> beVisible self visible: true TBPost >> notVisible
self visible: false
2.3 Initialization
2.3
Initialization
Theinitializemethod (’initialization’ protocol) sets the date to the cur-rent day and the visibility to false: the user must explicitly make a post vis-ible. This allows him to write drafts and only publish a post when the post is finished. By default, a post belongs to the ’Unclassified’ category that we define at the class level. This category name is defined on class-side by the
unclassifiedTagmethod. TBPost class >> unclassifiedTag
^ 'Unclassified'
Pay attention the methodunclassifiedTagshould be defined on the class-side of the classTBPost(click on theclassbutton to define it). The other methods are defined on the instance-side: it means that they will be applied toTBBloginstances.
TBPost >> initialize super initialize.
self category: TBPost unclassifiedTag. self date: Date today.
self notVisible
In the solution above, it would be better that theinitializemethod does not hard code the reference to theTBPostclass. Propose a solution. The sequence 3 of the week 6 of the Mooc can help you to understand why it is better to avoid hardcoding class references (Seehttp://mooc.pharo.org).
2.4
Posts Creation Methods
On class-side, we add class methods (i.e. methods execute on class) to ease posts creation for blogs - usually such kind of methods are grouped in the protocol ’instance creation’.
We define two methods.
TBPost class >> title: aTitle text: aText ^ self new
title: aTitle; text: aText; yourself
TBPost class >> title: aTitle text: aText category: aCategory ^ (self title: aTitle text: aText)
category: aCategory; yourself
TinyBlog Application: Core model
Figure 2-2 Inspector on a TBPost instance.
2.5
Creating a Post
Let us create posts to check a bit the created objects. Using the Playground tools execute the following expression:
TBPost
title: 'Welcome in TinyBlog'
text: 'TinyBlog is a small blog engine made with Pharo.' category: 'TinyBlog'
When you inspect the code above (right click and ”Inspect it”), you will ob-tain an inspector on the newly created object as shown in Figure 2-2.
2.6
Adding Some Unit Tests
Manually looking at objects is not a way to systematically verifying that such objects follow some expected invariant. Even though the model is quite sim-ple we can define some tests. In Test Driven Developpement mode we write test first. Here we prefered to let you define a little class to familiarize with the IDE. Let us fix this!
We define the classTBPostTest(as subclass of the classTestCase).
2.7 Post Queries
TestCase subclass: #TBPostTest instanceVariableNames: '' classVariableNames: '' package: 'TinyBlog-Tests' Let us define a two tests.
TBPostTest >> testWithoutCategoryIsUnclassified | post |
post := TBPost
title: 'Welcome to TinyBlog'
text: 'TinyBlog is a small blog engine made with Pharo.'. self assert: post title equals: 'Welcome to TinyBlog' . self assert: post category = TBPost unclassifiedTag. TBPostTest >> testPostIsCreatedCorrectly
| post | post := TBPost
title: 'Welcome to TinyBlog'
text: 'TinyBlog is a small blog engine made with Pharo.' category: 'TinyBlog'.
self assert: post title equals: 'Welcome to TinyBlog' .
self assert: post text equals: 'TinyBlog is a small blog engine made with Pharo.' .
Your tests should pass.
2.7
Post Queries
In the protocol ’testing’, define the following methods that checks whether a post is visible, and whether it is classified or not.
TBPost >> isVisible ^ self visible TBPost >> isUnclassified
^ self category = TBPost unclassifiedTag
It is not really good to hardcode a reference to the classTBPostin a method body. Propose a solution.
In addition, let us take the time to update our test to take advantage of the new behavior.
TBPostTest >> testWithoutCategoryIsUnclassified | post |
post := TBPost
title: 'Welcome to TinyBlog'
TinyBlog Application: Core model
self assert: post title equals: 'Welcome to TinyBlog' . self assert: post isUnclassified.
self deny: post isVisible
2.8
Conclusion
We develop a first part of the model (the classTBPost) and some tests. We strongly suggest writing some other unit tests to make sure that your model fully work.
C H A P T E R
3
TinyBlog: Extending and Testing
the Model
In this chapter we extend the model and add more tests. Note that when you will get fluent in Pharo, you will tend to write first your tests and then exe-cute tests to code in the debugger. We did not do it because coding in the de-bugger requires more explanation. You can see such a practice in the Mooc video entitled Coding a Counter in the Debugger (Seehttp://mooc.pharo.org) and read the book Learning Object-Oriented Programming, Design with TDD in Pharo (http://books.pharo.org).
Before starting, use back the code of the previous chapter or use the infor-mation of Chapter ??.
3.1
TBBlog class
We develop the classTBBlogthat contains posts (as shown by Figure 3-1). We define some unit tests.
Here is its definition:
isVisible isUnclassified visible date title text category Post allBlogPosts allBlogPostsFromCategory posts Blog
TinyBlog: Extending and Testing the Model
Object subclass: #TBBlog
instanceVariableNames: 'posts' classVariableNames: ''
package: 'TinyBlog'
We initialize thepostsinstance variable to an empty collection. TBBlog >> initialize
super initialize.
posts := OrderedCollection new
3.2
Only One Blog Object
In the rest of this project, we assume that we will manage only one blog. Later, you may add the possibility to manage multiple blogs such as one per user of the TinyBlog application. Currently, we use a Singleton design pat-tern on theTBBlogclass. However pay attention since this pattern intro-duces a kind of global variable in your application and brings less modularity to your system. Therefore avoid to make explicit references to the singleton, better use an instance variable whose value first refers to the singleton so that later you can pass another object without being forced to rewrite every-thing. Do not generalize what we are doing for this class.
Since all the management of a singleton is a class behavior, we define such methods at the class level ofTBBlog. We define an instance variable at the class level:
TBBlog class
instanceVariableNames: 'uniqueInstance' Then we define two methods to manage the singleton. TBBlog class >> reset
uniqueInstance := nil TBBlog class >> current
"answer the instance of the TBRepository"
^ uniqueInstance ifNil: [ uniqueInstance := self new ]
We redefine the class methodinitializeso that when the class is loaded in memory the singleton got reset.
TBBlog class >> initialize self reset
3.3
Testing the Model
We now adopt a Test-Driven Development approach i.e., we will write a unit test first and then develop the functionality until the test is green. We will repeat this process for each functionality of the model.
3.4 A First Test
We create unit tests in theTBBlogTestclass that belongs to the TinyBlog-Teststag. A tag is just a label to sort classes inside a package (See menu item ’Add Tag...’). We use a tag because using two packages will make this project more complex. However, while implementing a real application, it is recom-mended to have one (or multiple) separate test packages.
TestCase subclass: #TBBlogTest
instanceVariableNames: 'blog post first' classVariableNames: ''
package: 'TinyBlog-Tests'
Before each test execution, thesetUpmethod initializes the test context (also called test fixture). For example, it erases the blog content, adds one post and creates another temporary post that is not saved.
Pay attention since we will have to modify such behavior in the future else each time we will run the test we will destroy our data. This is an example of the kind of insidious behavior that a singleton introduces.
TBBlogTest >> setUp blog := TBBlog current. blog removeAllPosts.
first := TBPost title: 'A title' text: 'A text' category: 'First Category'.
blog writeBlogPost: first.
post := (TBPost title: 'Another title' text: 'Another text' category: 'Second Category') beVisible
As you may notice, we test different configurations. Posts do not belong to the same category, one is visible and the other is not visible.
At the end of each test, thetearDownmethod is executed and resets the blog. TBBlogTest >> tearDown
TBBlog reset
Here we see one of the limits of using a Singleton. Indeed, if you deploy a blog and then execute the tests, you will lose all posts that have been cre-ated because we reset the Blog singleton. We will address this problem in the future.
We will now develop tests first and then implement all functionalities to make them green.
3.4
A First Test
The first test adds a post in the blog and verifies that this post is effectivly added.
TinyBlog: Extending and Testing the Model
TBBlogTest >> testAddBlogPost blog writeBlogPost: post. self assert: blog size equals: 2
If you try to execute it, you will notice that this test is not green (does not pass) because we did not define the methodswriteBlogPost:, removeAll-Postsandsize. Let’s add them:
TBBlog >> removeAllPosts
posts := OrderedCollection new TBBlog >> writeBlogPost: aPost
"Add the blog post to the list of posts." posts add: aPost
TBBlog >> size ^ posts size
The previous test should now pass (i.e. be green).
3.5
Increasing Test Coverage
We should also add tests to cover all functionalities that we introduced. TBBlogTest >> testSize
self assert: blog size equals: 1 TBBlogTest >> testRemoveAllBlogPosts
blog removeAllPosts.
self assert: blog size equals: 0
3.6
Other Functionalities
We follow the test-driven way of defining methods: First we define a test. Then we verify that this test is failing. Then we define the method under test and finally verify that the test passes.
All Posts
Let’s a test that fails:
TBBlogTest >> testAllBlogPosts blog writeBlogPost: post.
self assert: blog allBlogPosts size equals: 2 And the model code that makes it succeed:
TBBlog >> allBlogPosts ^ posts
Your test should pass.
3.6 Other Functionalities
Visible Posts
We define a new unit test accessing visible blogs: TBBlogTest >> testAllVisibleBlogPosts
blog writeBlogPost: post.
self assert: blog allVisibleBlogPosts size equals: 1 We add the corresponding method:
TBBlog >> allVisibleBlogPosts
^ posts select: [ :p | p isVisible ] Verify that the test passes.
All Posts of a Category
The following test verifies that we can access all the posts of a given cate-gory. Once defined, we should make sure that the test failed.
TBBlogTest >> testAllBlogPostsFromCategory
self assert: (blog allBlogPostsFromCategory: 'First Category') size equals: 1
Then we can define the functionality and make sure that our test passes. TBBlog >> allBlogPostsFromCategory: aCategory
^ posts select: [ :p | p category = aCategory ] Verify that the test passes.
All visible Posts of a Category
The following test verifies that we can access all the visible posts of a given category. Once defined, we should make sure that the test failed.
TBBlogTest >> testAllVisibleBlogPostsFromCategory blog writeBlogPost: post.
self assert: (blog allVisibleBlogPostsFromCategory: 'First Category') size equals: 0.
self assert: (blog allVisibleBlogPostsFromCategory: 'Second Category') size equals: 1
Then we can define the functionality and make sure that our test passes. TBBlog >> allVisibleBlogPostsFromCategory: aCategory
^ posts select: [ :p | p category = aCategory and: [ p isVisible ] ] Verify that the test passes.
TinyBlog: Extending and Testing the Model
Check unclassified posts
The following test verifies that we do not have unclassified blogs in our test fixture.
TBBlogTest >> testUnclassifiedBlogPosts
self assert: (blog allBlogPosts select: [ :p | p isUnclassified ]) size equals: 0
Verify that the test passes.
Retrieve all categories
Again we define a new test and verify that it fails. TBBlogTest >> testAllCategories
blog writeBlogPost: post.
self assert: blog allCategories size equals: 2 We then add the new behavior.
TBBlog >> allCategories
^ (self allBlogPosts collect: [ :p | p category ]) asSet Verify that the test passes.
3.7
Testing data
To help you testing the application, you can add the following method that creates multiple posts.
TBBlog class >> createDemoPosts "TBBlog createDemoPosts" self current
writeBlogPost: ((TBPost title: 'Welcome in TinyBlog' text: 'TinyBlog is a small blog engine made with Pharo.' category: 'TinyBlog') visible: true);
writeBlogPost: ((TBPost title: 'Report Pharo Sprint' text: 'Friday, June 12 there was a Pharo sprint / Moose dojo. It was a nice event with more than 15 motivated sprinters. With the help of candies, cakes and chocolate, huge work has been done' category: 'Pharo') visible: true);
writeBlogPost: ((TBPost title: 'Brick on top of Bloc -Preview' text: 'We are happy to announce the first preview version of Brick, a new widget set created from scratch on top of Bloc. Brick is being developed primarily by Alex Syrel (together with Alain Plantec, Andrei Chis and myself), and the work is sponsored by ESUG.
Brick is part of the Glamorous Toolkit effort and will provide the basis for the new versions of the development tools.' category: 'Pharo') visible: true);
3.8 Possible Extensions
writeBlogPost: ((TBPost title: 'The sad story of unclassified blog posts' text: 'So sad that I can read this.') visible: true);
writeBlogPost: ((TBPost title: 'Working with Pharo on the Raspberry Pi' text: 'Hardware is getting cheaper and many new small devices like the famous Raspberry Pi provide new computation power that was one once only available on regular desktop computers.' category: 'Pharo') visible: true)
If you inspect the result of the following snippet, you will see that the cur-rent blog contains 5 posts:
TBBlog createDemoPosts ; current
Be aware that if you execute thiscreateDemoPostsmethod multiple times, your blog singleton object will contain multiple copies of these posts.
3.8
Possible Extensions
Many extensions can be made such as: retrieve the list of categories that contains at least one visible post, delete a category and all posts that it con-tains, rename a category, move a post from one category to another, make (in)visible one category and all its content, etc. We encourage you to develop some of them.
3.9
Conclusion
You now have the full model of TinyBlog as well as some unit tests. You are now ready to implement more advanced functionality such as the database storage or a first Web front-end. Do not forget to save your code.
C H A P T E R
4
Data Persitency using Voyage
and Mongo
Until now we used model objects stored in memory and it works well because saving the Pharo image also saves these objects. Nevertheless, it would be better to save these objects (blog posts) into an external database. Pharo sup-ports multiple object serializers such Fuel (binary format) or STON (text for-mat). These serializers are useful and powerful. Often with a single line of code we can save a full graph on objects as explained in the Enterprise Pharo book available athttp://books.pharo.org.
In this chapter, we will use another possibility: saving data in a document database such as Mongo (https://www.mongodb.com) using the Voyage frame-work. Voyage provides a unified API to store and retrieve objects in various document-based databases such as Mongo or UnQLite. But first, we will use Voyage and its capacity to simulate an external database in memory. This is really useful during development. Then, you may install a local Mongo database and access it through Voyage. As you will see, this second step will have a really little impact on our code.
The last chapter explains how to load the code of previous chapters if needed.
4.1
Configure Voyage to Save TBBlog Objects
By defining the class methodisVoyageRoot, we declare that objects of this class must be saved into the database as root objects. It means that the database will contain as many documents as instances of this class.
Data Persitency using Voyage and Mongo
TBBlog class >> isVoyageRoot
"Indicates that instances of this class are top level documents in noSQL databases"
^ true
We should establish connection to real database or work in memory. Let’s start to work in memory by using this expression:
VOMemoryRepository new enableSingleton.
TheenableSingletonmessage indicates to Voyage that we will use only one database. This will free us to specify the database each time. We create and initialize the database in memory in a class-side method named initial-izeVoyageOnMemoryDB.
TBBlog class >> initializeVoyageOnMemoryDB VOMemoryRepository new enableSingleton
Theresetclass method re-initializes the database. Theinitializeclass method ensures that the database is initialized when we load TinyBlog’s code. Do not forget to execute this expressionTBBlog initializeto ensure that the database is initialized.
TBBlog class >> reset
self initializeVoyageOnMemoryDB TBBlog class >> initialize
self reset
The class-sidecurrentmethod is trickier. Before using Voyage, we imple-mented a simple singleton pattern (TBBlog current). However, it does not work anymore because imagine that we saved our blog and that the server stopped by accident or that we would reload a new version of the code, it would re-initialize the connection and create a new fresh instance of the blog. It would then be possible to end up with a different instance than the saved one.
So we change the implementation of thecurrentclass method to make a database request and retrieve saved objects. Since we only save one blog object, it only consists in doing:self selectOne: [ :each | true ]or
self selectAll anyOne. If the database contains no instance, we create a new one and save it.
TBBlog class >> current ^ self selectAll
ifNotEmpty: [ :x | x anyOne ] ifEmpty: [ self new save ]
We can also remove the class instance variable nameduniqueInstancethat we previously used to store our singleton object.
TBBlog class
instanceVariableNames: ''
4.2 Saving a Blog
4.2
Saving a Blog
Each time we modify a blog object, we must propagate changes into the database. For example, we modify thewriteBlogPost:method to save the blog when we add a new post.
TBBlog >> writeBlogPost: aPost "Write the blog post in database" self allBlogPosts add: aPost. self save
We also save the blog when removing (removemethod) a post from a blog. TBBlog >> removeAllPosts
posts := OrderedCollection new. self save.
4.3
Revising Unit Tests
We now save blogs in a database, either in memory or in an external Mongo server, through Voyage. We must be careful with unit tests that modify the database because they may corrupt production data. To circumvent this dan-gerous situation, a test should not modify the state of the system.
To solve this situation, before running a test we will keep a reference to the current blog and create a new context and restore it after test execution. Let’s add an instance variablepreviousRepositoryin theTBBLogTestclass. TestCase subclass: #TBBlogTest
instanceVariableNames: 'blog post first previousRepository' classVariableNames: ''
package: 'TinyBlog-Tests'
Then, we modify thesetUpmethod to save the database before each test execution. We create a temporary database object that will be used by the test.
TBBlogTest >> setUp
previousRepository := VORepository current.
VORepository setRepository: VOMemoryRepository new. blog := TBBlog current.
first := TBPost title: 'A title' text: 'A text' category: 'First Category'.
blog writeBlogPost: first.
post := (TBPost title: 'Another title' text: 'Another text' category: 'Second Category') beVisible
In thetearDownmethod executed after each test, we restore the original database object.
Data Persitency using Voyage and Mongo
TBBlogTest >> tearDown
VORepository setRepository: previousRepository
4.4
Querying the Database
The database is currently in memory and we can access to the blog object us-ing thecurrentclass-side method of theTBBlogclass. It is enough to show the API of Voyage since it will be the same to access a real Mongo database. You can create posts:
TBBlog createDemoPosts
You can count the number of blog saved.countis part of the Voyage API. In this example, we get the result 1 because the blog is implemented as a Single-ton.
TBBlog count >1
Similarly, you can retrieve all saved root objects of one kind. TBBlog selectAll
You can also remove a root objet using theremovemessage. You can discover more about the Voyage API by looking at:
• theClassclass,
• theVORepositoryclass which is the root of the hierarchy of all databases either in memory or external.
Those queries will be more relevant with more objects but they would be similar.
4.5
If we would Save Posts [Discussion]
This section should not be implemented. It is only described as an exam-ple (More information about Voyage can be found in the Enterprise Pharo bookhttp://books.pharo.org). We want to illustrate that declaring a class as a Voyage root has an influence on how an instance of this class is saved and reloaded.
So far, a post (an instance ofTBPost) is not declared as a Voyage root. Post objects are therefore saved as sub-parts into the blog object they belong to. It implies that a post is not guaranteed to be unique after saving and re-loading from the database. Indeed, after re-loading each blog objects will have their own posts objects even if some posts were shared before saving. Shared objects before saving will be duplicated for each root objects after loading.
4.6 Configure an External Mongo Database [Optional]
We can declare posts as root objects meaning that a post can be saved in-dependently from a blog. It implies that saved blogs have a reference to a
TBPostobject. This would preserve posts sharing between blog objects. However, not all objects should be root objects. If we represent post com-ments, we would not define them as root objects too because manipulating a comment outside of its context (a post) does not make sense.
Post as Root = Uniqueness
If you want to share posts and make them unique between multiple blogs, therefore, theTBPostclass must be declared as a root in the database. In this case, posts are saved as autonomous entities and instances ofTBBlogwill reference posts entities instead of embedding them. The consequence is that a post is unique and can be shared via reference from a blog. To achieve this, we would define the following methods:
TBPost class >> isVoyageRoot
"Indicates that instances of this class are top level documents in noSQL databases"
^ true
During the addition of a post to a blog, it would be important to save both the blog and the new post.
TBBlog >> writeBlogPost: aPost "Write the blog post in database" posts add: aPost.
aPost save. self save
TBBlog >> removeAllPosts
posts do: [ :each | each remove ]. posts := OrderedCollection new. self save.
In theremoveAllPostsmethod, we first remove all posts, then update the collection and finally save the blog.
4.6
Configure an External Mongo Database [Optional]
By using Voyage, we can easily save our model objects into a Mongo database. This section explains how to proceed and the few modifications to make into our code. This is not mandatory to do it. Even if you do it, we encourage you to continue to work with a memory database afterwards.
Data Persitency using Voyage and Mongo
Installing Mongo
Regardless of your operating system (Linux, MacOS or Windows), you can in-stall a local Mongo server on your machine (cf.https://www.mongodb.com). This is useful to test your application without requiring an internet connec-tion. Instead directly installing Mongo, we suggest to install Docker (https: //www.docker.com) on your machine and execute a Mongo container using the following command line:
docker run --name mongo -p 27017:27017 -d mongo
Note The running Mongo server must not use authentication (it is not the case with the default installation) because the new SCRAM authentica-tion mechanism used by Mongo 3.0 is currently not supported by Voyage. Some useful Docker commands:
# to stop your Mongo docker container docker stop mongo
# to re-start your container docker start mongo
# to delete your container (it must be stopped before) docker rm mongo
Connecting a Local Mongo Server
Once installed, you can connect to a Mongo server directly from Pharo. We define the method namedinitializeLocalhostMongoDBto establish the connection to the local Mongo server (localhost, default port) and access the database named ’tinyblog’.
TBBlog class >> initializeLocalhostMongoDB | repository |
repository := VOMongoRepository database: 'tinyblog'. repository enableSingleton.
Reset the class to set a new connection to the database. TBBlog class >> reset
self initializeLocalhostMongoDB
Now, if you recreate demo posts, they are automatically saved into your local Mongo database:
TBBlog reset.
TBBlog createDemoPosts
4.7 Conclusion
In Case of Trouble
If you need to re-initialize completely an external database, you can use the
dropDatabasemethod. (VOMongoRepository
host: 'localhost'
database: 'tinyblog') dropDatabase
You can also do it in command line whenmongodis running with: mongo tinyblog --eval "db.dropDatabase()"
or by connecting to the docker container it is running in: docker exec -it mongo bash -c 'mongo tinyblog --eval
"db.dropDatabase()"'
Points of Attention: Changing TBBlog Definition
When you use an external Mongo database instead of a memory one, each time you add new root objects or modify the definition of some root objects, it is important to reset the cache maintained by Voyage. It can be done us-ing:
VORepository current reset
4.7
Conclusion
Voyage proposes a nice API to transparently manage storage of objects either into memory or in a document database. Application data are now saved into a database and we are ready to build the web user interface.
C H A P T E R
5
First Steps with Seaside
In this chapter, we will setup Seaside and build our first Seaside component. In the next chapters, we will develop the public part of TinyBlog, then the authentication system, followed by the administration part reserved to blog administrators.
All along, we will define Seaside componentshttp://www.seaside.st. A refer-ence book is available onlinehttp://book.seaside.stand the firsts chapters may help you and be a great companion of this tutorial book.
All the following work is independent of Voyage and the Mongo database. As usual, you can download the code of previous chapters as explained in the last chapter.
First Steps with Seaside
Figure 5-2 Running Seaside.
5.1
Starting Seaside
Seaside should be already loaded in your PharoWeb image. If not, please re-fer to the loading chapter.
There are two ways to start Seaside. The first one consists in executing the following snippet:
ZnZincServerAdaptor startOn: 8080.
The second one uses the graphical tool named ”Seaside Control Panel” (Tools Menu>Seaside Control Panel). In the contextual menu (right clic) of this tool, select ”add adaptor...” and add a server of typeZnZincServerAdaptor, then define the port number (e.g. 8080) it should run on (cf. Figure 5-1). By open-ing a web browser on the URLhttp://localhost:8080, you should see the Sea-side home page as displayed on Figure 5-2.
5.2
Bootstrap for Seaside
The Bootstrap library is directly accessible from Pharo and Seaside. The repository and the documentation of Bootstrap for Pharo is available there:
https://github.com/astares/Seaside-Bootstrap4. But it is already loaded into the PharoWeb image we are using with this book.
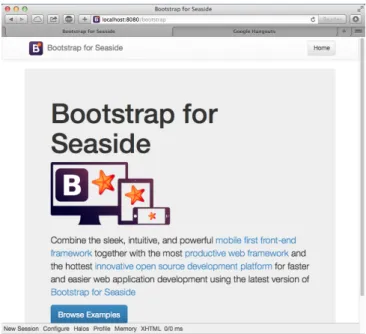
You can browse the examples locally in your browser by clicking on the
bootstrap link in the list of applications hosted by Seaside or directly enter
5.3 Define our Application Entry Point
Figure 5-3 Browsing the Seaside Bootstrap Library.
this URLhttp://localhost:8080/bootstrap. You should see Bootstrap examples as shown in Figure 5-3.
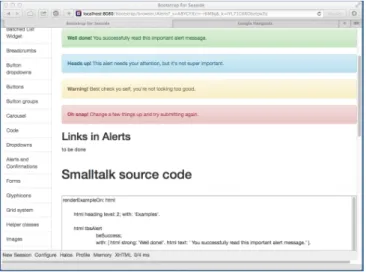
By clicking on the Examples link at the bottom of the page, you can see both Bootstrap graphical elements and the Seaside code needed to obtain them (cf. Figure 5-4).
5.3
Define our Application Entry Point
Create a class namedTBApplicationRootComponentwhich will be the entry point of the application.
WAComponent subclass: #TBApplicationRootComponent instanceVariableNames: ''
classVariableNames: ''
package: 'TinyBlog-Components'
We register the TinyBlog application into the Seaside application server by defining theinitializeclass method into the'initialization'protocol. We also integrate dependencies to the Bootstrap framework (CSS and JS files will be embedded in the application).
First Steps with Seaside
Figure 5-4 A Bootstrap element and its code.
TBApplicationRootComponent class >> initialize "self initialize"
| app |
app := WAAdmin register: self asApplicationAt: 'TinyBlog'. app
addLibrary: JQDeploymentLibrary; addLibrary: JQUiDeploymentLibrary; addLibrary: TBSDeploymentLibrary
Once declared, you should execute this method with TBApplicationRoot-Component initialize. Indeed, class-sideinitializemethods are exe-cuted at loading-time of a class but since the class already exists, we must execute it by hand.
We also add a method namedcanBeRootto specify that TBApplication-RootComponentis not a simple Seaside component but a complete applica-tion. This component will be automatically instantiated when a user con-nects to the application.
TBApplicationRootComponent class >> canBeRoot ^ true
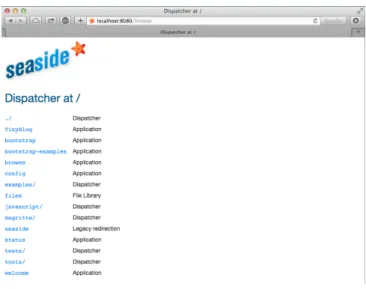
You can verify that your application is correctly registered into Seaside by connecting to the Seaside server through your web browser, click on ”Browse the applications installed in your image” and then see that TinyBlog ap-pears in the list as illustrated on Figure 5-5. Alternatively, you can visithttp: //localhost:8080/TinyBlog.
5.4 First Simple Rendering
Figure 5-5 TinyBlog is a registered Seaside application.
Figure 5-6 A first Seaside web page.
5.4
First Simple Rendering
Let’s add an instance method namedrenderContentOn:inrendering pro-tocol to make our application displaying something.
TBApplicationRootComponent >> renderContentOn: html html text: 'TinyBlog'
If you openhttp://localhost:8080/TinyBlogin your web browser, the page should look like the one on Figure 5-6.
You can customize the web page header and declare it as HTML 5 compliant by redefining theupdateRoot:method.
First Steps with Seaside HeaderComponent CategoriesComponent PostComponent Root Component TBPostsListComponent
Figure 5-7 Main components of TinyBlog (public view).
TBApplicationRootComponent >> updateRoot: anHtmlRoot super updateRoot: anHtmlRoot.
anHtmlRoot beHtml5.
anHtmlRoot title: 'TinyBlog'
Thetitle:message is responsible for setting the page title, as can be seen in your web browser’s title bar. TheTBApplicationRootComponent com-ponent is the root comcom-ponent of our application. It will not display a lot of things. In the following, it will contain and display other components. For example, a component to display posts to the blog readers, a component to administrate the blog and its posts, ...
5.5
Architecture
We are now ready to define the visual components of our web application.
Overview of TinyBlog
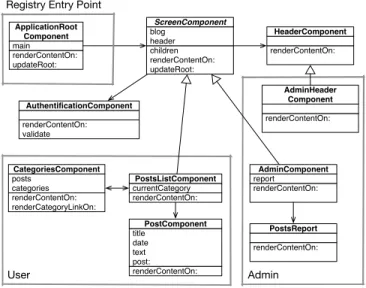
Figure 6-2 shows an overview of them and their responsibilities while Fig-ure 5-8 shows the general architectFig-ure of our application and the relations between those components.
5.6 Conclusion renderContentOn: updateRoot: main ApplicationRoot Component children renderContentOn: updateRoot: blog header ScreenComponent renderContentOn: HeaderComponent renderContentOn: currentCategory PostsListComponent renderContentOn: title date text post: PostComponent renderContentOn: renderCategoryLinkOn: posts categories CategoriesComponent Registry Entry Point
User renderContentOn: report AdminComponent renderContentOn: PostsReport Admin renderContentOn: validate AuthentificationComponent renderContentOn: AdminHeader Component
Figure 5-8 Architecture of TinyBlog.
Description of the Main Components
To ease your understanding of the incremental development of this applica-tion, Figure 5-8 describes the targeted architecture.
• ApplicationRootComponentis the entry point registered into Seaside. This component contains components inheriting from the abstract classScreenComponent.
• ScreenComponentis the root of the components used to build the public and administration view of the application. It is composed of a header.
• PostsListComponentis the main component that displays the posts. It is composed of instances ofPostComponent) and manages cate-gories.
• AdminComponentis the main component of the administration view. It is composed of a report component (instance ofPostsReport) built using Magritte.
5.6
Conclusion
We are now ready to start the development of the described components. In the next chapters, we guide you linearly to develop those components. If you feel lost at some point, we invite you to come back on this architecture overview to better understand what we are developing.
C H A P T E R
6
Web Components for TinyBlog
In this chapter, we build the public view of TinyBlog that displays the posts of the blog. Figure 6-1 shows the components we will work on during this chapter. If you feel lost at any moment, please refer to it.
Before starting, you can load the code of previous chapters as described in the last chapter of this book.
6.1
Visual Components
Figure 6-2 shows the visual components we will define in this chapter and where they will be displayed.
renderContentOn: updateRoot: main ApplicationRoot Component children renderContentOn: updateRoot: blog header ScreenComponent renderContentOn: HeaderComponent renderContentOn: currentCategory PostsListComponent renderContentOn: title date text post: PostComponent User
Figure 6-1 Component Architecture of the Public View (opposed to the Adminis-tration View).
Web Components for TinyBlog HeaderComponent PostComponent Root Component TBPostsListComponent
Figure 6-2 Visual Components of TinyBlog.
The TBScreenComponent component
All components contained inTBApplicationRootComponentwill be sub-classes of the abstract classTBScreenComponent. This class allows us to fac-torize shared behavior between all our components.
WAComponent subclass: #TBScreenComponent instanceVariableNames: ''
classVariableNames: ''
package: 'TinyBlog-Components'
All components need to access the model of our application. Therefore, in the ’accessing’ protocol, we add ablogmethod that returns the current in-stance ofTBBlog(the singleton). In the future, if you want to manage multi-ple blogs, you will modify this method and return the blog object it has been configured with.
TBScreenComponent >> blog
"Return the current blog. In the future we will ask the session to return the blog of the currently logged in user." ^ TBBlog current
Let’s define a methodrenderContentOn:on this new component that tem-porarily displays a message. If you refresh your browser, nothing appears because this new component is not displayed at all yet.
TBScreenComponent >> renderContentOn: html html text: 'Hello from TBScreenComponent'
6.2 Using the TBScreenComponent component renderContentOn: updateRoot: main ApplicationRoot Component children renderContentOn: updateRoot: blog header ScreenComponent renderContentOn: HeaderComponent
Figure 6-3 ApplicationRootComponent temporarily uses a
ScreenCompo-nent that contains a HeaderCompoScreenCompo-nent.
6.2
Using the TBScreenComponent component
In the final architecture,TBScreenComponentis an abstract component and should not be used directly. Nevertheless, we will use it temporarily while developing other components.
Let’s add an instance variablemaininTBApplicationRootComponentclass. We obtain the situation described in Figure 6-3.
WAComponent subclass: #TBApplicationRootComponent instanceVariableNames: 'main'
classVariableNames: ''
package: 'TinyBlog-Components'
We initialize this instance variable in theinitializemethod with a new instance ofTBScreenComponent.
TBApplicationRootComponent >> initialize super initialize.
main := TBScreenComponent new
We make theTBApplicationRootComponentto render this sub-component. TBApplicationRootComponent >> renderContentOn: html
html render: main
We do not forget to declare that the object contained inmaininstance vari-able is a sub-component ofTBApplicationRootComponentby redefining the
childrenmethod.
TBApplicationRootComponent >> children ^ { main }
Figure 6-4 shows the result that you should obtain in your browser. Cur-rently, there is only the text:Hello from TBScreenComponentdisplayed by theTBScreenComponentsub-component. (voir figure 6-4).
6.3
Pattern of Component Definition
We will often use the same following steps:
Web Components for TinyBlog
Figure 6-4 First visual rendering ofTBScreenComponent.
• then, we reference it from an existing component that uses it;
• and we express the composite/sub-component relationship by redefin-ing thechildrenmethod.
6.4
Populating the Blog
You can inspect the blog object returned byTBBlog currentand verify that it contains some posts. You can also do it simply as:
TBBlog current allBlogPosts size If it does not, execute:
TBBlog createDemoPosts
6.5
Definition of TBHeaderComponent
Let’s define a component namedTBHeaderComponentthat renders the com-mon header of all pages of TinyBlog. This component will be inserted on the top of all components such asTBPostsListComponent. We use the pattern described above: define the class of the component, reference it from its en-closing component and redefine thechildrenmethod.
Here the class definition:
WAComponent subclass: #TBHeaderComponent instanceVariableNames: ''
classVariableNames: ''
package: 'TinyBlog-Components'
6.6
Usage of TBHeaderComponent
Remember thatTBScreenComponentis the (abstract) root of all components in our final architecture. Therefore, we will introduce our header into TB-ScreenComponentso that all its subclasses will inherit it. Since, it is not desirable to instantiate theTBHeaderComponenteach time a component is called, we store the header in an instance variable namedheader.
6.7 Composite-Component Relationship
WAComponent subclass: #TBScreenComponent instanceVariableNames: 'header' classVariableNames: ''
package: 'TinyBlog-Components'
We initialize it in theinitializemethod categorized in the ’initialization’ protocol:
TBScreenComponent >> initialize super initialize.
header := self createHeaderComponent TBScreenComponent >> createHeaderComponent
^ TBHeaderComponent new
Note that we use a specific method namedcreateHeaderComponentto cre-ate the instanticre-ate the header component. Redefining this method makes it possible to completely change the header component that is used. We will use that to display a different header component for the administration view.
6.7
Composite-Component Relationship
In Seaside, sub-components of a component must be returned by the com-posite when sending it thechildrenmessage. So, we must define that the
TBHeaderComponentinstance is a children of theTBScreenComponent com-ponent in the Seaside comcom-ponent hierarchy (and not in the Pharo classes hierarchy). We do so by specializing the methodchildren. In this example, it returns a collection of one element which is the instance of TBHeaderCom-ponentreferenced by theheaderinstance variable.
TBScreenComponent >> children ^ { header }
6.8
Render an header
In therenderContentOn:method (’rendering’ protocol), we can now display the sub-component (the header):
TBScreenComponent >> renderContentOn: html html render: header
If you refresh your browser, nothing appears because the TBHeaderCompo-nenthas no rendering. Let’s add arenderContentOn:method on it that displays a Bootstrap navigation header:
Web Components for TinyBlog
Figure 6-5 TinyBlog with a Bootstrap header.
TBHeaderComponent >> renderContentOn: html html tbsNavbar beDefault; with: [
html tbsContainer: [ self renderBrandOn: html ]] TBHeaderComponent >> renderBrandOn: html html tbsNavbarHeader: [ html tbsNavbarBrand
url: self application url; with: 'TinyBlog' ]
Your browser should now display what is shown on Figure 6-5. As usual in
Bootstrap navigation bar, the link on the title of the application (tbsNavbarBrand) enable users to go back to home page of the application.
Possible Enhancements
The blog name should be customizable using an instance variable in the TB-Blogclass and the application header component should display this title.
6.9 List of Posts renderContentOn: updateRoot: main ApplicationRoot Component children renderContentOn: updateRoot: blog header ScreenComponent renderContentOn: HeaderComponent renderContentOn: PostsListComponent
Figure 6-6 TheApplicationRootComponent uses PostsListComponent.
6.9
List of Posts
Let’s create aTBPostsListComponentinheriting fromTBScreenComponent
to display the list of all posts. Remember that we speak about the public ac-cess to the blog here and not the administration interface that will be devel-oped later.
TBScreenComponent subclass: #TBPostsListComponent instanceVariableNames: ''
classVariableNames: ''
package: 'TinyBlog-Components'
We can now modifyTBApplicationRootComponent, the main component of the application, so that it displays this new component as shown in figure 6-6. To achieve this, we modify itsinitializemethod:
TBApplicationRootComponent >> initialize super initialize.
main := TBPostsListComponent new
We add a setter method namedmain:to dynamically change the sub-component to display but by default it is an instance ofTBPostsListComponent.
TBApplicationRootComponent >> main: aComponent main := aComponent
We now add a temporaryrenderContentOn:method (in the ’rendering’ protocol) onTBPostsListComponentto test during development (cf. Fig-ure 6-7). In this method, we call therenderContentOn:of the super-class which renders the header component.
TBPostsListComponent >> renderContentOn: html super renderContentOn: html.
html text: 'Blog Posts here !!!'
If you refresh TinyBlog in your browser, you should now see what is shown in figure 6-7.
Web Components for TinyBlog
Figure 6-7 TinyBlog displaying a basic posts list.
renderContentOn: updateRoot: main ApplicationRoot Component children renderContentOn: updateRoot: blog header ScreenComponent renderContentOn: HeaderComponent renderContentOn: PostsListComponent renderContentOn: title date text post: PostComponent
Figure 6-8 Using PostComponents to diplays each Posts.
6.10
The PostComponent
Now we will defineTBPostComponentto display the details of a post. Each post will be graphically displayed by an instance ofTBPostComponentwhich will show the post title, its date and its content as shown in figure 6-8. WAComponent subclass: #TBPostComponent
instanceVariableNames: 'post' classVariableNames: ''
package: 'TinyBlog-Components' TBPostComponent >> initialize
super initialize. post := TBPost new
6.11 Display Posts TBPostComponent >> title ^ post title TBPostComponent >> text ^ post text TBPostComponent >> date ^ post date
TherenderContentOn:method defines the HTML rendering of a post. TBPostComponent >> renderContentOn: html
html heading level: 2; with: self title. html heading level: 6; with: self date. html text: self text
About HTML Forms
In a future chapter on the administration view, we will show how to use Magritte to add descriptions to model objects and then use them to auto-matically generate Seaside components. This is powerful and free developers to manually describe forms in Seaside.
To give you a taste of that, here the equivalent code as above using Magritte: TBPostComponent >> renderContentOn: html
"DON'T WRITE THIS YET" html render: post asComponent
6.11
Display Posts
Before displaying available posts in the database, you should check that your blog contains some posts:
TBBlog current allBlogPosts size
If it contains no posts, you can recreate some: TBBlog createDemoPosts
Now, we just need to modify theTBPostsListComponent >> renderCon-tentOn:method to display all visible posts in the database:
TBPostsListComponent >> renderContentOn: html super renderContentOn: html.
self blog allVisibleBlogPosts do: [ :p | html render: (TBPostComponent new post: p) ] Refresh you web browser and you should get an error.
Web Components for TinyBlog
Figure 6-9 TinyBlog with a List of Posts.
6.12
Debugging Errors
By default, when an error occurs in a web application, Seaside returns an HTML page with the error message. You can change this message or during development, you can configure Seaside to open a debugger directly in Pharo IDE. To configure Seaside, just execute the following snippet:
(WAAdmin defaultDispatcher handlerAt: 'TinyBlog') exceptionHandler: WADebugErrorHandler
Now, if you refresh the web page in your browser, a debugger should open on Pharo side. If you analyze the stack, you should see that we forgot to define the following method:
TBPostComponent >> post: aPost post := aPost
You can define this method in the debugger using theCreatebutton. After that, press theProceedbutton. The web application should now correctly renders what is shown in Figure 6-9.
6.13
Displaying the List of Posts with Bootstrap
Let’s use Bootstrap to make the list of posts more beautiful using a Bootstrap container thanks to the messagetbsContainer::
6.14 Instantiating Components inrenderContentOn: TBPostsListComponent >> renderContentOn: html
super renderContentOn: html. html tbsContainer: [
self blog allVisibleBlogPosts do: [ :p |
html render: (TBPostComponent new post: p) ] ] Your web application should look like Figure 6-2.
6.14
Instantiating Components in
renderContentOn:
We explained that thechildrenmethod of a component should return its sub-components. Indeed, before executing therenderContentOn:method of a composite, Seaside needs to retrieve all its sub-components and their state. However, if sub-components are instantiated in therenderContentOn:
method of the composite (such as in TBPostsListComponent>>renderCon-tentOn:), it is not needed thatchildrenreturns those sub-components. Note that, instantiating sub-components in the rendering method is not a good practice since it increases the loading time of the web page.
If we would store all sub-components that display posts, we should add an instance variablepostComponents.
TBPostsListComponent >> initialize super initialize.
postComponents := OrderedCollection new Initialize it with posts.
TBPostsListComponent >> postComponents postComponents := self readSelectedPosts
collect: [ :each | TBPostComponent new post: each ]. ^ postComponents
Redefine thechildrenmethod and of course render these sub-components inrenderContentOn::
TBPostsListComponent >> children ^ self postComponents, super children TBPostsListComponent >> renderContentOn: html
super renderContentOn: html. html tbsContainer: [
self postComponents do: [ :p | html render: p ] ]
Web Components for TinyBlog
6.15
Conclusion
In this chapter, we developed a Seaside component that renders a list of posts. In the next chapter, we will improve this by displaying posts’ cate-gories.
Notice that we did not care about web requests or the application state. A Seaside programmer only define components and compose them as we would do in desktop applications.
A Seaside component is responsible of rendering itself by redefining its ren-derContentOn:method. It should also returns its sub-components (if no instantiated during each rendering) by redefining thechildrenmethod.
C H A P T E R
7
Managing Categories
In this chapter, we add the possibility to sort posts in a category. Figure 7-1 shows you on which components we will work in this chapter.
You can find instructions to load the code of previous chapter in Chapter 10.
7.1
Displaying Posts by Category
Posts are sorted by a category. If no category is specified, posts are sorted in a special category called ”Unclassified”. To manage a list of categories, we will define a component namedTBCategoriesComponent.
renderContentOn: updateRoot: main ApplicationRoot Component children renderContentOn: updateRoot: blog header ScreenComponent renderContentOn: HeaderComponent renderContentOn: currentCategory PostsListComponent renderContentOn: title date text post: PostComponent renderContentOn: renderCategoryLinkOn: posts categories CategoriesComponent User
Managing Categories
Displaying Categories
We need a component to display a list of categories defined in the blog. This component should support the selection of one category. This component should be able to communicate with the componentTBPostsListComponent
to give it the currently selected category. Figure 7-1 described the situation. Remember that a category is simply expressed as a string in the model we defined in Chapter 2 and how the following test illustrates it:
testAllBlogPostsFromCategory
self assert: (blog allBlogPostsFromCategory: 'First Category') size equals: 1
Component Definition
Let us define a new component namedTBCategoriesComponent. It keeps a sorted collection of string representing each category as well as a reference to the component managing the post list.
WAComponent subclass: #TBCategoriesComponent instanceVariableNames: 'categories postsList' classVariableNames: ''
package: 'TinyBlog-Components' We define the associated accessors. TBCategoriesComponent >> categories
^ categories
TBCategoriesComponent >> categories: aCollection categories := aCollection asSortedCollection TBCategoriesComponent >> postsList: aComponent
postsList := aComponent TBCategoriesComponent >> postsList
^ postsList
We define a creation method as a class method.
TBCategoriesComponent class >> categories: categories postsList: aTBScreen
^ self new categories: categories; postsList: aTBScreen
From the Post List
In the classTBPostsListComponent, we need to add an instance variable to store the current category.
7.2 Category Rendering
TBScreenComponent subclass: #TBPostsListComponent instanceVariableNames: 'currentCategory' classVariableNames: ''
package: 'TinyBlog-Components' We define its associated accessors.
TBPostsListComponent >> currentCategory ^ currentCategory
TBPostsListComponent >> currentCategory: anObject currentCategory := anObject
The method selectCategory:
We define the methodselectCategory:(protocol ’actions’) to communi-cate the current communi-category to theTBPostsListComponentcomponent. TBCategoriesComponent >> selectCategory: aCategory
postsList currentCategory: aCategory
7.2
Category Rendering
We can now define method for the rendering of the category component on the page. Let us call itrenderCategoryLinkOn:with:, we define in particu-lar that clicking on a category will select it as the current one. We use a call-back (messagecallback:). The argument of this message is a block that can contains any Pharo expression. This illustrates how simple is to call function to react to event.
TBCategoriesComponent >> renderCategoryLinkOn: html with: aCategory html tbsLinkifyListGroupItem
callback: [ self selectCategory: aCategory ]; with: aCategory
The methodrenderContentOn:ofTBCategoriesComponentis simple: we iterate on all categories and we display them using Bootstrap.
TBCategoriesComponent >> renderContentOn: html html tbsListGroup: [
html tbsListGroupItem
with: [ html strong: 'Categories' ]. categories do: [ :cat |
self renderCategoryLinkOn: html with: cat ] ]
We are nearly there. We need to display the list of categories and update the posts based on the current category.