Indirect Bonding Method:
in vitro Comparison of the Shear Bond Strength Between
Metallic Orthodontic Brackets and Different Porcelain
Surface Preparations
par
Stéphanie Ha Mai
Département d’orthodontie Faculté de médecine dentaire
Mémoire présenté à la Faculté de médecine dentaire en vue de l’obtention du grade de maîtrise en sciences
en médecine dentaire option orthodontie
Avril 2013
Faculté des études supérieures et postdoctorales
Ce mémoire intitulé:
Indirect Bonding Method:
in vitro Comparison of the Shear Bond Strength Between Metallic
Orthodontic Brackets and Different Porcelain Surface Preparations
Présenté par: Stéphanie Ha Mai
a été évalué par un jury composé des personnes suivantes:
Dre Nelly Huynh, président-rapporteur Dre Annie St-Georges, directrice de recherche
Dr Jocelyn Talbot, co-directeur Dre Andrée Montpetit, membre du jury
Résumé
Introduction : La force d’adhésion à l'interface métal-céramique avec les résines auto-polymérisantes destinées au collage indirect des boîtiers orthodontiques n'a pas été évaluée à ce jour et un protocole clinique basé sur la littérature scientifique est inexistant.
Objectifs : 1) Comparer la force de cisaillement maximale entre des boîtiers métalliques et des surfaces en porcelaine préparées selon différentes méthodes; 2) Suggérer un protocole clinique efficace et prévisible.
Matériel et méthodes : Quatre-vingt-dix disques en leucite (6 groupes; n = 15/groupe) ont été préparés selon 6 combinaisons de traitements de surface : mécaniques (+ / - fraisage pour créer les rugosités) et chimiques (acide fluorhydrique, apprêt, silane). Des bases en résine composite Transbond XT (3M Unitek, Monrovia, California) faites sur mesure ont été collées avec le système de résine adhésive auto-polymérisante Sondhi A + B Rapid Set (3M Unitek, Monrovia, California). Les échantillons ont été préservés (H2O/24hrs),
thermocyclés (500 cycles) et testés en cisaillement (Instron, Norwood, Massachusetts). Des mesures d’Index d’adhésif résiduel (IAR) ont été compilées. Des tests ANOVAs ont été réalisés sur les rangs étant donné que les données suivaient une distribution anormale et ont été ajustés selon Tukey. Un Kruskall-Wallis, U-Mann Whitney par comparaison pairée et une analyse de Weibull ont aussi été réalisés.
Résultats : Les médianes des groupes varient entre 17.0 MPa (- fraisage + acide fluorhydrique) à 26.7 MPa (- fraisage + acide fluorhydrique + silane). Le fraisage en surface ne semble pas affecter l’adhésion. La combinaison chimique (- fraisage + silane + apprêt) a démontré des forces de cisaillement significativement plus élevées que le traitement avec (- fraisage + acide fluorhydrique), p<0,05, tout en possédant des forces similaires au protocole typiquement suggéré à l’acide fluorhydrique suivi d’une application de silane, l’équivalence de (- fraisage + acide fluorhydrique + silane). Les mesures d’IAR sont significativement plus basses dans le groupe (- fraisage + acide fluorhydrique) en comparaison avec celles des 5 autres groupes, avec p<0,05. Malheureusement, ces 5 groupes ont des taux de fracture élévés de 80 à 100% suite à la décimentation des boîtiers. Conclusion : Toutes les combinaisons de traitement de surface testées offrent une force d’adhésion cliniquement suffisante pour accomplir les mouvements dentaires en orthodontie. Une application de silane suivie d’un apprêt est forte intéressante, car elle est simple à appliquer cliniquement tout en permettant une excellente adhésion. Il faut cependant avertir les patients qu’il y a un risque de fracture des restorations en céramique lorsque vient le moment d’enlever les broches. Si la priorité est de diminuer le risque d’endommager la porcelaine, un mordançage seul à l’acide hydrofluorique sera suffisant. Mots-clés : Porcelaine, céramique, surface de préparation, collage indirect, Sondhi, boîtier métallique, orthodontie
Abstract
Background : Bond strength at the metal-ceramic interface of auto-polymerizing resins used in orthodontic indirect bonding has not yet been evaluated and a literature-based clinical protocol is lacking.
Goals : 1) To compare shear bond strength (SBS) between metal brackets and differently treated porcelain surfaces; 2) To suggest efficient and predictable chairside approaches. Materials and methods : Ninety leucite discs (6 groups; n=15/group) were prepared following 6 combinations of mechanical (+/- bur roughening) and chemical (hydrofluoric acid, primer, silane) treatments. Metal brackets with custom composite resin Transbond XT (3M Unitek, Monrovia, California) bases were bonded with the adhesive resin system Sondhi A+B Rapid Set (3M Unitek, Monrovia, California). Samples were stored (H2O/24hrs), thermocycled (500 cycles) and tested (Instron, Norwood, Massachusetts).
Maximum SBS and adhesive remnant index (ARI) scores were collected for each sample. ANOVAs were performed on ranks since data was not normally distributed, and then adjusted with the post-hoc Tukey method. A Kruskall-Wallis, a Mann Whitney U pairwise comparison and a Weibull analysis were also performed.
Results : SBS medians of groups ranged from 17.0 MPa (- bur + hydrofluoric acid) to 26.7MPa (- bur + hydrofluoric acid + silane). Bur roughening did not affect bond strength. The chemical preparation of (- bur + primer + silane) showed statistically significant higher SBS than (- bur + hydrofluoric acid) preparation (p<0,05), while having similar SBS to the popular recommended protocol (- bur + hydrofluoric acid + silane). ARI scores were statistically significant lower in group (- bur + hydrofluoric acid) with p<0,05, while all other 5 groups were not different from each other. Percentage of porcelain damage in these 5 groups were very high at 80-100%.
Conclusion : All the tested surface preparations combinations provided clinically adequate adhesion for orthodontic tooth movement. A silane and primer combination for porcelain surface preparation is clinically attractive as it is safe and simple and provides great adhesion for orthodontic tooth movement. It is wise to warn patients that there is a risk of porcelain fractures when debonding brackets. If one prefers to avoid porcelain fracture at all cost, one may treat porcelain with hydrofluoric acid only.
Keywords: Porcelain, Ceramic, Surface preparation, Indirect bonding, Sondhi, Metal bracket, Orthodontic
Table of Contents
Résumé ... i
Abstract ... ii
Terminology ... v
List of Abreviations ... viii
List of Tables ... ix
List of Figures ... x
1 INTRODUCTION ... 1
2 LITERATURE REVIEW ... 5
2.1 The Indirect Bonding Technique ... 6
2.1.1 Essential Steps of Indirect Bonding Brackets ... 7
2.1.2 Advantages of the Indirect Bonding Method ... 13
2.1.3 Disadvantages of the Indirect Bonding Method ... 15
2.2 Types of porcelain ... 16
2.3 Methods for Porcelain Surface Preparation ... 21
2.3.1 Mechanical Preparation ... 21
2.3.2 Chemical Preparation ... 22
2.4 Concerns when Debonding ... 26
2.5 Materials for Custom Base Fabrication ... 27
2.5.1 Cements ... 28
2.5.2 Composite Resins ... 28
2.6 Adhesive Resins for Chairside Step ... 30
2.6.1 Chemically-‐cured Adhesive Resins ... 31
2.6.2 Light-‐cured Adhesive Resins ... 33
2.7 Measuring Shear Bond Strength ... 35
2.7.1 Factors Affecting Bond Strength ... 36
2.7.3 Porcelain : Shear Bond Strength Comparisons ... 40
3.1 Adhesive Remnant Index ... 43
3.1.1 Background and Relevance ... 43
3.1.2 Reports of Porcelain Fractures ... 45
3.2 Thermocycling ... 46
4 EXPERIMENTAL HYPOTHESES ... 48
5 SCIENTIFIC ARTICLE ... 49
6 DISCUSSION ... 69
6.1 Comparaisons of Results ... 70
6.1.1 Shear Bond Strength ... 70
6.1.2 Adhesive Remnant Index & Fractures ... 71
6.2 Clinical Implications ... 73
6.3 Limitations of the Study ... 74
6.4 Future Research Venues ... 75
7 CONCLUSION ... 78
Bibliography ... i
Terminology
Adhesion : The property of remaining in close proximity, as that resulting from the physical attraction of molecules to a substance or molecular attraction existing between the surfaces of bodies in contact.[1]
Bond strength: The force required to break a bonded assembly with failure occuring in or near the adhesive/adherens interface. Bond force is divided by the area of the bonded interface. The units of bond strength are megapascals (MPa), kilograms per square centimeter (kg/cm2), and pounds per square inch (lb/in2 or psi). It is common to see bond
force reported with units of Newtons (N), kilograms (kg), or pounds (lb).[1, 2]
Bonding : Joining together secure with an adhesive substance such as cement or glue; the procedure of using an adhesive, cementing material or fusible ingredient to combine, unite or strengthen; an adhesive technique in dentistry involving conditioning of a surface as to create tags in the stucture for mechanical retention of a restorative material.[1]
Ceramics : Compounds of one or more metals with a non-metallic element, usually oxygen, and non-metal mineral, as clay. They are formed of chemically and biochemically stable substances that are strong, hard, brittle and inert non-conductors for thermal and electrical energy.[1]
Cement: Dental cements consist of an acid component and an alkaline component that, when combined, result in the hardening or setting of the mixture via a neutralization reaction. Cements are brittle, with relatively high compressive strength, low tensile strength, and relatively low fracture resistance.[3]
Glass Ionomer Cement : The conventional, chemically-cured glass ionomer cement (GIC) is supplied as a powder and liquid that are either mixed by hand or are encapsulated for automatic mixing. The powder is a calcium fluoroaluminosilicate glass, and the liquid is typically a solution of a polyacrylic acid copolymer in water.[2]
Resin-Modified Glass Ionomer Cement : The orthodontic use of GICs increased dramatically with the development of resin-modified GICs (RMGIC). The addition of 10- 20% resin monomers to the GICs resulted in a cement that is initially hardened with the use of either light or chemical activators to polymerize the monomers. RMGICs are adhesive cements with improved physical properties and more stable hydrogels compared with GICs. Capsulation of RMGIC powder and liquid components simplified mixing procedures with a triturator.[3]
Hybrid Ionomer : These materials are also known as light-cured glass ionomers and resin-modified glass ionomers. They are supplied as a powder and liquid that are mixed by hand. The powder is typically a fluoroaluminosilicate glass. The liquid is a complex monomer containing carboxylic acid groups that react with the glass and tooth structure, and vinyl groups that can polymerize once they are chemically- or light-activated.[2]
Resins: A broad term used to describe natural or synthetic substances that form plastic materials after polymerization. They are named according to their chemical composition, physical structure, and means for activation of polymerization. They can be either light-activated, chemically-light-activated, or dual-cured with combined light- and chemical- activation.[1, 3]
Composite Resin: This material is formulated from glass particles and dimethacrylate monomers. The highly filled resin composites contain 60-80% by weight of glass filler, whereas the lightly filled composites contain about 28% by weight of silica.[2]
Adhesive resin : Any resin material with incorporated adhesive chemicals such as organophosphates, HEMA (hydroxyethyl methacrylate), or 4-META (4 methacrylethyl trimellitic anhydride) ; in dentistry, it describes the luting agents used with resin bonded prosthesis.[1]
Silane : This coupling agent is used to enhance bond strength to porcelain surfaces by chemical adhesion. Silanes are difunctional molecules, with one region compatible to bond with the silica within the porcelain, and the other having a -C=C group that cross-polymerizes with the bonding resin, thus forming a bridge between the two materials.[4]
List of Abreviations
Al2O3 : Aluminium oxide or alumina
APC: Adhesive pre-applied composite resin to bracket system APF : Acidulated phosphate fluoride
ARI : Adhesive remnant index CO2 : Carbon dioxide
GICs : Glass ionomer cements HFA : Hydrofluoric acid PA: Phosphoric acid
ISO : International organisation for standardization MC : Maximum cure
MPa : Mega Pascals N : Newtons
OTM : Orthodontic tooth movement
RMGIC : Resin-modified glass ionomer cement
SBS : Shear bond strength
SD : Sondhi Rapid Set A+ B Indirect Bonding system, adhesive resin
SEM : Scanning electon microscopy TXT : Transbond XT, composite resin YAG : Yittrium aluminium garnet
List of Tables
Table 1: Revised advantages for the indirect bonding method.. ... 14
Table 2: Bonding properties of common ceramic ingots used in peer-reviewed literature. 20 Table 3: SBS comparisons between direct and indirect bonding with teeth. ... 39
Table 4: Summary of SBS studies with various porcelain surface treatments. ... 42
Article Table 1: Shear Bond Strength Results ... 59
Article Table 2 : Modified Adhesive Remnant Index Results ... 60
List of Figures
Figure 1: Direct bonding method of individual brackets performed chairside. ... 2
Figure 2: Two-step procedure for the indirect bonding method. ... 3
Figure 3: Individual cast in green stone ... 8
Figure 4: Left image : Reference lines for bracket placement ; Right image : application of the separating medium ... 8
Figure 5: Once brackets are placed and attached to the stone cast, polymerization of custom composite resin bases is done in a light curing unit, for 10 minutes. ... 9
Figure 6: " Inner " transfer tray fabrication with light polyvinylsiloxane and putty. ... 10
Figure 7: Left image : polymerized " inner " transfer tray separated from stone vast ; other images: cold-cured acrylic " outer " transfer tray on top of " inner " tray ... 11
Figure 8: Nola System installation and transfer tray for upper arch ... 12
Figure 9: Samples of popular all-ceramic dental products ... 17
Figure 10: Comparison of all-ceramic dental materials frequently used. ... 19
Figure 11: OpalDam barrier for gingival protection from HFA ... 23
Figure 12: Silane molecule R′—Si(OR)3 ... 25
Figure 13: Sondhi Rapid Set A+B Indirect Bonding System ... 32
Figure 14: Studied variables that can affect SBS. ... 37
Article Figure 1: Finesse All-Ceramic discs or ingots mounted in blue acrylic cylinders. . 54
Article Figure 2: Pocelain surface preparations. ... 54
Article Figure 3: Universal testing machine in shear compression mode ... 57
Article Figure 4: Three random samples’ surface condition post-testing. ... 61
To my loving parents for coming to Canada without a penny, for all the sacrifices they have made for us and their future generations. To my husband Steve and my brother Alex who have always been unmistakably there for me.
Acknowledgements
I would like to extend my gratitude towards Dr Annie St-Georges for her continuous guidance throughout this Master’s project. I am very fortunate to have had the chance to work with someone so meticulous and dedicated to academic excellence. I would also like to thank Dr Jocelyn Talbot, Mr Pierre Rompré and Dr Nelly Huyhn for their input in the elaboration of this Thesis. Thank you to Dr Antonio Nanci, Mme Sylvia Zalzal and Dr Daniel Fortin for their assistance during the laboratory experiment.
To Dr Claude Remise, thank you for giving me this opportunity to fulfill my hopes of becoming an orthodontist. To Drs Audrey Bellerive, Ariane Lebuis and Laurent Richard, thank you for three memorable years in your company. I feel like you all are part of my extended family. You have made me a better health care professional, friend and person. To all my other co-residents and clinicians, thank you for fostering an environment for learning and camaraderie.
1 . INTRODUCTION
Orthodontics has its roots from the Greek word orthos, which means straight or
proper or even perfect. Orthodontics is the specialty of dental medicine which focuses on
the malalignment of the teeth and of the jaws. A typical comprehensive orthodontic treatment requires application of forces to generate orthodontic tooth movements (OTM) in order to displace and align teeth. OTM can be performed with removable appliances, but also by cementing fixed appliances such as bands or brackets on the tooth. OTM is only generated once wires are inserted into the appliances’ slots. The bonding of orthodontic brackets for the entire duration of the orthodontic treatment is a very common procedure.
Bonding in orthodontics is semi-permanent in that bond strength of orthodontic attachments should be high enough to resist accidental debonding during treatment, but also low enough to facilitate the debond of brackets with light forces at the end of the treatment and not damage the tooth surfaces. Brackets can be attached on dental surfaces by two methods: direct bonding, which is performed chairside; or indirect bonding, which involves an additional laboratory step before the chairside step.
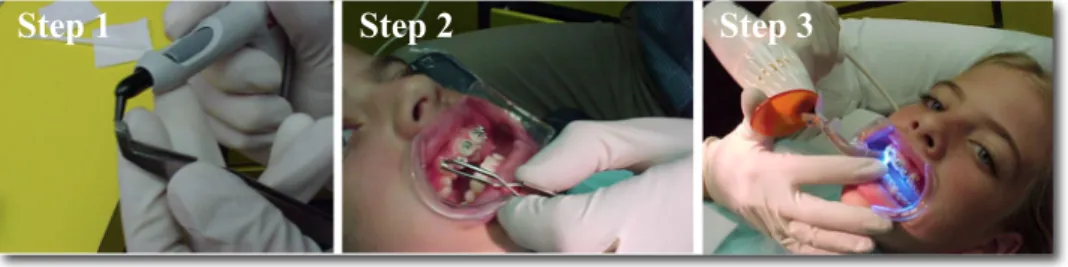
The method for direct bonding of orthodontic brackets is well known and understood by clinicians. It begins with the isolation of the oral environment, preparation of the tooth surface, application of uncured composite resin on the back of the bracket, and placement of the individual bracket onto the tooth surface. Photo-polymerization of the composite resin is initiated once ideal bracket position is obtained, as shown in Figure 1. Ideally this step is performed on each tooth individually.
Figure 1: Direct bonding method of individual brackets performed chairside. (All images adapted from http://www.drbiteright.com/gettingbraces.htm)
The ideal placement of brackets is critical to effectively meet treatment plan objectives. The brackets fulfill essential orthodontic goals such as the leveling of the marginal ridges, which in return level the cenamo-enamel junction and consequently the bone levels. Bone levels tend to be parallel to the cemento-enamel junction in healthy periodontium. Bracket placement can also meet various treatment objectives such as vertical control to maintain a Curve of Spee and prevent auto-rotation of the mandible, or more gingival placement of incisor brackets to close a dental openbite. Hence, over-corrections are easy to incorporate with brackets.[5]
However, the placement of brackets can be challenging as orthodontists have come to recognize some of the generic problems associated with the direct bonding technique. First, there is difficulty in visualizing the intra-oral vertical and horizontal planes of moderately to severe malpositioned teeth. Secondly, access may be limited and this can frequently lead to a less than ideal bracket placement position. Clinician fatigue during a comprehensive bonding session and patient comfort are other problems associated with direct bonding.[6] In a previous direct bonding failure rate study, a higher bonding failure rate in the posterior region was detected. This high failure rate may be related to the increased difficulty of isolation against saliva and humidity in the posterior segments of the mouth.[7]
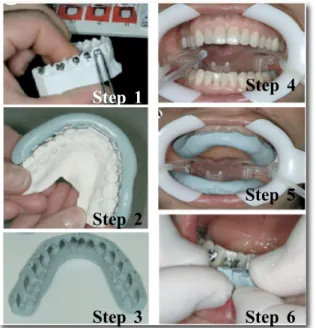
Indirect bonding method of brackets was developed to overcome the difficulties associated with the direct bonding technique. The first indirect bonding technique was introduced and published in 1972.[8] The proposed method is divided into two stages: the laboratory step and the clinical procedure. Brackets are placed on stone models in the lab, allowing orthodontists to visualize teeth and brackets easily from all angles, before transfering them to the mouth as shown in Figure 2. By facilitating ideal bracket positioning, this approach might decrease the need to reposition brackets during the course of the treatment. This method will be explained in greater depth in the later sections.
Figure 2: Two-step procedure for the indirect bonding method. Left images : represent the laboratory
steps 1, 2 and 3; Right images : represent the chairside steps 4, 5 and 6.
(All images adapted from Kalange[9])
Two problems quickly arose with the indirect bonding method. First, the resin systems originally designed for the direct bonding method were tried in the indirect method but resulted in disappointment. Research and development for an adhesive resin suitable for the indirect bonding method thus began. Initially, there were higher bond failures rates with the first few indirect bonding products, off-setting the advantages of the method.[10] With time, the protocols and products have improved greatly.[5, 9, 11-14]
Step 1 Step 2 Step 3 Step 4 Step 5 Step 6
The stepping stone occured in 1999, when a new indirect bonding method developped by Dr. Anoop Sondhi and 3M Unitek entered the orthodontic market. The Sonhdi Rapid Set A+B adhesive resin system (3M Unitek, Monrovia, California) is an auto-polymerizing resin with faster cure times and leaves minimal adhesive resin flash around brackets after tray removal in comparison with the other competitors’ products.[15] Since then, the indirect bonding method has gained popularity. A survey in 2009 revealed that 46% of the orthodontic residents in North America plan to use the indirect bonding methods in private practice.[16] Today, clinical failure rates of indirect bonding are similar to those of direct bonding.[17]
Many modern orthodontic appliances are currently being manufactured to high precision using sophisticated computer-aided designs and robotic machines. Each tooth has its specific bracket with tip and torque prescriptions incorporated in the slot, allowing ideal alignment within the arch. To take full advantage of the precision built into these appliances, an equally precise method for bonding them to the tooth surfaces is required.[9] Hence, with the increased use of prescription bracket appliances, clinicians will place a greater emphasis on the ideal and exact positioning of brackets, and the indirect bonding technique may become even more popular.[7]
However, new problems have arisen as an increasing number of adult patients are seeking orthodontic treatment. The increased demand among adults for orthodontic treatment generally leads to more frequent bonding of orthodontic attachments to various non-enamel surfaces, such as composite or porcelain substrates. Unlike with composite surfaces, a lack of durable bonding forces between brackets and ceramic restorations unfortunately persists in clinical orthodontics, whether with direct or indirect bonding methods.[9]
This thesis will focus on finding a predictable porcelain surface preparation for clinicians who plan to use the indirect bonding method and its related products.
2.1 The Indirect Bonding Technique
The original indirect bonding technique recommended placing orthodontic brackets on plaster models using sugar candy. The brackets were transfered to the mouth through a transfer tray which was like an arch-long mouthguard. The candy was removed and replaced by a composite resin or cement at the time of the chairside bracket delivery. Therefore custom bases were made chairside. This original method had many problems because it left excessive amounts of composite resin flash, which was very time-consuming to remove.[12]
Authors then suggested modifications to the indirect bonding technique with laboratory made custom composite bases. In 1979, Thomas revolutionized the indirect bonding protocol by making the custom bases in the laboratory, instead of chairside. He eliminated the sugar candy, immediately applied filled composite on the bracket bases, and then placed them directly on the model casts. Once bracket positions were approved, they were cured and then transfered to the mouth with a transfer tray.[11]
The indirect bonding method of orthodontic brackets can be generally divided into a laboratory step and a chairside step. No bands are typically used in the technique; however, if a case requires bands for a transpalatal arch, it can be bonded directly chairside.[5, 14, 18] Each manufacturer can occasionally suggest their own variation of the laboratory or chairside step.
When comparing direct and indirect bonding, the underlining principles are the same: the bases are said to be "custom" because they are adapted to each individual tooth’s anatomy and position in the three planes. However, the difference is that custom bases in the indirect bonding method are fabricated on a stone model in the laboratory, whereas in the direct bonding technique the custom bases are made chairside, intra-orally, directly on the patient’s teeth.
2.1.1 Essential Steps of Indirect Bonding Brackets
1) Chairside appointment
Impressions for model cast fabrication:
Tooth surfaces are cleaned with pumice. Accurate impressions are taken with mechanically mixed alginate and metal impression trays. Accurate impressions are essential since the reference for bracket placement is the incisal edge and the marginal ridges.[18] In cases that require tooth recontouring, some authors recommend that it be done before impressions are taken so that overall accuracy can be maximized.[9, 14] For adults with mature dentitions, a two-week interval has clinically shown to be acceptable. However, the recommended time interval between the impression appointment and the bonding appointment is limited to 10 days for adolescents. Small eruptive movements of the teeth can become significant if there is a longer delay between the appointments, especially in growing patients. Significant tooth eruptions can cause transfer trays to fit imprecisely, leading in reduced bracket placement accuracy.
2) Laboratory steps
Cast model preparation:
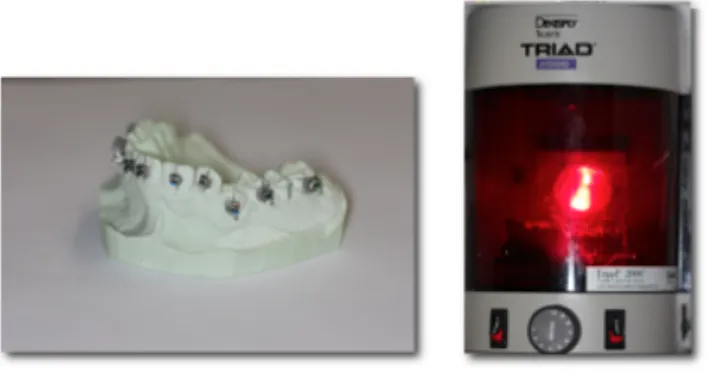
The laboratory technique begins by pouring the stone model or working cast in dental stone from the acurate impressions. As depicted in Figure 3, green and pink stone are commonly used as they are precise, dimensionally stable, and replicate details well. Casts should be distortion- and bubble-free. The casts are then trimmed and allowed to dry completely.[9]
Figure 3: Individual cast in green stone.
(Image courtesy of Dr. Stephanie H. Mai, Université de Montréal)
Bracket placement and custom base fabrication:
On the dry stone model, reference lines are added to assist in bracket placement
(Figure 4). Vertical lines represent the long axis of the teeth, and horizontal lines represent
the marginal ridge lines. Some clinicians also add a third line that represents the slot line.[14] A caliper may be used to increase precision. Placing these lines on the working casts ensures a customized bracket prescription placement for each patient. The stone model teeth are then painted with a thin coat of separating medium and allowed to dry.
Figure 4: Left image : Reference lines for bracket placement ; Right image : application of the separating medium.
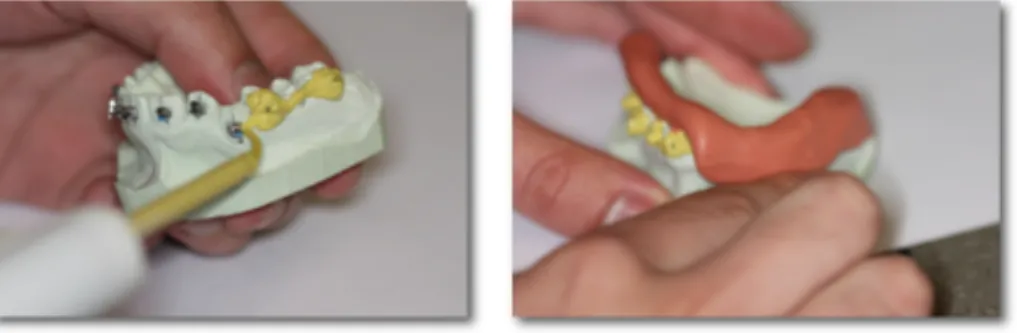
Composite resin is applied to the bracket’s base. Brackets are then placed on the casts and, once brackets positions are considered ideal, the composite resin can be cured according to the manufacturer’s recommendations, as depicted in Figure 5.[14]
Figure 5: Once brackets are placed and attached to the stone cast, polymerization of custom composite resin bases is done in a light curing unit, for 10 minutes.
(Images courtesy of Dr. Stephanie H. Mai, Université de Montréal)
Transfer tray fabrication:
Once the custom bases are cured, these ideal bracket placements are recorded with a tray for each dental arch. Trays can be made of silicone, thermal glue, polyvinylsiloxane (Figure 6) or polyvinyl stock papers under vacuum, and can be transparent or colored.[19] Regardless of the transfer tray material, it is important to adapt the material over the incisal edges and occlusal surfaces of the teeth. This creates an index for accurate tray seating intra-orally during chairside bracket delivery.
Tray fabrication is a technically sensitive step as an inadequate tray can prevent proper tray seating, introduce inaccuracies, and result in bond failure by uneven adhesive resin distribution or saliva contamination. The tray should be about 5 mm thick to provide enough bulk for support and rigidity. If the tray is too thin, it will be flexible and may distort because of the finger pressure during delivery. If the tray is too thick, it may be
difficult to fully seat it and can be combersome for the patient.
Some authors also recommend using an additional shell to support the transfer trays, called the the "outer-tray". The "outer-tray" can be fabricated either with a 0.020 inch vacuum-form clear Essix (Dentsply Raintree Essix, Sarasota, Florida) or with a cold acrylic material that covers the polysiloxane or silicone " inner-tray ". These " outer-trays " are accurate, stable and compact (Figure 7).[6, 19]
Figure 6: " Inner " transfer tray fabrication with light polyvinylsiloxane and putty.
(Images courtesy of Dr. Stephanie H. Mai, Université de Montréal)
Once the trays have been fabricated, they are detached from the casts by soaking in a water bath for at least 30 minutes or until no more air bubbles rise from the models. After soaking, trays are carefully separated from the models using light finger pressure. The brackets will remain embedded inside the transfer trays. If a light-cured or dual-cured composite resin was used, the bracket bases need to be cured again to ensure complete polymerization in their center.
Trays are trimmed to prepare them for bracket delivery: the trays can be carefully trimmed to expose the gingival edge of the bracket bases, allowing for excess adhesive resin to seep out during bonding. It is important to leave the tray material covering the entire occlusal and incisal surface and part of the lingual surface of the teeth to provide an index for accurate tray seating.
Figure 7: Left image : polymerized " inner " transfer tray separated from stone cast ; other images: cold-cured acrylic " outer " transfer tray on top of " inner " tray.
(Images courtesy of Dr. Stephanie H. Mai, Université de Montréal)
Transfer trays can be separated into quadrants by sectioning them at the midline allowing easier seating and removal in comparison to a full arch tray. Trimming at the midline also provides a visual verification for full seating of the transfer trays.[9]
Pre-delivery preparation of the composite bases :
A residual film of separating medium or stone may still be present on the custom composite resin bases. While the brackets are still encased in the transfer tray, their bases are cleaned with a micro-etch and 50 µm aluminum oxide (Al2O3), then rinsed with distilled
water, and dried with forced air.[9] Some authors even recommend cleaning with soap.[19] The trays are then stored away from contaminants until the patient returns for the bracket delivery appointment.
3) Chairside steps:
Bracket bonding delivery and arch wire engagement
Before isolating the mouth, the teeth should be cleaned with a fluoride-free pumice. The Nola Dry Field System (Nola Specialties Inc, Covington, Louisiana) can be useful for
isolation. The teeth are etched with a 37% phosphoric acid (H3PO4) solution or gel for 30
now be applied to the bracket bases and on the teeth with a microbrush. Since there is a greater risk of saliva accumulation in the posterior segments throughout the appointment, distal teeth are idealy painted first with the microbrush to prevent cross-contamination with other teeth.[9]
The adhesive resin used for the bracket delivery can be light-cured or chemically- cured, the latter being the most common. In a chemically-cured adhesive resin system, a
thin layer of component A is painted on the tooth and component B on the bracket bases
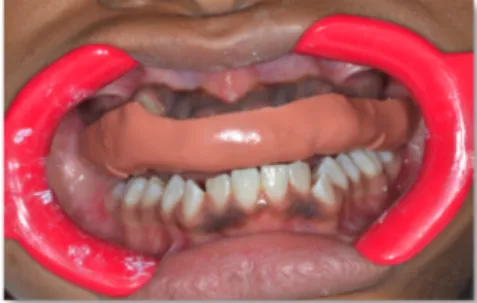
with separate microbrushes. The polymerization reaction will start when the two components are brought in contact. Trays are then placed and held in mouth with a light finger pressure for the recommended time to allow complete polymerisation of the adhesive resin (Figure 8). Trays need to be removed carefully to avoid accidental bracket debonding. If a bracket fails after removal of the transfer trays, it can be rebonded directly.
Figure 8: Nola System installation and transfer tray for upper arch
seated in mouth for polymerization after application of the chemically-cured adhesive system Sondhi Rapid Set in which component A is applied on teeth and component B is
applied on custom composite resin bases.
(Image courtesy of Dr. Stephanie H. Mai, Université de Montréal)
As the custom bracket bases have an intimate fit against the tooth surface, excess adhesive resin application should be avoided, and be removed with a scaler. Archwires are placed in the usual manner immediately after clean up.[9] Typically, one hour is scheduled
to perform indirect bonding of both arches, to engage initial archwires, and to review instructions with the patient and the parents.
Since the chairside steps do not require any handpieces or any particular orthodontic knowledge, a trained hygienist in many instances will be performing this chairside step. This allows the orthodontist to be free to attend other patient needs.
2.1.2 Advantages of the Indirect Bonding Method
Thomas et al. initially published an extensive list of advantages for the indirect method (Appendix 1). However, subsequent studies showed that several of these advantages were unsupported by the literature. Today, advantages for the indirect bonding technique include decreased chair time, less patient discomfort, easier debonding, and improved ability to bond posterior teeth.[20] As brackets are placed in the laboratory, it has been suggested that indirect bonding results in more accurate bracket positioning. When comparing direct and indirect bonding, Koo et al. found that indirect bonding resulted in more accurate height of bracket placement, but did not note a difference in angulation or mesiodistal bracket position.[21] Along with other authors, Aguirre et al. demonstrated that neither direct nor indirect bonding techniques resulted in 100% accuracy of bracket positioning.[20-22]
The other clear advantage of the indirect bonding method is the efficient usage of the orthodontist and the staff’s office time. Clinicians may use any free time during the day to complete the steps of the indirect bonding method. Additionally, small tasks, like the fabrication of transfer trays and preliminary bracket positioning on model casts can be delegated to auxiliary personnel.[14] As noted above, the chairside indirect bonding of orthodontic brackets via transfer tray can be performed by a trained hygienist, freeing the orthodontist’s time further.
The general perception is that direct bonding is physically and mentally demanding. With indirect bonding, there is no pressure on the clinician to make crucial bracket placement decisions in a less-than-ideal working field, with limited access and visibility. The indirect bonding method is more ergonomic as the delivery of the brackets is faster than bonding individual brackets and access is less of an issue. As a result of shorter appointments, patients can benefit from this overall more comfortable experience.[5] If patients go through a more comfortable experience, they will have a greater attention span for the delivery of instructions and can benefit from more time for routine questions at the end of the bracket delivery appointment.[18]
Some authors also argue that the indirect bonding method is more efficient and more profitable: a study by Keim et al. found that practices with higher gross income typically used indirect bonding.[23]
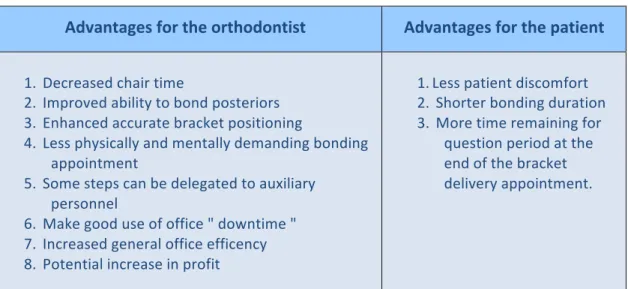
Table 1 shows a revised list of advantages for the indirect bonding method, based on recent publications mentionned above.
Table 1: Revised advantages for the indirect bonding method.[20]
Advantages for the orthodontist Advantages for the patient
1. Decreased chair time
2. Improved ability to bond posteriors 3. Enhanced accurate bracket positioning
4. Less physically and mentally demanding bonding appointment
5. Some steps can be delegated to auxiliary personnel
6. Make good use of office " downtime " 7. Increased general office efficency 8. Potential increase in profit
1. Less patient discomfort 2. Shorter bonding duration 3. More time remaining for
question period at the end of the bracket delivery appointment.
2.1.3 Disadvantages of the Indirect Bonding Method
There are two main disadvantages to the indirect bonding method. First, it is generally more technique sensitive, where errors can be incorporated at each step, and can be compounded with each subsequent step. Secondly, the method requires significantly greater laboratory preparation time and costly materials.
Impressions and models must be accurate and transfer trays must be properly fabricated. In a clinical setting, incorrect placement of a tray for multiple teeth may result in larger adhesive resin film thickness, decreased bracket bond strength, and inaccurate placement of brackets.[20]
Ciuffolo et al. highlight three critical steps where indirect bonding is especially technique sensitive: impression, adhesive resin application, and transfer tray (fabrication, application and removal). Of these steps, transfer tray stability and its ease of removal is the most important as accidental debonding and failures easily occur.[19]
Dheal et al. found that the modest increase in bracket placement accurary for individual tooth might not necessarily lead to a clinically significant difference for the patient in terms of treatment time or number of visits, as it was initially aspired to grant.[17]
At an organizational level, orthodontists who decide to implement the indirect bonding method in the clinic should set up their clinics to mainly follow the indirect bonding protocol. This allows staff to develop routines for tasks, to manage emergencies efficiently, and to avoid technique sensitive errors due to lack of practice and familiarity.
2.2 Types of porcelain
Ceramic material is believed to give the most esthetically pleasing option for the replacement of a lost tooth, the repair of a damaged tooth, or for masking an unattractive enamel surface. The demand for better restorations has led to the development of more advanced porcelain systems.
Ceramics are made from the melting and fusion of non-metallic minerals, like clay, after having fired them at high temperatures (850-13,000o
Celsius). Dental porcelains are a form of ceramic, and can be classified according to:
1. Indications: anterior, posterior, crowns, veneers, post and cores, stain ceramics, glaze ceramic and fixed partial dentures (bridges)
2. Composition: pure alumina, alumina-based glass ceramic, pure zirconia, zirconia-based glass ceramic, silica glass ceramic, leucite-zirconia-based glass ceramic and lithia-based glass ceramic
3. Processing methods: sintering, partial sintering and glass infiltration, copy-milling and CAD-CAM
4. Firing temperature: ultra-low fusing, low-fusing, medium-fusing and high-fusing 5. Microstructure: glass, crystalline, and crystal-containing glass
6. Translucency: opaque, translucent and transparent 7. Fracture resistance
8. Abrasiveness
For the purpose of this thesis, a general understanding of the various dental ceramics currently available will aid in understanding the materials’ different behaviors. There are essentially two families of dental porcelains: the family of glass ceramics and the family of poly-crystalline ceramics in which physical properties vary greatly (Figure 9 and
Figure 10). Table 2 states physical properties of all-ceramic ingots or discs in regards to their indications and ease of bonding to orthodontic brackets.
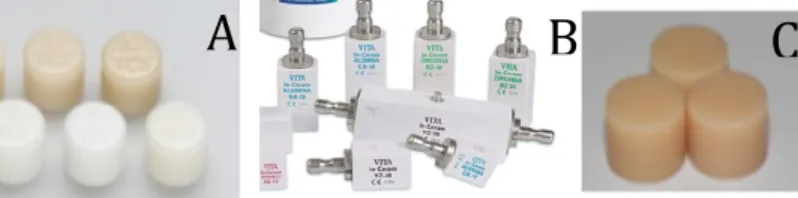
Figure 9: Samples of popular all-ceramic dental products
A : IPS Empress ingots (Image adapted from http://www.dentalcadcam.de); B : In-Ceram ingots (Image adapted from www.vita-zahnfabrik.com); C : Finesse All-Ceramic ingots
(Image courtesy of Dr. Stephanie H. Mai, Université de Montréal)
The family of glass ceramics can further be divided into three sub-groups of dental ceramics: feldspathic porcelain, leucite-reinforced porcelain and lithium-disilicate porcelain. Feldspathic porcelain is formed from clay or sand that has been fired at high temperatures. It becomes a vitreous dental ceramic formed of a glass matrix and one or more crystalline phases. Conventional dental feldspar porcelains contain a silica network (SiO2, 52-62% by weight), alumina (Al2O3, 11-16% by weight), lithium oxide and barium
oxide additives, and either potash (K2O, 9-11% by weight), soda (Na2O, 5-7% by weight)
or both. As dental feldspars are relatively colorless and pure, pigments, opacifiers and other types of glass modifiers are required to reproduce the hues of natural teeth, to control the fusion and sintering temperatures, and to control the coefficient of thermal contraction and solubility.[4]
Feldspathic porcelains are the most esthetic type of porcelain, but have the weakest flexural strength of 90 MPa; they contain less than 40% leucite by content. Leucite is a crystalline mineral formed from melting potassium feldspar or potash. In other words, leucite is a potassium-aluminum-silicate mineral.[24] In contrast, leucite-reinforced or leucite-based glass ceramics contain more than 35-50% of leucite in weight dispersed in a
glassy matrix, and have a higher flexural strength of 110 MPa.[25] Lithium-disilicate or lithia-based glass ceramic has a greater flexural strength of 300-400 MPa. These materials can be relatively translucent.[26]
The family of poly-crystalline ceramics is divided into two sub-groups: alumina or zirconia ceramics. The alumina or zirconia may come in pure forms, or be dispersed in a glass matrix as alumina- or zirconia-based glass ceramic. Alumina ceramics have a high fracture toughness and hardness, with a flexural strength of 700-800 MPa. It is often used as a porcelain core upon which esthetic feldspathic ceramics can be layered.[24]
Zirconia or zirconium oxide is also considered a core material as it has the highest flexural strength of 1100-1300 MPa. Although this type of ceramic is the strongest and toughest, it has disadvantages: zirconia can only be fabricated through computer aided design-computer aided manufacturing (CAD-CAM) technology, which can be expensive and technique sensitive; zirconia ceramics are also commonly limited to posterior crowns or fixed-partial dentures due to its greater opacity.[24] Furthermore, bonding to zirconia is extremely challenging as it contains little or no glass matrix required for etching and silane conditioning. For example, In-Ceram Zirconia is 30 % zirconia and 70 % alumina by weight.[4]
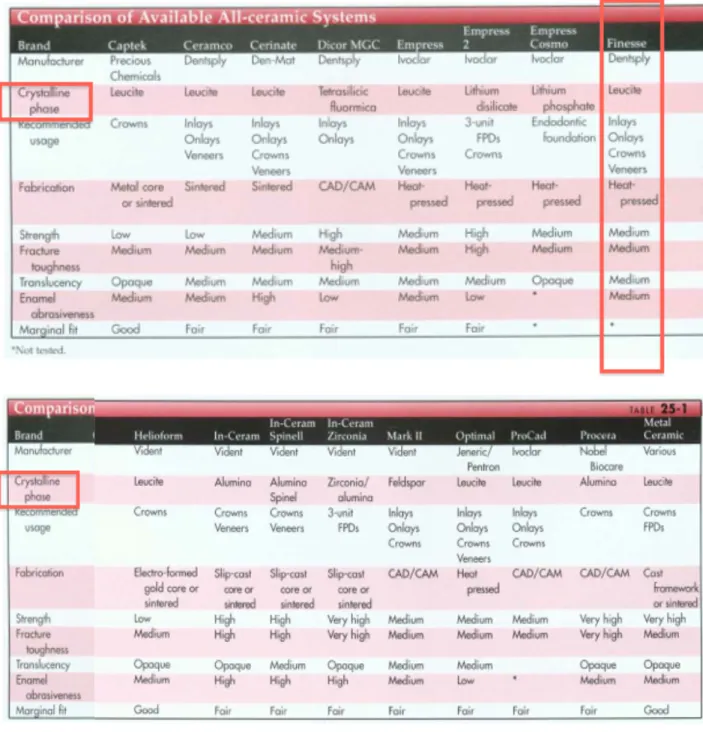
Figure 10: Comparison of all-ceramic dental materials frequently used. Finesse All-ceramic by Dentsply, highlighted in red, is of particular interest for this
Table 2: Bonding properties of common ceramic ingots used in peer-reviewed literature.
Ingots General
Composition Fabrication Process Indications Concerns Bonding
IPS Empress (Ivoclar-‐Vivadent, Amherst, New York) [4, 27] Glass porcelain: feldspathic ingots made up of micro-‐ leucite or lithium-‐ disilicate crystals
Hot-‐pressed : Controlled crystallization in a glass containing nucleating agents.
They are heated and subsequently pressed in a mould using an alumina plunger to form an all-‐ceramic restoration -‐ Veneers -‐ Inlays -‐ Onlays -‐ Anterior crowns -‐ Posterior crowns and fixed partial denture with IPS Empress 2
Bonding can be performed predictably via the glass particles. In-‐Ceram (Vita Zahnfabrik, Bad Säckingen, Baden-‐ Württemberg) [4, 27, 28]. Aluminus porcelain ; made with an aluminium oxide infiltrated core
Slip cast : Infiltrated molten glass matrix with a porous core made out of aluminum oxide subsequently veneered with feldspathic porcelain.
Considered the strongest among all-‐ceramic restoration
-‐ Anterior crowns with In-‐Ceram Spinell and In-‐Ceram Alumina. -‐ Posterior and anterior fixed partial dentures with In-‐ Ceram Alumina. -‐ Any posterior restaurations with In-‐ Ceram Zirconia.
Surfaces are more homogeneous and thus less susceptible to acid etching. Etched with boiling sulfuric acid is possible, a procedure that is inapplicable in orthodontics. Y-‐TPZ [26, 29, 30]. Yttria-‐stabilized
polycrystalline tetragonal zirconia : tetragonal phase of zirconia is stabilized at room
temperatue with Y2O3
Direct sintering of crystals together without any matrix to form a dense, air-‐free,
polycrystalline structure. It is a monophase ceramic.
Initially used in orthopedics, being bio-‐compatible. Recently used for endodontic dowels and implant abutments. An alternative core material and fixed partial dentures.
Far more
homogeneous and not susceptible to acid etching or other mechanical forms of roughening. Finesse All-‐Ceramic (Dentsply GAC, Bohemia, New York) [4, 31] Leucite-‐reinforced pressable glass ceramic Hot-‐pressed : fabricated via lost-‐wax injection moulding, low fusion (see IPS Empress)
-‐ Single anterior crowns -‐ Veneers -‐ Inlays -‐ Onlays
To date, no study has tested shear bond using the Finesse All-‐ ceramic ingots.
2.3 Methods for Porcelain Surface Preparation
Ceramic is an inert material which does not adhere chemically to any of the currently available bonding resins. Therefore it is necessary to change the inert characteristics of the surface to achieve clinically acceptable bonding of brackets to porcelain surfaces.[27] Although commercially available porcelains are usually similar in chemical formula, they do have their own characteristics, and adhesion can vary as shown in Table 2.
Successful bonding depends on establishing a surface with a high population of unreacted vinyl groups (–C=C) that can then be cross-polymerized to the composite resin. Authors have suggested three different approaches: 1) physical or mechanical preparation, 2) chemical preparation and 3) combined mechanical and cheminal preparations of the porcelain.[29] The approaches will be discussed in depth in the following sections.
Insight into how to bond to ceramics can be obtained from literature on porcelain repair. The following treatments are cited by manufacturers of porcelain repair kits: micro-mechanical roughening with a diamond bur; air abrasion with 50 µm Al2O3; or etching with
either 9.6% hydrofluoric acid (HFA) or 1.23% acidulated phosphate fluoride (APF). Mair et al. explains that these agents roughen the porcelain and provide physical or mechanical retention : the applied adhesive resin penetrate and become micro-mechanically locked, in a similar fashion as to the microtags formed in etched enamel.[29]
2.3.1 Mechanical Preparation
Mechanically preparing the porcelain involves the removal of the porcelain’s glaze and/or the roughening of the porcelain to provide more surface area for mechanical retention. Several options are available and are relatively quick chairside procedures.
The use of coarse and fine diamond burs has been well documented, along with green stones, and abrasive disks.[32-34] Zachrisson et al. found that intra-oral sandblasting with microscopic particles of aluminium oxide removes the glaze better than burs or stones, since only a small amount of surface is removed and the result is more uniform.[35]
Although this requires minimal chairside set-up, the aluminium oxide particles are difficult to contain within limits of the mouth and also requires thorough rinsing afterwards. Authors have found that fine diamond roughening and sandblasting showed the highest surface roughness when compared to surface roughness obtained by acid etching.[36]
A retention cavity can also be cut in the porcelain surface.[34, 37] One may not need to go as far as to creating cuts, as resin tag length is not a determinant of bond strength according to Eliades et al.[38] Laser radiation of the porcelain surface has been studied as an alternative conditioning technique, but it is a very costy procedure.[35]
2.3.2 Chemical Preparation
2.3.2.1 Acid Etching
The acid is meant to create a series of micro-retention pits by preferential dissolution of the glass phase within the ceramic matrix.[34] Although this procedure yields mecanical retention and not a chemical bond to the porcelain, it is included as part of a chemical preparation because it entails the application of a technique-sensitive liquid product. For chemical conditioning, HFA and APF can be used. The etch must be left on the porcelain surface, usually for more than 1 minute before rinsing, and caution is always taken to protect the patient and staff while using these acids.
Further understanding of HFA use can be found in restorative and esthetic dentistry because bonding of porcelain materials are common trade. Borges et al. have noticed that HFA application forms a honeycomb-like topography on the porcelain, ideal for micro-mechanical retention and bonding.[39] Etching protocols can also vary depending on the
type of ceramic involved. When treating feldspathic porcelain, restorative researchers recommend a 2-2.5 minute etching time with 9.6% HFA ; with leucite-reinforced ceramic, etching time with 9.6% HFA is of 60 seconds ; while with lithium disilicate ceramics, etching is only for 20 seconds.[40] Protocols would also vary should different acid concentrations be used.
Etching with HFA yields similar or even higher bond strengths than etched enamel.
Strong acids such as 9.6% HFA have been used to increase bond strength of porcelain.[35]
Clinicians must exercise caution during the intra-oral application of HFA, as soft tissue irritation and burns, or tooth damage, could result from accidental contact. HFA is highly toxic and corrosive. Soft-tissue barriers, like OpalDam (Ahren Dental, Stockholm, Stockholm) shown in Figure 11, are handy protective shields.[32, 33, 36]
Figure 11: OpalDam barrier for gingival protection from HFA
Black arrow pointing to the dam which is a light-cured resin applied with a seringe (Image adapted from www.ahrendental.com)
Bourke et al. have questioned the clinical relevance of bond strengths with HFA application. His shear bond strength (SBS) study found that SBS was similar when comparing the groups that have used HFA with those that did not.[34] If there is no added advantage of using HFA, one should eliminate it for obvious reasons.
Another study found that 1.23% APF-etching was a suitable substitute to HFA etching, while being a safer product. A 10 minute etching time with APF provided similar SBS to a 1 minute HFA etching time.[27, 41] There are contradicting results in the current literature on APF application which provided clinically unacceptable low bond strengths.[27, 35, 42]
There are also inconsistent findings on the effect of conventional acid etching with phosphoric acid (PA) on porcelain bond strength. Some studies demonstrated that etching ceramic surfaces with 37% PA gave a clinically acceptable bond strength, comparable with the bond strength produced by the application of HFA, without silane application.[27, 33, 34, 43] However, Zachrisson et al. and Kocadereli et al. found that conventional acid etching was ineffective for mechanical retention of brackets to porcelain.[35, 44] Unlike HFA,37 % PA does not actually etch porcelain nor produce topographical changes in the porcelain surface. It is hypothized that PA neutralizes the alkalinity of the adsorbed water layer, present on all intra-oral ceramic restorations. Therefore, PA can enhance the chemical activity of any silane primer that is subsequently applied.[34] Indeed, Larmour et al. found no statistically significant difference in bond strength between the HFA and PA etch technique, when followed by silane application.[33]
2.3.2.2 Silane Application
Silane is a coupling agent that can be used to enhance bond strength between inorganic porcelain surfaces and organic resin surfaces by chemical adhesion. Silanes are in fact difunctional molecules with an organic substrate and an inorganic subtrate. This coupling agent, also commonly refered to as the porcelain conditionner, displays the general chemical structure R′—Si(OR)3, where R′ is the organofunctional group, typically
an unsaturated methacrylate, that reacts to the adhesive system or the composite resin and creates a covalent bond by free radical polymerization. In the process of silanization, the alkyl group (R) is hydrolyzed to a silanol (SiOH), creating a covalent bond with the silicon
inorganic particles (Si—O—Si), thus completing the bonding process to the silica/glass matrix of the ceramic.[4] Hence, silane coupling agents provide a chemical interaction between the silicon-based ceramic and the carbon-based resin.[25] Silanization also increases the wettability of the ceramic surface.[32]
R’ (Methacrylate group) (CH2)3 Si(OR)3
Figure 12: Silane molecule R′—Si(OR)3
(Image adapted from Philipps’ Dental Materials.[4])
Some studies reported a statistically significant increase in SBS after HFA and silane application. However Chung et al. cautioned the interpretation of these results because the choice of bonding agent has a significant impact on the SBS.[45] For example, glass ionomer cements (GIC) used for bonding generally have a weaker bond strength than composite resin. Cochran et al. and Kao et al. combined silane with GIC and demonstrated a statistically significant increase in SBS when compared with a control group using GIC only.[46, 47] On the other hand, the combination of silane with composite resin may not always significantly increase SBS because the SBS of compostite resin is already high. Some authors found similar SBS when HFA was followed with or without silane and use of composite resin in a clinical and in vitro studies.[32, 36, 48]
Whether the application of silane is recommended or not remains inconclusive because it is unclear if this additional step enhances SBS. On the other hand, Abu Alhajia et
al. view silane application as a substitute to mecanical preparation of the porcelain surfaces. Indeed, they have demonstrated that adequate bond strengths required for OTM can be achieved with conventional composite resins combined with silane application, without the
need of any mechanical preparation. This alternative is interesting since mechanical
preparation was associated with a higher incidence of porcelain fracture after debonding.[27, 47] Roughening introduces surface weaknesses or micro-cracks that can propagate into the porcelain body.[33, 47, 49] In the same line of thought, a few studies have in fact shown that bur roughening is unnecessary since it increases the bond strength beyond clinically acceptable values while risking unacceptable damage to the porcelain surface.[33, 49]
2.4 Concerns when Debonding
Cohesive failures occur either within the tooth substrate, the bracket or the adhesive system. Adhesive failures occur between the tooth-adhesive resin or bracket-adhesive resin
interfaces. Unfortunately, cohesive fractures of ceramic restorations resulting from bracket removal are common and unpredictable. These fractures pose problems of esthetic and financial nature if they are large or extensively deep. The clinician may attempt to repair
the slight porcelain damage with polishing systems. One can further try to prevent further
extension of the micro-cracks by finishing and polishing with a series of graded ceramiste points or diamond-impregnated polishing wheels. Kao et al. and Wood et al. both agree that this procedure can yield an acceptable, although not ideal, esthetic result if finalized with a diamond polishing paste.[37, 47]
Understanding the nature of cohesive failures can give clues on how to avoid them. Cohesive porcelain fractures occur when the adhesive strength at the metal bracket-porcelain interface exceeds the cohesive strength of the bracket-porcelain. Mechanical roughening with diamond burs or sandblasting can be guilty of weakening the cohesive strength of the porcelain. Therefore, Wood et al. tried to avoid bur roughening and preserving the glaze.
He tested SBS on glazed and silanated porcelain. Unfortunatelly, this approach did not provide sufficient bond strength, so it was recommended that silane be combined with some form of mechanical retention treatment.[37] More recent studies, mentioned in the previous section, have found otherwise.[27, 47] However, there is a general concensus in
the literature highly recommending a mechanical retention component when bonding to
ceramics, as there will be greater potential of bracket failures mid-treatment of an orthodontic treatment and sub-optimal OTM.
Like mechanical preparation, silane treatment also has been blamed for procelain fractures at debonding sites by excessively enhancing the bond strength.[33, 36, 46, 50] In Larmour et al.’s study, all samples had silane treatment, without any mecanical preparation. They still found a high incidence of porcelain surface damage visible at debond, particularly in the groups using Transbond XT (TXT) composite resin (3M Unitek, Monrovia, California) where 37.5% of the ceramic samples had visible damage. Thus even without mechanical preparation, one may still obtain porcelain fracture.
From a clinical perspective, it would be prudent to warn patients about the risk of damage to porcelain surfaces prior to the start of treatment and of the possible need to
repair or replace them following orthodontic treatment.
2.5 Materials for Custom Base Fabrication
As previously mentioned, adhesion strength can vary significantly not only according to surface preparation but also according to the bonding material used. Clinicians need to be knowledgeable about the various bonding materials so that they can select their materials appropriately. New orthodontic cements, adhesive resins, and hybrid cement-resin combinations offer improved physical properties and clinical benefits, but there are clear differences in their clinical indications and contra-indications.
2.5.1 Cements
Clinical use of GIC for orthodontic use has been reported. They come in two pastes that require mixing. GICs’ inhibition of demineralization of adjacent enamel is useful for cementing bands in caries-prone patients. Also, their chemical adhesion and moisture tolerance eliminate the need for etching and drying. As previously stated, studies have shown that brackets cemented with GICs have poorer retention if compared to controls cemented with composite resin.[3, 45] Since GICs offer low fracture resistance, their orthodontic use is mainly limited to band cementation.
Direct bonding method studies have suggested that resin-modified glass ionomer cements (RMGICs) might also provide suitable bond strengths for orthodontic bonding.[33, 51, 52] In addition, it has been shown that brackets cemented with RMGICs will tend to fail at the enamel/cement interface. This may be advantageous for easier cement clean-up at the debonding appointment.[33, 53]
2.5.2 Composite Resins
Composite resins are the most popular choices for bonding brackets. They are either thermo-cured, light-cured, or chemically-activated or dual-activated. Composite resins are a class of materials that do not inherently contain water. To obtain optimal adhesion, composite resins require acid-etched or roughened dry surfaces for best mechanical retention. They are also more fracture resistant than GICs. Unfortunately, composite resins have the disadvantages of not bonding well in the presence of moisture and their attachment to surfaces is primarily mechanical.
Thermo-cured composite resins are available for custom base fabrication. It is dispensed as a single-paste onto the bracket base, which is then placed onto the casts. The resin stays unpolymerized until the cast is cured with heat for at least 15 minutes.[14] Only
thermo-cured and light-cured composite resins allow an unlimited working time before polymerization.[20]
Light-cured composite resins are available and are dispensed as a single-paste. These single-component materials are easier to manipulate. They have little ability to inhibit caries and to remineralize enamel.[3] The composite resin is cured with a handheld curing light or unit. Again, bracket placement can be verified indefinitely before curing, provided that the brackets are not exposed to light.[18] Another possible advantage with light-cured composite resin is the possibility of faster clean-up, as there may be less residual material adherent to the enamel surface after debonding at the end of treatment.[7]
Chemically-activated or auto-polymerizing or dual-activated composite resins are supplied as two-part formulation with a base and catalyst. These materials require hand-mixing on a pad prior to application and start their polymerization as soon as they come in contact with each other, limiting the working time. Handling and applying these materials were problematic, time-consuming, and cumbersome. This step alone can introduce defects such as surface porosity and inevitable inclusions of air bubbles or voids in the bulk material and weak spots. If a dual-activated composite resin is used, a final light-cure is required once the transfer tray is detached from the cast to ensure complete polymerization of the custom bases’ centers.[6]
In the end, selection of material required for the fabrication of the custom bases will depend on clinician’s preference, clinical bond failure rate and office set-up for staff execution of the multiple laboratory steps.
2.5.2.1 Performance of Thermo-cured Composite Resins
The thermally-cured composite resin Therma Cure (Reliance Orthodontic, Itasca, Illinois) combined with a chemically-cured adhesive resin exhibited lower SBS when compared to other indirect bonding systems in vitro.[20] The use of thermo-cured
composite resins have shown several disadvantages including: brackets " drifting " away from their ideal position during their polymerization in a heated toaster oven, confusing and various suggested laboratory protocols, technique sensitivity and time consuming steps. The method is also oven-sensitive according to Moskowitz et al.; an oven thermometer is highly recommended, as temperatures vary between ovens and with the number of casts being cured simultaneously.[6]
2.5.2.2 Performance of Chemically-cured Composites Resins
As previously mentioned, hand-mixing can incorporate air bubbles. Oxygen inside the trapped bubbles theoretically interferes with the complete polymerization reaction and reduces bond strenght.[38] However, it was demontrated that SBS between chemically- and light-cured composite resins were comparable and both were clinically acceptable in an in
vitro study using the indirect bonding method and tooth substrates.[20]
2.5.2.3 Performance of Light-cured Composites Resins
Studies using extracted bovine and human teeth found that shear bond strengths were comparable when the same light-cure composite resin TXT (3M Unitek, Monroavia, California) was used to bond the brackets directly and indirectly.[20, 54, 55] On a side note, clinicians who use the indirect bonding method still have to be equiped with the materials necessary for direct bonding of accidental bracket failures. They may as well opt for the same light-cured composite resins for both direct and indirect bonding methods for ease of clinic inventory, such as TXT.
2.6 Adhesive Resins for Chairside Step
The adhesive resin materials refered to in this section are used for chairside bracket delivery and are applied to the teeth, the custom composite bases, or both. They are typically light-cured or chemically-cured.